Your entryway is the first thing you see when you walk in—and usually the first place clutter piles up. Shoes, bags, keys, mail, jackets… it adds up fast. The good news: you don’t need a full remodel to fix it. With some basic tools and a weekend, you can build a simple, custom “drop zone” that keeps everything in one organized spot.
This guide walks you through planning, building, and installing a DIY entryway drop zone with hooks, a bench, and smart storage—using materials you can find at any home center.
Step 1: Plan the Space So It Actually Works
Before you buy anything, figure out what your drop zone needs to do in your home.
Start by watching how your household actually uses the entry for a day or two. Do shoes pile up? Are backpacks on the floor? Are keys always missing? Write down the real problems you want to solve. Measure the width of the wall where you’ll build your drop zone, the height of nearby light switches, and the depth available before you hit a door swing or block a walkway.
Decide what elements you want: a bench for sitting, hooks for bags and coats, cubbies for shoes, or a shelf for baskets and hats. Sketch a quick layout on paper with rough dimensions. A comfortable bench height is about 17–19 inches; seat depth around 14–18 inches. Keep wall hooks at a height everyone can reach—about 48–66 inches from the floor, with lower hooks for kids. Check for nearby outlets or vents you shouldn’t block. Once the layout feels realistic on paper, you’re ready to size up materials.
Step 2: Gather Simple Materials and Tools
You don’t need a full workshop to build a clean, solid drop zone—just a few common tools and basic lumber or plywood.
For materials, consider 3/4-inch plywood or pre-primed shelf boards (like 1x12s) for the bench top and shelves. Use 1x3 or 1x4 boards for wall cleats (the supports that anchor everything to the wall) and trim. Choose heavy-duty coat hooks rated for the weight of backpacks and jackets, plus wood screws (2–3 inches for wall studs, shorter ones for attaching trim and hooks). Grab construction adhesive, wood filler, caulk, primer, and paint or stain that matches your home’s style.
Tool-wise, a drill/driver, a saw (circular, miter, or even a good hand saw), tape measure, stud finder, level, and sanding block will get the job done. A speed square helps keep cuts straight, and painter’s tape is handy for test layouts on the wall. If your walls are drywall over studs, plan on using a stud finder and long screws instead of relying on hollow-wall anchors for main supports—studs carry far more weight and keep things safe.
Step 3: Build a Sturdy Bench Base and Top
The bench is the workhorse of your drop zone, so build it strong and square before you worry about hooks and shelves.
Mark your bench height on the wall (for example, 18 inches from floor to top of the bench) and subtract the thickness of your bench top (3/4 inch is common). This gives you the height for a horizontal wall cleat that supports the back edge of the bench. Cut a 1x3 or 1x4 to length, locate wall studs with a stud finder, and screw the cleat into at least three studs using 2–3 inch wood screws. Use a level to keep this perfectly straight.
For the front support, you can build simple box-style bases (like open cabinets) or use vertical legs. For a box base, cut vertical pieces to match the bench height (minus top thickness) and horizontal rails to tie them together. Space supports every 16–24 inches so the bench doesn’t flex. Screw the frame together, then anchor it to the floor and wall (into studs) for stability. Cut your bench top to size from plywood or a solid board, test-fit it, then attach it to the cleat and front supports with screws from underneath where possible for a cleaner look. Sand any rough edges and make sure the bench feels solid when you sit on it.
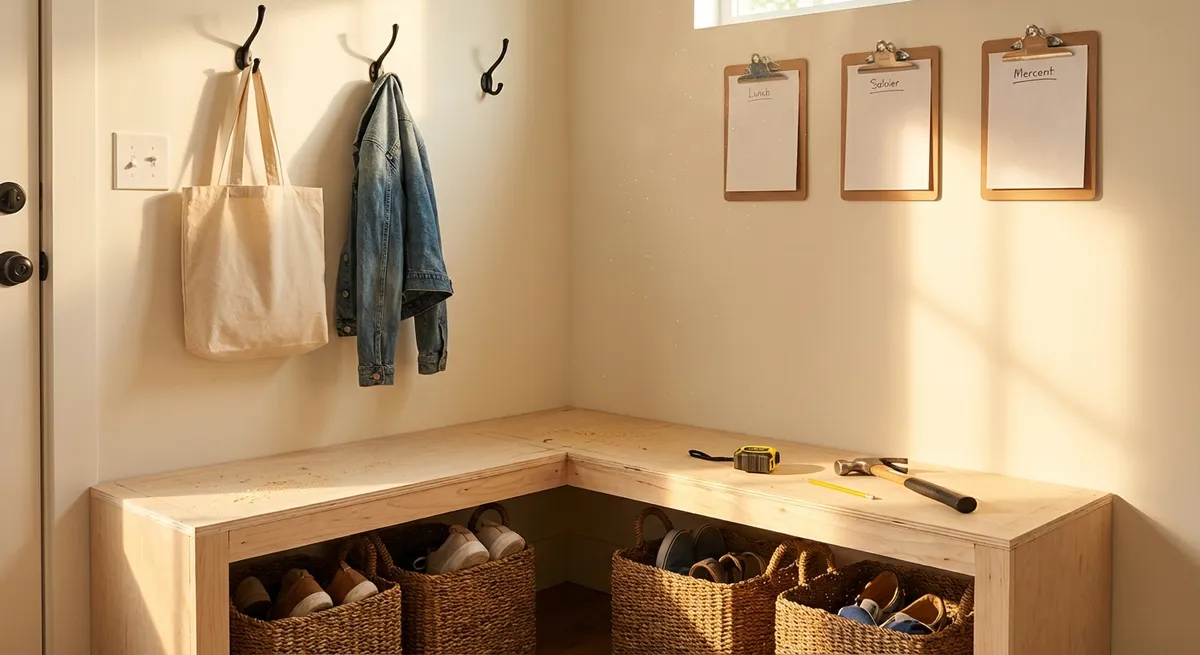
Step 4: Add Hooks, Cubbies, and a Top Shelf
With the bench in place, you can build vertical storage that makes your entryway actually usable.
Above the bench, decide where you want your hook rail. Measure up from the bench top (usually 12–18 inches above the bench works well), mark a level line, and attach another 1x3 or 1x4 board as a hook rail, screwing it into studs. Pre-drill and attach hooks with the spacing you need—closer together for kids’ hooks, wider for bulky winter coats.
To keep things looking built-in, add vertical side boards from the bench top up to a top shelf height (for example, 72–78 inches from the floor). Screw these into wall studs where possible. Then add a simple top shelf across the top, supported by those side boards and a rear wall cleat just like the bench. This shelf is ideal for labeled baskets or bins. If you want shoe cubbies, divide the space under the bench with vertical boards or pre-made cube organizers. Make sure cubbies are big enough for your household’s largest shoes or boots—test with an actual pair before finalizing spacing.
Step 5: Finish, Paint, and Dial in the Details
The last step is what makes the project look intentional instead of “random boards on a wall.”
Fill all visible screw holes with wood filler, let it dry, then sand smooth. Lightly sand all surfaces to knock down splinters and sharp edges. Vacuum or wipe everything with a damp cloth to remove dust. If you used bare wood or plywood, apply a quality primer before painting—this helps prevent blotches and makes the final coat more durable. Semi-gloss or satin paint is easier to wipe down than flat paint, which is ideal in a high-traffic area.
Caulk gaps where boards meet the wall or each other for a clean, built-in look. Once paint or stain is dry, reinstall hooks (if you removed them for painting), place baskets on the top shelf, and slide bins or shoe trays into the bench cubbies. Test the setup with real gear: hang your heaviest coat and bag, put actual daily shoes in the cubbies, and tweak hook placement or basket labels if something doesn’t feel natural. From there, keep the system simple: “hooks for bags and coats, bench for sitting, baskets for small stuff” so everyone in the house knows exactly where things go.
Conclusion
A DIY entryway drop zone doesn’t need fancy carpentry or expensive custom cabinets. With some basic planning, a solid bench, sturdy hooks, and thoughtful storage, you can turn a chaotic doorway into a clean, functional space that works every single day. The goal isn’t perfection—it’s a simple setup that matches how your household actually lives, and that’s what will keep clutter under control for the long haul.
Sources
- [This Old House – How to Build a Mudroom Bench](https://www.thisoldhouse.com/entryways-mudrooms/21017723/how-to-build-a-mudroom-bench) - Step-by-step guidance and design ideas for entry benches and storage.
- [Family Handyman – Mudroom Lockers and Benches](https://www.familyhandyman.com/project/how-to-build-a-mudroom-bench/) - Practical construction tips, dimensions, and layout considerations for DIY mudroom projects.
- [Lowe’s – How to Use a Stud Finder](https://www.lowes.com/n/how-to/use-a-stud-finder) - Explains how to safely locate studs so your bench, cleats, and hooks are properly anchored.
- [Sherwin-Williams – How to Prep Surfaces for Painting](https://www.sherwin-williams.com/en-us/homeowners/how-to/painting-prep) - Covers surface prep, priming, and finishing techniques for durable painted woodwork.
- [U.S. Consumer Product Safety Commission – Anchor It!](https://www.cpsc.gov/AnchorIt) - Safety information on securing furniture and built-ins to prevent tip-overs, relevant for entryway storage projects.
Key Takeaway
The most important thing to remember from this article is that this information can change how you think about DIY Projects.


