A messy garage eats time and motivation. You know you own the right tools—you just can’t find them when you need them. A simple, well-planned tool wall turns that chaos into a clear, visible system you’ll actually use. This project is beginner‑friendly, customizable, and can usually be done in a weekend with basic tools.
This guide walks you through planning, building, and organizing a DIY garage tool wall with five clear, step‑by‑step sections so you end up with something sturdy, safe, and easy to maintain.
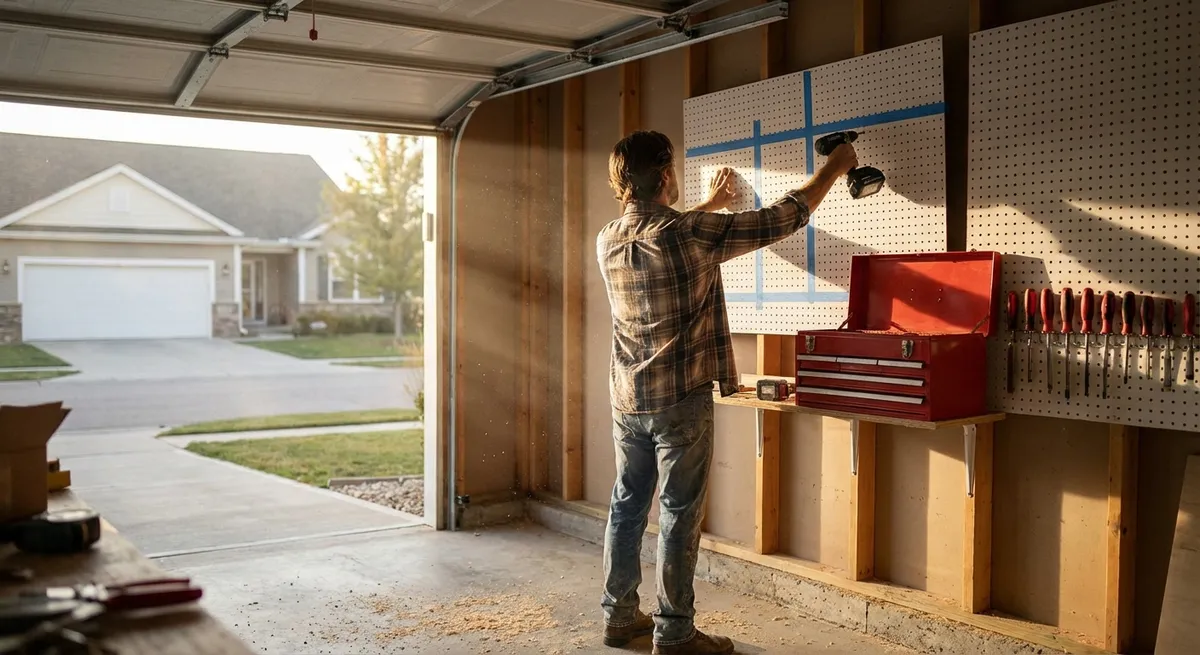
Step 1: Plan Your Tool Wall Like a Working Zone
Before you touch a stud finder or buy a single board, decide what this wall needs to do for you.
Start by grouping your tools by how you actually work: hand tools (hammers, screwdrivers, pliers), measuring and layout tools, power tools, yard tools, and small hardware. Lay them out on the floor roughly how you’d like them to be on the wall—frequently used items in the “prime zone” (between shoulders and hips), heavier tools lower, lighter tools higher.
Measure the wall you want to use and note any obstacles: outlets, windows, doors, or breaker panels. Sketch a rough layout on paper: mark where studs likely are (16 or 24 inches on center in most modern homes) and block out main sections—like a central hand‑tool area, a power‑tool dock section, and a vertical zone for long items like levels or a shovel.
Decide on your wall system:
- Pegboard: flexible and beginner‑friendly, best for lighter tools.
- French cleats: very strong and reconfigurable, ideal for heavier tools and custom holders.
- Slatwall: commercial‑style, modular, good if you want a clean, unified look.
If you’re unsure, a hybrid system works well: French cleats or 2x4 framing for structure and shelves, pegboard on top for smaller tools. Take photos of your layout on the floor—you’ll refer back to them when you start hanging things.
Step 2: Choose Materials That Won’t Sag or Tear Out
Using the right materials up front means your tool wall stays solid instead of slowly pulling off the garage wall.
For the base surface:
- 1/2" or 3/4" plywood is ideal for strength (3/4" for lots of heavy tools).
- If you use pegboard, back it with furring strips or install it over plywood so hooks don’t rip out over time.
For structure and mounting:
- 2x4 lumber for horizontal or vertical supports tied directly into studs.
- 1x4 boards or 1x3 furring strips for spacing pegboard off the wall (to allow hooks to engage properly).
For hanging systems and hardware:
- French cleat strips cut from 3/4" plywood or 1x4 boards at a 45° angle.
- Heavy‑duty construction screws (2½" or 3") to hit studs.
- Washers for extra holding power on heavy load points.
- Quality pegboard hooks or metal tool hooks rated for the loads you’ll hang.
Choose corrosion‑resistant screws if your garage is humid. If your garage wall is unfinished (open studs), you can either sheath the wall with plywood directly on the studs or add horizontal 2x4 blocking where you plan to hang heavy items. Plan for more structure than you think you need; adding it now is far easier than repairing a failed tool rack later.
Step 3: Safely Locate Studs and Build a Solid Mounting Frame
A tool wall is only as strong as how it’s attached. This step is where you make sure the structure is anchored correctly and safely.
Start by finding the studs using a stud finder and confirming with a small test nail or screw. Mark each stud location clearly with painter’s tape or a pencil line from about knee height to above eye level. Measure the spacing between studs and note any odd gaps or doubled studs near doors and corners.
If you’re installing plywood sheets:
- Cut sheets to size so seams land over studs when possible.
- Pre‑drill holes along stud lines about every 12–16 inches vertically.
- Hold the sheet in place (have a helper or use a temporary support) and drive 2½"–3" screws into each stud line, starting at the center and working outward to avoid warping.
If you’re framing for pegboard:
- Screw 1x3 or 1x4 furring strips horizontally across the studs, spacing them every 16–24 inches from floor to top of your planned tool area.
- Make sure the strips are level, even if the floor or ceiling isn’t.
- Attach pegboard to these strips using wood screws and oversized washers to prevent pull‑through.
For French cleats:
- Rip 3/4" plywood or 1x boards into strips about 3–4 inches wide with a 45° bevel.
- Fasten the “wall cleats” (angled edge facing up and out) directly into studs using long screws.
- Keep the cleats level and consistent in spacing (e.g., every 8–12 inches vertically) so you can move hangers around later.
Never rely on drywall anchors alone for a loaded tool wall. Heavy tools (impact drivers, circular saws, clamps, etc.) need to be supported by fasteners driven into solid wood framing.
Step 4: Build Simple, Custom Holders for Your Most‑Used Tools
Standard hooks work, but custom holders make your wall easier to read at a glance and harder to mess up over time.
Start with your most‑used tools and tools that don’t hang nicely on basic hooks:
- Screwdriver rack: Use a 1x4 board, drill evenly spaced holes slightly larger than the shafts, then mount the board to your backing or on a French cleat bracket.
- Hammer and pliers bar: A horizontal 1x4 with short dowels or screws spaced along the face gives each tool a clear parking spot.
- Power tool dock: Build a simple shelf with slots (U‑shaped cutouts) that let drill/drivers hang by their handles, battery down. Make sure your cutouts are wide enough for the largest handle, and test with the real tools before final assembly.
- Clamp rack: Screw a slightly angled 2x4 to the wall and hang clamps over it, or build a simple “comb” style rack from scrap plywood.
Construct these holders with screws rather than nails so you can adjust, move, or reinforce them easily. Label key spots with a paint pen or small tags for things that tend to wander (tape measures, utility knives, specific wrenches). When every tool has a shaped, obvious home, you spend less mental energy putting things away—and your wall is more likely to stay organized.
If you’re using French cleats, attach each holder to its own cleat bracket. This lets you slide entire tool groups around as your collection grows or your workflow changes, without tearing up the wall.
Step 5: Arrange, Test, and Fine‑Tune for Real‑World Use
Once the structure and holders are in place, it’s time to load the wall—and then treat it like a prototype for a week or two.
Start by hanging tools in this order:
- Most‑used hand tools at chest height, within easy reach.
- Power tools near an outlet if possible; leave room for batteries and chargers.
- Measuring/layout tools (levels, squares, tape measures) together in one visible zone.
- Long tools (rakes, shovels, long clamps) lower or at the sides to avoid blocking other items.
Step back a few times and look for conflicts: handles overlapping, sharp edges protruding where you might bump them, or tools hiding others behind them. Rearrange until everything is clearly visible and has at least a small “buffer” around it.
Test the wall by doing a real project: hang a picture, fix a hinge, or assemble a small project using only tools from the wall. Notice what felt awkward: Did you have to walk across the garage for something obvious? Was a frequently used tool up too high or too low? Make small adjustments now.
Finally, build in a simple maintenance habit: every time you finish a project, take two extra minutes to put every tool back and remove anything that doesn’t belong on the wall (random junk, packaging, broken items). If you add a new tool, decide on its home immediately. A tool wall isn’t “set and forget”; it’s a living system that should evolve with how you actually work.
Conclusion
A DIY garage tool wall is more than a storage project—it’s a way to remove friction from every repair and build you tackle. By planning your layout around how you work, anchoring into studs, using the right materials, and building a few simple custom holders, you’ll end up with a system that saves time and keeps you safer.
You don’t need a pro workshop to feel organized. Start with one wall, treat it as a working zone, and refine as you go. The payoff shows up every time you grab exactly the right tool on the first try.
Sources
- [Occupational Safety and Health Administration (OSHA) – Hand and Power Tools](https://www.osha.gov/hand-power-tools) - General safety principles for tool use and storage that inform safe wall layouts
- [The Family Handyman – How to Build a French Cleat Tool Storage Wall](https://www.familyhandyman.com/project/how-to-build-a-french-cleat-tool-storage-wall/) - Practical example of using French cleats for flexible garage storage
- [This Old House – Garage Storage Ideas & Tips](https://www.thisoldhouse.com/garages/21015176/garage-storage-ideas) - Guidance on planning garage storage zones and organizing tools efficiently
- [Home Depot – Pegboard Buying Guide](https://www.homedepot.com/c/ab/pegboard-buying-guide/9ba683603be9fa5395fab909e29a885) - Overview of pegboard types, load capacities, and mounting considerations
- [Fine Woodworking – Designing Your Tool Storage](https://www.finewoodworking.com/2007/09/01/designing-your-tool-storage) - Concepts for grouping and arranging tools for efficient workflow
Key Takeaway
The most important thing to remember from this article is that this information can change how you think about DIY Projects.


