A pile of firewood on the ground turns into a mess fast—rot, bugs, and wasted wood. A basic firewood rack keeps your logs dry, organized, and ready to use, and you don’t need to be a pro to build one. With a few pressure-treated boards, basic tools, and an afternoon, you can create a sturdy, weather-resistant rack that looks neat and keeps your wood off the dirt.
This project is ideal if you’re new to DIY but want something genuinely useful and long-lasting. Below you’ll find clear planning tips, a materials list, safety basics, and five simple build steps.
Plan the Size and Location of Your Rack
Before you buy anything, figure out where the rack will go and how much wood you want it to hold.
Choose a spot that:
- Is at least a few feet away from the house to deter pests.
- Has decent air circulation to help wood dry out.
- Sits on relatively level ground (less shimming, less frustration).
- Is convenient to access in bad weather, if you actually burn the wood in winter.
A common backyard size is around 8 feet long, 4 feet high, and 16–18 inches deep. That usually holds roughly half a cord of wood, depending on your stacking. You can scale this up or down easily once you understand the basic frame.
Measure the space with a tape measure and mark the approximate footprint with stakes or chalk. This helps you visualize how it will look and confirms you’ll still have room to walk, mow, or store other items nearby.
Gather Materials, Tools, and Safety Gear
Using the right materials will make your rack last much longer outdoors.
Typical materials for a basic 8-foot rack:
- 4 pieces of pressure-treated 2x4 lumber, 8 ft long (for base and top rails if desired)
- 4 pieces of pressure-treated 4x4 lumber, 4–5 ft long (for vertical posts)
- 4–6 concrete pavers or patio blocks (for the rack to sit on)
- 3-inch exterior wood screws (coated or stainless)
- 2.5-inch exterior wood screws
- Optional: metal L-brackets for extra reinforcement
- Tape measure
- Carpenter’s pencil
- Speed square
- Circular saw or handsaw
- Drill/driver with screwdriver bits
- Level
- Safety glasses and hearing protection
- Work gloves
Basic tools:
For longevity, pressure-treated lumber is key because it resists rot and insects when in contact with moisture. Use exterior-rated screws so they don’t rust quickly. If you live in an area with heavy snow, consider slightly thicker lumber (like 2x6 for the base) for more strength.
Step 1: Create a Stable, Raised Base
A solid base is the difference between a neat wood stack and a warped, sagging rack.
- Level the ground: Rake away loose debris and roughly level the soil where the rack will sit. You don’t need perfection, just a reasonably even surface.
- Set the pavers: Place concrete pavers where the 2x4 base boards will rest—typically one under each end, and one or two spaced evenly in the middle for support.
- Check for level: Lay a 2x4 on top of the pavers and place a level on it. Adjust the pavers by adding or removing small amounts of soil until the board sits level front to back and side to side.
- Install the base boards: Lay two 2x4s on edge, parallel to each other, about 16–18 inches apart. These will be your main base rails.
- Secure the spacing: Cut two short 2x4 blocks (about 16–18 inches long) and screw them across the ends of the base rails to keep them parallel and stable.
This raised base lets air flow under the wood and keeps the bottom row from sitting in standing water. Even a small amount of elevation dramatically slows rot.
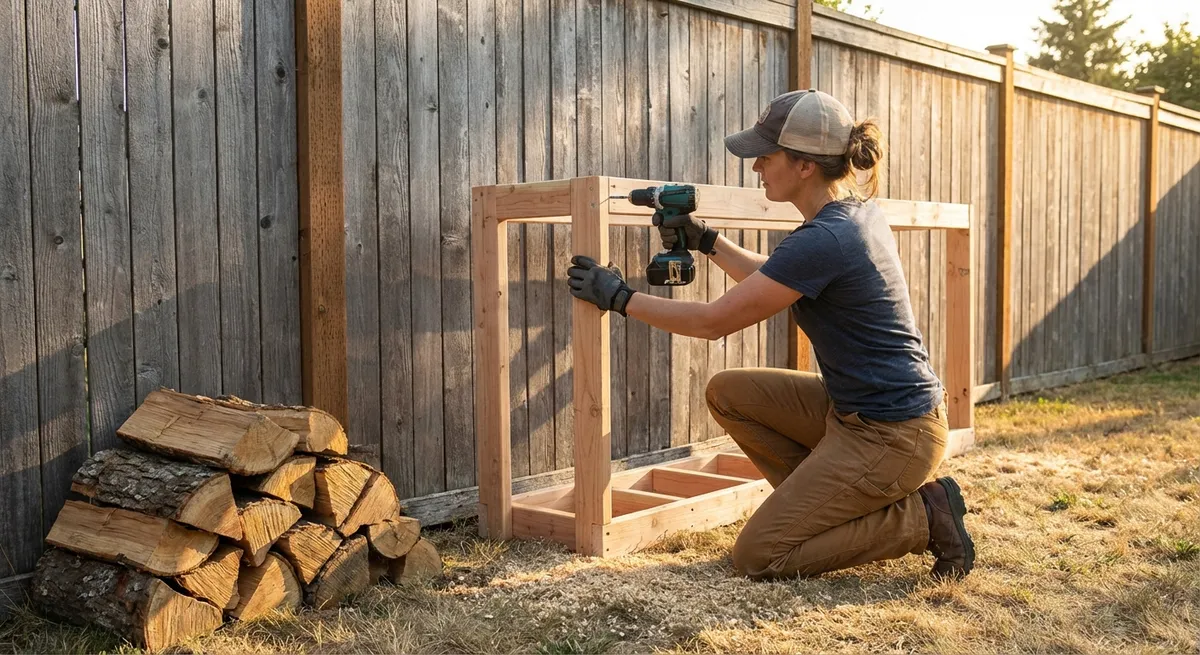
Step 2: Attach the Vertical Posts
The vertical posts keep your stack upright and prevent logs from tumbling into the yard.
- Mark post locations: On each end of the base, mark where the 4x4 posts will go—flush with the outer edges of the 2x4 base rails.
- Pre-drill for fewer splits: Pre-drill two or three pilot holes through the base 2x4 into where each 4x4 will sit. This helps prevent the wood from splitting when you drive long screws.
- Stand the posts: Hold a 4x4 vertically at the corner of the base. It helps to have a second person hold it in place, but you can also brace it with scrap wood.
- Secure with 3-inch screws: Drive at least two 3-inch exterior screws through the base rails into the bottom of each 4x4 post on both sides. Check that the post remains straight as you tighten.
- Repeat for all corners: Install a 4x4 at each of the four corners, then use a level along each post to confirm it’s plumb (straight up and down). Adjust as needed before fully tightening screws.
If you want extra strength, add metal L-brackets where the posts meet the base. This helps resist side pressure from heavy wood stacks.
Step 3: Add Cross Bracing for Strength
Bracing keeps your rack from wobbling or racking sideways over time.
- Measure diagonals: Measure from the top of one post to the bottom of the post on the opposite side to estimate your brace length.
- Cut diagonal braces: From a 2x4, cut two diagonal pieces that will run from near the top of one post down to the base near the opposite post on each side of the rack.
- Test-fit first: Hold each brace in place before cutting the final angle. Mark the angles where they meet the posts and base, then trim to match.
- Attach the braces: Use 2.5-inch exterior screws to secure the braces to the posts and base rails. Two screws per connection point is usually enough.
- Check for wobble: Push the rack gently from the side. If there’s noticeable movement, add another short brace or metal corner brackets.
Bracing is especially important if you build longer racks or live in windy areas. A few extra minutes here saves you from a twisted or leaning frame after your first season.
Step 4: Build Optional Top Rails or a Simple Roof
Top rails help keep tall stacks contained; a small roof helps wood dry and stay dry.
For top rails:
- Decide the height: Measure up from the base to about 4 feet on each post. Mark this height on all four posts.
- Install 2x4 rails: Cut two 2x4s to match the rack length. Attach them horizontally between the front posts and between the back posts at your marked height using 3-inch exterior screws.
- Check alignment: Use a level to keep these rails straight; they act like a corral for your stacked wood at the top.
For a simple roof (optional but useful):
- Add short uprights: Screw a short 2x4 block on top of each post to add a slight height and create a pitch (back taller than front by 1–2 inches).
- Install purlins: Lay 2x4s or 1x4s across these blocks, spanning from front to back, and screw them in place.
- Attach roofing panels: Cut corrugated metal or polycarbonate panels to fit and secure them to the purlins with the manufacturer’s recommended fasteners.
- Overhang edges: Let the roof extend 2–4 inches beyond the rack on all sides so rainwater drips away from the wood.
If you don’t want a roof, you can always cover the top of your stacked wood with a breathable tarp, leaving the sides open for airflow.
Step 5: Stack Firewood for Airflow and Easy Access
How you stack wood affects how quickly it dries and how easy it is to grab later.
- Start with the straightest pieces: Lay your straight, thicker logs on the bottom row for stability.
- Run logs parallel to the length: Stack each row with logs running the long way of your rack so they rest fully on the base rails.
- Alternate end supports: At each end of the rack, you can “crib” stack—alternating logs perpendicular to form end pillars that lock the stack in place.
- Leave some gaps: Don’t jam logs too tightly together. Small gaps between pieces allow air to flow and help the wood season (dry) faster.
- Keep the top slightly peaked: A gently rounded or peaked top sheds water better if you’re not using a hard roof.
Try to avoid stacking wood directly against a fence or wall; a few inches of space behind the rack improve airflow and reduce moisture buildup.
Conclusion
A DIY firewood rack is a practical, low-stress project that upgrades your yard and protects your fuel from rot and pests. With basic tools and a weekend afternoon, you can build a durable, organized storage solution that keeps your firewood dry, easy to grab, and off the ground. Once you’ve built one, you’ll have the confidence—and the skills—to tweak the design, add more sections, or take on bigger outdoor projects.
Sources
- [U.S. Forest Service – How to Dry Firewood](https://www.fs.usda.gov/Internet/FSE_DOCUMENTS/stelprdb5357564.pdf) - Explains proper firewood drying and storage practices to prevent rot and improve burn quality
- [University of Missouri Extension – Storing Firewood](https://extension.missouri.edu/publications/g5450) - Covers best practices for firewood storage, pests, and moisture control
- [The Spruce – Pros and Cons of Pressure-Treated Wood](https://www.thespruce.com/pros-and-cons-of-pressure-treated-wood-1824804) - Provides background on why pressure-treated lumber is suitable for outdoor projects
- [Family Handyman – Outdoor Wood Storage Ideas](https://www.familyhandyman.com/project/how-to-build-a-firewood-rack/) - Example project and tips for designing and building firewood racks
- [OSHA – Hand and Power Tool Safety](https://www.osha.gov/hand-power-tools) - Safety guidelines for using saws, drills, and other tools during DIY projects
Key Takeaway
The most important thing to remember from this article is that this information can change how you think about DIY Projects.


