A messy woodpile attracts pests, traps moisture, and wastes good firewood. A simple, sturdy rack keeps logs off the ground, lets air circulate, and makes your backyard or patio look more put-together. The good news: you can build a durable firewood rack in a weekend using basic tools and off-the-shelf lumber or steel pipe. This guide walks you through the process step-by-step, with practical tips to avoid sagging, rot, and wobbly supports.
Plan Your Rack: Size, Location, and Materials
Before you buy anything, decide where the rack will live and how much wood you want it to hold.
Pick a location that’s:
- Off the ground and away from direct contact with soil
- At least a few inches from your exterior wall or fence to let air flow behind the stack
- Not directly against your house (to reduce pest and moisture risk)
- Relatively flat and well-drained so water doesn’t collect under the rack
For a typical backyard, a 4–8 foot long rack is plenty for small fire pits or indoor fireplaces. Standard firewood (often called “cordwood”) is usually 16 inches long, so aim for a rack depth of about 18–24 inches. That gives enough room to stack but not so deep that airflow is blocked.
Common DIY material choices:
- Pressure-treated 2x4 lumber (most accessible, budget-friendly)
- Galvanized pipe with store-bought bracket kits (very durable, modular)
- Concrete pavers or blocks for the base to keep wood off the soil
Keep it simple: if you’re new to DIY, go with pressure-treated 2x4s and concrete blocks. They’re forgiving, easy to cut, and available at any home center.
Step 1: Build a Solid Base That Sheds Water
A solid base is the difference between a rack that lasts a season and one that lasts for years.
- Prepare the ground. Mark the rack footprint with stakes or chalk. Use a shovel to remove grass and loose topsoil until you reach firm ground. Aim for a rectangle slightly larger than your planned rack length and depth.
- Level the area. Place a straight 2x4 or long level across the ground. Add or remove soil until it reads level in both directions. You don’t need perfection, but obvious dips will lead to a crooked rack.
- Lay down a moisture barrier (optional but helpful). A layer of compacted gravel or a strip of landscape fabric under the base discourages weeds and helps water drain away.
- Set concrete blocks or pavers. Place two parallel rows of concrete blocks or pavers running the length of the rack, spaced about 12–16 inches apart (center to center). These will support your 2x4 “skids.” Adjust them until they’re roughly level with each other.
- Check final level. Place a 2x4 on top of the blocks and check with a level. Adjust by adding sand or gravel under individual blocks instead of trying to fix everything with the lumber later.
Practical tip: If your yard slopes, it’s better to step the base (create small height changes between sections) than to force a long, perfectly level platform that fights the terrain.
Step 2: Build the Lower Frame to Support the Weight
The lower frame spreads the weight of the firewood and prevents sagging.
- Cut the long runners. Cut two pressure-treated 2x4s to your desired rack length (for example, 6 or 8 feet). These will run along the top of the concrete blocks or pavers.
- Add cross pieces (optional but recommended for longer racks). For racks over 6 feet, cut two or three shorter 2x4s to span between the long runners like rungs on a ladder. Space them evenly. This creates a strong frame that supports the load and keeps the runners from twisting.
- Assemble the frame. Lay the two long 2x4s on edge (tall side vertical) and screw the cross pieces between them with exterior-rated screws (e.g., 3-inch deck screws). Pre-drill near cut ends to reduce splitting.
- Attach frame to base. Set the assembled frame on top of the concrete blocks. Use a level across the frame and shim under the runners with cedar shims or thin pieces of composite shim where needed. If your local conditions are windy or the rack will be heavily loaded, you can anchor the frame to the blocks with masonry screws or metal straps.
- Test for flex. Stand on the frame and shift your weight around. Watch for any obvious bending or rocking. Add an extra cross piece or adjust the blocks if needed.
Practical tip: Always keep 2x4s on edge (standing tall) when bearing weight. They’re significantly stronger that way than lying flat.
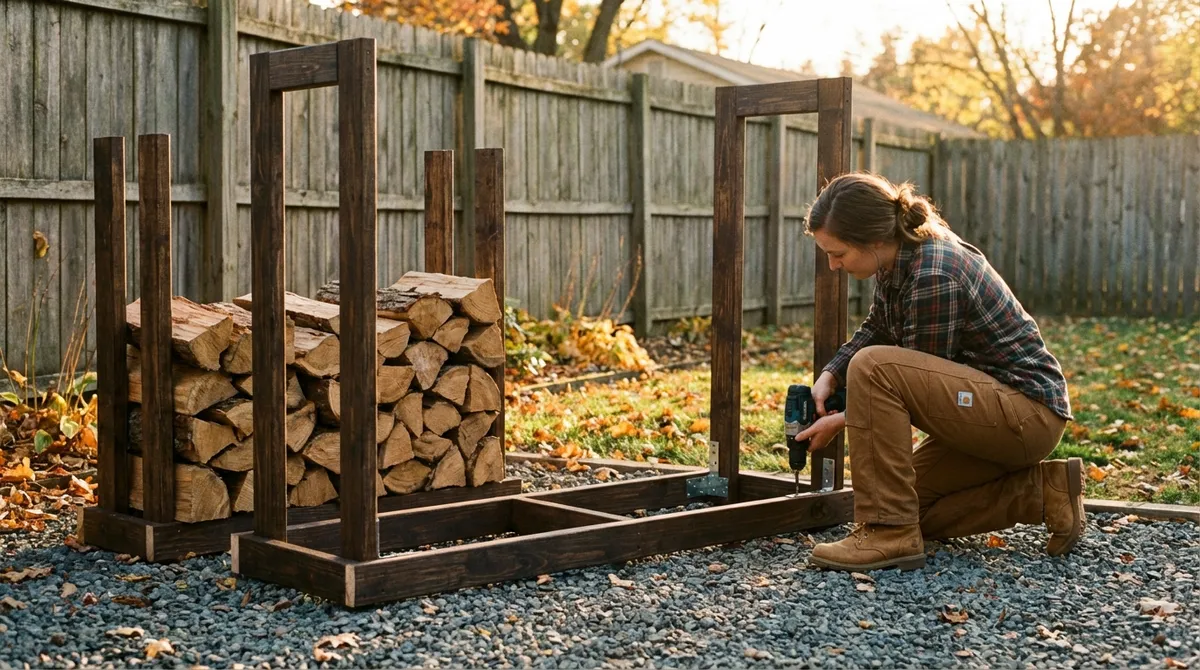
Step 3: Install Uprights to Keep Logs Contained
The uprights at each end keep your stack standing and help define the rack capacity.
- Decide on height. For safety and stability, most DIY racks work best at around 4 feet tall. Higher stacks can tip and make loading awkward.
- Cut vertical supports. Cut four 2x4s to your chosen height (e.g., four pieces at 48 inches). These will be paired at each end of the rack for strength.
- Attach uprights to the frame.
- Position one 2x4 upright at each corner of the frame, sitting directly over the long runners.
- Use two or three exterior-rated screws through the side of the runner into the base of each upright.
- For more rigidity, add metal L-brackets at the inside of each joint.
- Double up the uprights. Sister a second 2x4 to each upright by screwing them together side-by-side (or back-to-back) for extra stiffness. This is especially useful if you plan to load the rack heavily.
- Add a top cross brace (optional but useful). For extra stability, connect the top of each pair of uprights with a short 2x4 cross brace. This also creates a natural “fill line” for stacking.
Practical tip: If you’re worried about racking (sideways sway), add diagonal braces from the uprights down to the lower frame at each end. Short scrap 2x4s screwed at a 45° angle work well.
Step 4: Add Airflow Gaps and Moisture Protection
Firewood needs air movement and protection from ground moisture to dry properly and stay usable.
- Create airflow under the stack. If your lower frame doesn’t already have gaps, space your 2x4 runners or slats so there’s at least a 1–2 inch gap between boards. This lets air reach the bottom of the pile.
- Avoid solid surfaces. Don’t top the frame with plywood or a solid board; it traps moisture and slows drying. Runners or spaced slats are better.
- Keep wood off the soil. The bottom piece of firewood should be at least 3–4 inches above any soil or mulch. The concrete blocks and frame usually achieve this automatically.
- Plan for a simple cover. Firewood should be protected from direct rain and snow but still able to breathe. Instead of wrapping the whole rack in a tarp, plan to cover just the top one or two rows:
- Use a slightly oversized piece of UV-resistant tarp or scrap metal roofing.
- Weight it down with a few split logs or small bricks so you can easily remove it.
- Maintain open sides. Always leave the sides of the stack exposed to air. If you use a tarp, anchor it so it drapes over the top and a few inches down the sides, but doesn’t seal the stack.
Practical tip: Face the cut ends of the logs toward the dominant wind direction in your area; this speeds drying by pushing air through the stack.
Step 5: Stack Firewood Safely and Use the Rack Long-Term
A well-built rack can still fail if the wood is stacked poorly or overloaded.
- Sort by size and dryness. Stack drier, ready-to-burn wood in the most accessible area. Keep greener or freshly split wood toward one side so you don’t mix it up later.
- Use a stable stacking pattern.
- For the main body, stack logs in neat rows, each row perpendicular to the one below if you want extra stability, or parallel rows if your uprights are strong.
- At the ends between uprights, you can use “cribbing” (alternating perpendicular layers) if you don’t trust your uprights alone, but on a supported rack many people skip this.
- Keep height reasonable. Don’t exceed the top of your uprights. Stacking higher invites tipping, especially in wind or when you pull logs from lower in the pile.
- Monitor for lean. As you stack, occasionally step back and look for any signs of the pile bowing outward or the uprights shifting. Fix issues while the rack is only half-full—you’ll avoid a bigger mess.
- Maintain the rack.
- Once or twice a year, check for loose screws, rotted boards, and leaning supports.
- Tighten fasteners and replace any soft or cracked wood.
- Sweep leaves and debris away from the base to keep moisture down.
Practical tip: If you burn regularly, consider building two racks—one for “seasoning” (freshly cut wood) and one for “ready” wood. Rotate through them so you’re always using the driest fuel.
Conclusion
A firewood rack doesn’t have to be complicated or expensive to work well. With a stable base, a strong lower frame, solid uprights, and good airflow, you’ll protect your wood from rot, keep pests away from your house, and make every campfire or fireplace session easier. Once you build one rack, it’s straightforward to adapt the design—shorter, longer, or modular—for whatever your yard and firewood habits demand.
Sources
- [U.S. Department of Energy – Wood and Pellet Heating](https://www.energy.gov/energysaver/wood-and-pellet-heating) - Overview of how wood fuel works, efficiency considerations, and best practices for wood heating
- [University of Missouri Extension – Drying Firewood](https://extension.missouri.edu/publications/gh4842) - Explains seasoning time, stacking methods, and moisture concerns for firewood
- [University of Minnesota Extension – Safe Use of Wood in the Home](https://extension.umn.edu/wood-heating-and-cooking/safe-use-wood-home) - Covers safety tips for storing and handling firewood near the home
- [USDA Forest Service – Firewood and Invasive Pests](https://www.fs.usda.gov/managing-land/firewood) - Discusses pest risks associated with firewood and storage considerations
- [Consumer Product Safety Commission – Home Heating Safety Tips](https://www.cpsc.gov/Safety-Education/Safety-Education-Centers/Carbon-Monoxide-Information-Center/Home-Heating-Safety-Tips) - Provides general home heating safety guidance relevant when storing and using firewood indoors and outdoors
Key Takeaway
The most important thing to remember from this article is that this information can change how you think about DIY Projects.


