A chaotic entryway makes the whole home feel disorganized. Shoes pile up, keys disappear, and mail lands everywhere except where it should. The good news: you don’t need a full remodel or custom built-ins to fix it. With some basic tools, a bit of lumber, and a clear plan, you can build a simple, durable entryway “drop zone” that keeps daily clutter under control and actually gets used.
This guide walks you through planning and building a compact bench-and-hook setup with storage that works for real life—kids, pets, muddy shoes and all.
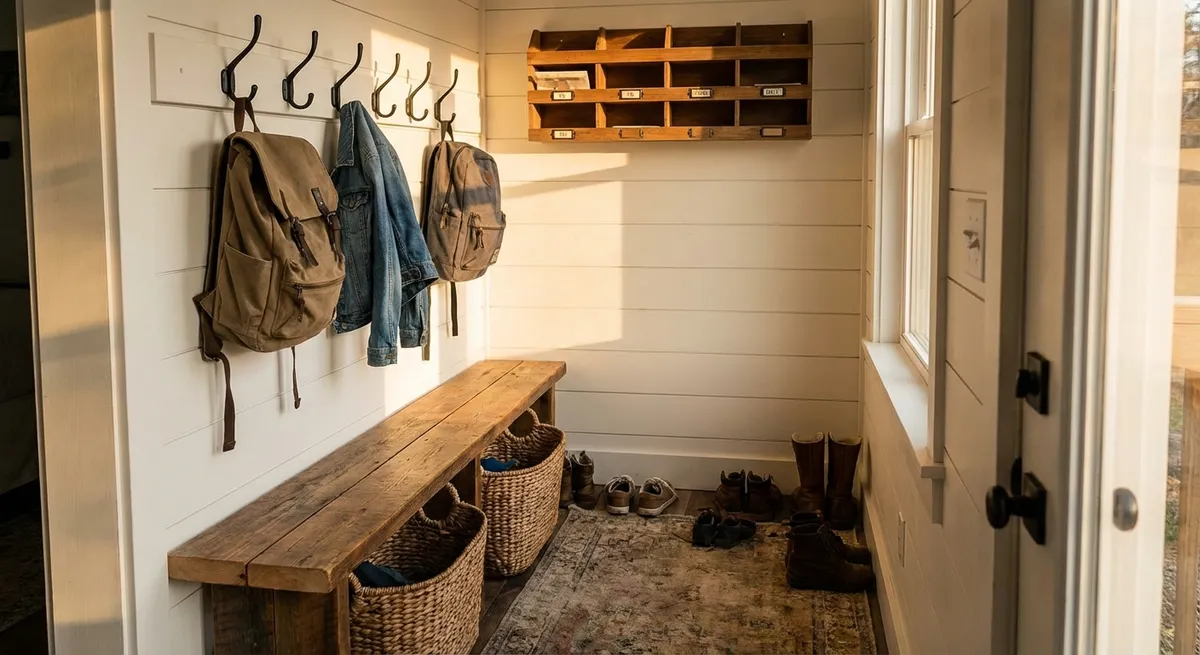
Plan a Drop Zone That Fits Your Space (and Your Stuff)
Before you buy anything, spend 10 minutes just watching how your household uses the entryway. Where do shoes land? Where do bags get tossed? Who actually hangs up coats and who drops them on the floor?
Use those observations to answer a few key questions:
- Where will it go? Measure the wall where you want your drop zone. Note width, ceiling height, and any obstructions (outlets, vents, baseboard heaters, doors).
- What must it hold? List the everyday items: shoes, backpacks, keys, leashes, mail, work bags, sports gear. Prioritize the top 5 that must have a home.
- Who is using it? Kids need lower hooks and easy-open bins; adults can use higher hooks and shallow shelves.
- How deep can it be? In tighter hallways, you may be limited to 12–14 inches of depth so you don’t block the walkway.
- What’s your style? Decide if you want a simple, utility look (painted pine and basic hooks) or something more finished (stained top, painted base, decorative trim).
Once you have measurements and a clear idea of what you’re storing, sketch a simple front view of your wall with a bench, hooks above it, and storage under the seat. This doesn’t need to be artistic—just enough to check proportions and spacing.
Gather Materials and Tools Before You Start
With your basic design in mind, you can pull together a practical material list. This example assumes a 4-foot-wide wall, but you can adjust lengths to fit your space.
Typical materials:
- 1 sheet of 3/4" plywood (for bench top and cubby dividers)
- 1–2 1x4 or 1x6 boards (for wall-mounted hook rail and trim)
- 2x2 or 2x3 lumber (for simple bench frame/legs)
- 4–6 heavy-duty coat hooks
- 2–3 storage baskets or bins sized to fit under the bench
- 2–3 angle brackets or corner braces (optional, for extra support)
- 2 1/2" wood screws (for framing and wall studs)
- 1 1/4" wood screws (for attaching plywood and trim)
- Construction adhesive (optional, for extra strength)
- Wood filler, sandpaper (120–220 grit), primer, and paint or stain
- Stud finder, wall anchors (if you can’t hit studs for every screw)
Basic tools:
- Tape measure and pencil
- Stud finder
- Circular saw or miter saw (a handsaw works in a pinch)
- Drill/driver with drill bits and screwdriver bits
- Level (24" or longer is best for this project)
- Safety glasses and hearing protection
- Clamps (helpful but not mandatory)
Lay everything out before you begin. A big time-waster on DIY projects is repeatedly stopping to run to the store. Check you have the right screw lengths and enough hooks and brackets based on your plan.
Step 1: Mark the Wall and Find the Studs
Getting the layout right on the wall is what makes the whole setup look intentional instead of “stuck on at random.”
- Mark bench height. A comfortable bench height is typically 17–19 inches from finished floor to seat top. Use a tape measure to mark this height in several spots along the wall and lightly draw a level line.
- Plan hook height. For adults, 66–70 inches from the floor works well. For kids, install an extra row at 42–48 inches. Lightly mark these heights with a level line where the hook board will go.
- Find the studs. Use a stud finder to locate studs along the wall where your bench and hook board will attach. Mark their centers with a vertical pencil line. Verify with a small test screw or finish nail if you’re unsure.
- Check obstructions. Note any outlets or switches. Ensure your bench doesn’t cover them and that your hook board won’t interfere with wall plates.
- Confirm width. Mark your bench’s left and right edges on the wall based on your measured space, leaving at least a couple inches clearance from door trim or corners.
Take a step back and visually confirm: does the planned bench width feel right? Is there room for the door to open fully and for people to walk past?
Step 2: Build a Simple, Sturdy Bench Base
You don’t need cabinetmaker skills to build a solid bench. A simple frame with legs will handle daily use if it’s properly attached to the wall.
- Cut the bench top. From 3/4" plywood, cut a piece the full width of your space and 14–16 inches deep (or whatever your measurement allows). Sand the edges lightly to remove splinters.
- Cut the frame pieces. Using 2x2 or 2x3 lumber, cut:
- Two pieces the same length as your bench top (front and back rails)
- Two or three shorter pieces for internal supports (front-to-back)
- Assemble the frame. Lay out the frame like a rectangle with internal supports spaced evenly (every 16–24 inches). Pre-drill and screw the frame together with 2 1/2" screws.
- Add legs (if needed). For freestanding front support, cut legs from the same lumber to your desired height minus the 3/4" bench top thickness. Attach them at corners and under internal supports.
- Secure to the wall. Position the frame against the wall, aligned with your bench height line. Drive 2 1/2" screws through the back rail into wall studs at every stud location you marked.
- Attach the top. Center the plywood top on the frame with a slight overhang in front (about 1"). Pre-drill and screw it down with 1 1/4" screws.
Check for wobble. If the bench feels at all bouncy, add an extra leg or angle bracket where needed. This is the time to overbuild slightly—you’ll never regret a stronger bench.
Step 3: Create Under-Bench Storage That Actually Gets Used
Open storage that’s easy to access beats “pretty but annoying” solutions every time. Think baskets you can pull out with one hand, not tiny cubbies no one uses.
- Decide on cubbies vs. open span. For maximum flexibility, leave the space open and use baskets. If you prefer defined spots, cut plywood dividers.
- Measure for baskets. If you’re using baskets or bins, measure their width and height. Plan for at least 1/2" clearance so they slide easily.
- Install dividers (optional). If you’re building cubbies:
- Cut plywood dividers to the height from floor to underside of the bench minus any baseboard thickness.
- Attach them to the underside of the bench top using screws through simple 2x2 blocking, or screw into the frame.
- Protect the floor. If your floor is prone to scuffs, add felt pads to bottom of dividers or use a thin mat under the baskets.
- Assign each space a job. Decide right away: left basket for shoes, middle for backpacks, right for sports gear, etc. Label if you have kids.
The key is making sure nothing requires careful aiming. If someone can kick off shoes roughly toward their basket and still succeed, you’ve designed it right.
Step 4: Install a Strong Hook Rail for Coats and Bags
Individual hooks screwed straight into drywall will eventually rip out if they hold heavy bags. A hook rail spreads the load across multiple studs and looks cleaner.
- Cut the rail. From a 1x4 or 1x6 board, cut a piece the same width as your bench or slightly wider if you want a framed look.
- Pre-finish if possible. It’s often easier to prime and paint or stain this board before it goes on the wall. Touch up later after installation.
- Locate screw positions. Mark on the board where it will line up with the studs you found earlier. Pre-drill countersunk holes so screw heads sit slightly below the surface.
- Level and attach. Hold the board along your hook height line. Use a level to keep it straight, then drive 2 1/2" screws through the pre-drilled holes into studs.
- Fill and touch up. Fill the screw holes with wood filler, sand smooth when dry, and touch up with paint or stain.
- Add hooks. Space hooks 6–8 inches apart, more if you hang bulky coats. Pre-drill for each hook, then attach with the provided screws, making sure at least some screws bite into solid wood behind the rail.
If you need a second lower rail for kids, repeat the process at their reachable height, using shorter hooks so they don’t snag clothing above.
Step 5: Finish, Organize, and Make It “Automatic” to Use
Once the structure is in place, the final details are what turn this into a habit-building spot instead of just more furniture.
- Sand and finish. Smooth all exposed wood surfaces with 120–220 grit sandpaper. Round over any sharp edges where legs might bump. Apply primer plus two coats of paint or a stain-and-polyurethane finish, following dry times on the can.
- Add a back panel (optional). For a more built-in look and to protect the wall, you can add beadboard or plywood behind the bench up to the hook rail. Attach it to studs or the bench frame and paint it to match.
- Define zones. Place baskets, add a small tray or bowl for keys on one end of the bench, and consider a vertical file or wall-mounted organizer for incoming mail.
- Add lighting if needed. If your entry is dark, a simple plug-in wall sconce or lamp near the drop zone makes it easier to see and use.
- Set household rules. Make it clear and simple:
- Shoes in baskets
- Coats on hooks
- Bags on lower hooks or in a specific cubby
- Keys and wallets in the tray
- Test and tweak. Live with it for a week. Notice where clutter still appears. Adjust basket positions, add or move hooks, or dedicate one extra bin for “random stuff” that shows up.
The goal is for the drop zone to be the easiest place to drop things—not just the neatest. If you design with that in mind, your entryway will stay under control with far less effort.
Conclusion
A well-built entryway drop zone doesn’t require custom cabinetry or a big budget—just a solid plan, a few basic tools, and attention to how your household actually lives. By anchoring a sturdy bench to the wall, giving every everyday item a defined home, and installing hooks that can handle real-world loads, you’ll transform your entry from chaos to automatic organization.
Tackle the project one step at a time, adjust the design to your space, and don’t overcomplicate it. The most successful DIY solutions are usually the simplest ones that people can use without thinking.
Sources
- [U.S. Consumer Product Safety Commission – Anchor It!](https://www.anchorit.gov) - Guidance on safely anchoring furniture and fixtures to walls to prevent tip-over hazards
- [Family Handyman – How to Build a DIY Entryway Bench](https://www.familyhandyman.com/project/how-to-build-a-diy-entryway-bench/) - Practical example of basic bench construction and dimensions
- [This Old House – How to Hang Shelves and Hooks on Drywall](https://www.thisoldhouse.com/walls/21015129/how-to-hang-shelves) - Explains best practices for locating studs and using the right anchors
- [Fine Homebuilding – Basics of Framing with 2x Lumber](https://www.finehomebuilding.com/2017/09/18/basic-wall-framing) - Background on simple, strong framing techniques that also apply to bench bases
- [Sherwin-Williams – How to Sand and Prepare Wood for Staining](https://www.sherwin-williams.com/en-us/paint-and-supplies/how-to/wood-stain-projects/how-to-sand-wood-for-staining) - Covers surface prep and finishing steps for durable, good-looking wood surfaces
Key Takeaway
The most important thing to remember from this article is that this information can change how you think about DIY Projects.


