A cluttered entryway makes your whole home feel chaotic, even if the rest is fairly tidy. The good news: you don’t need custom built-ins or a major renovation to get control of shoes, bags, and keys. With a few basic tools and some affordable materials, you can build a simple, durable “drop zone” that fits your space and makes everyday life smoother.
This step-by-step guide walks you through planning, building, and installing a DIY entryway drop zone with hooks, a bench, and storage. Each step includes practical tips to help you avoid common mistakes and get a result that looks intentional—not like a temporary fix.
Step 1: Measure Your Space and Plan the Layout
Before you buy anything, get clear on the space you have and what you need it to do.
Start by measuring the wall you’ll use: width, height, and the depth you can comfortably spare without blocking the door or walkway. Note obstacles like light switches, outlets, vents, or baseboard heaters. Take a quick photo of the area so you can refer back to it while planning.
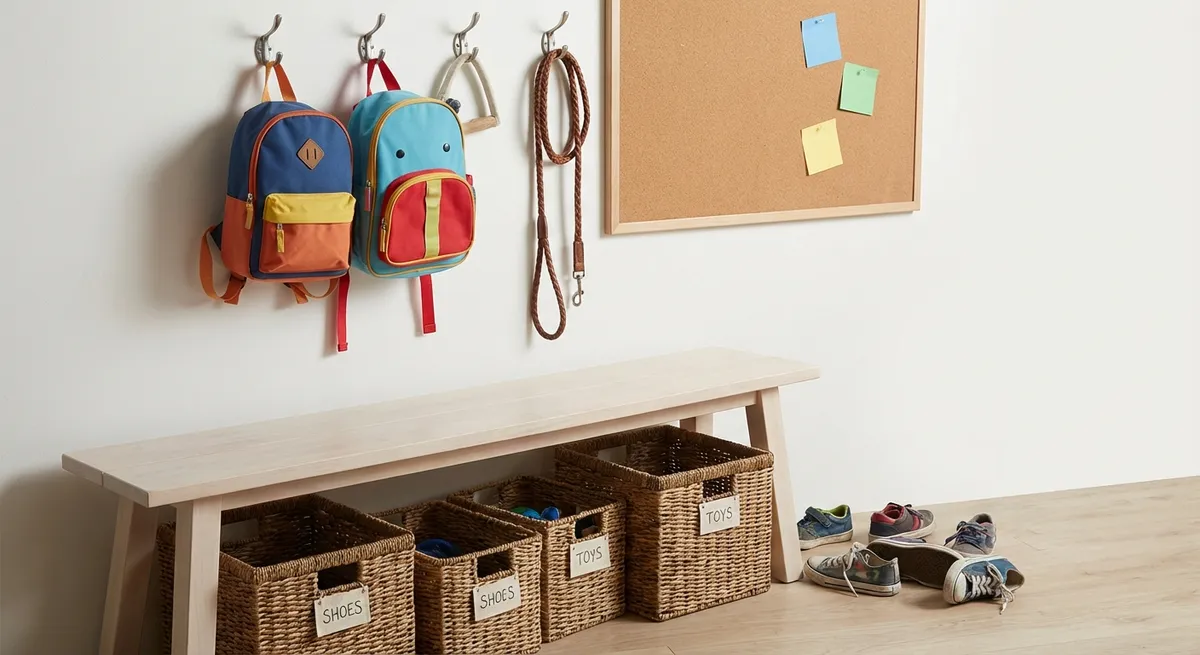
Decide the main jobs your drop zone must handle: hanging coats and bags, storing shoes, corralling mail and keys, or giving kids a place to park backpacks. Prioritize two or three functions rather than trying to solve everything at once. Sketch a basic layout on paper: a bench along the bottom, hooks above, maybe a narrow shelf or cubbies on top if you have vertical space.
Aim for practical dimensions: a bench height around 17–19 inches works for most adults; depth of 12–16 inches usually fits shoes without sticking too far into the walkway. Hooks typically sit 60–70 inches from the floor; if you have kids, plan a second, lower row at their reach. Check your sketch against your measurements so you’re not designing something that won’t fit.
Finally, think about style and durability. Entryways take abuse, so choose materials that can handle wet coats and dirty shoes—sealed wood, sturdy metal hooks, and washable baskets. A simple, clean design will be easier to build and easier to keep tidy.
Step 2: Gather Materials, Tools, and Hardware
With a plan in place, you can pick materials that fit both your layout and your budget.
For a basic build, you’ll need:
- Bench surface: a solid wood board, laminated panel, or pre-made shelf (at least 3/4" thick for strength)
- Support structure: 2x2 or 2x3 lumber for legs or cleats, or a simple ready-made cube shelf unit as a base
- Backing (optional but helpful): a sheet of plywood or beadboard to create a unified “wall” look
- Hooks: heavy-duty coat hooks with 2–4 screw holes each
- Storage: baskets, bins, or crates that fit under the bench or on a shelf
Tool-wise, a tape measure, pencil, level, drill/driver, stud finder, and saw (hand saw, circular saw, or miter saw) will cover most tasks. Wood screws (1 1/4" to 3", depending on what you’re fastening), wall anchors (for non-stud locations), wood glue, sandpaper, and paint or polyurethane will round out the supplies.
Before you cut anything, check that your hardware and boards work together: will your screws be long enough to bite into studs after going through a cleat or backing board? Are your hooks designed for the thickness of your panel? Lay your pieces out on the floor in roughly the right arrangement and confirm it matches your sketch.
If you’re unsure about moisture near an exterior door, favor finishes that seal wood against water: exterior-grade paint or a water-resistant polyurethane. This helps prevent warping or staining over time. Label your materials by location (“left cleat,” “top board,” etc.) as you go—future you will be glad you did.
Step 3: Build a Sturdy Bench Base
The bench is the workhorse of your drop zone, so focus on strength and stability first, style second.
If you’re building from scratch, cut two side supports and a front support rail from 2x2 or 2x3 lumber. For a standard 18-inch bench height, subtract the thickness of your bench top from that number to get the leg length. For example, with a 1 1/2" thick top, your legs should be about 16 1/2". Screw the legs to the underside of your bench top from above, or build a simple rectangular frame and attach the top last.
For added strength (and a cleaner look against the wall), use a wall cleat: a horizontal 2x2 or 2x3 screwed directly into wall studs at the target bench height. The bench top can sit partly on this cleat and be secured from above with short screws. Use a stud finder and mark stud locations with painter’s tape, then pre-drill holes in the cleat and drive at least two screws into each stud you hit.
If you’re using a ready-made cube organizer as a base, secure it to the wall with L-brackets and into studs or proper anchors. Then fasten your bench top to the cube unit from underneath so it doesn’t slide. Check for wobble: if the floor is uneven, add felt pads or shims under the legs until the bench sits solidly without rocking.
Before moving on, sit on the bench and shift your weight around. It should feel solid, with no creaks or obvious flex. If it moves, add a diagonal brace at the back, another wall cleat, or additional screws into studs. Entryway benches take a lot of dynamic load—fix weakness now, not after the first person drops onto it with a full backpack.
Step 4: Install the Wall Panel and Hooks
Now you’ll turn the wall above the bench into a functional hang-up zone that looks intentional, not random.
If you’re using a backing panel (plywood, beadboard, or a painted board), cut it to fit the width of your bench and the desired height—often 36–48 inches above the bench is enough for hooks and visual balance. Paint or finish the panel before installing; it’s easier flat on sawhorses than on the wall.
Locate studs again and mark them along the wall. Hold the panel in place (a second person or temporary supports help here), then drive screws through the panel into studs. If the panel edges don’t land on studs, you can add a narrow trim board at the sides to hide any small gaps and give a finished frame look.
Mark your hook locations on the panel or wall using a level line. Space hooks 6–8 inches apart for coats, or slightly wider if you have bulky winter gear. Think in zones: adult coats higher, kids’ hooks lower, and a dedicated spot for everyday bags or dog leashes where they’re easy to grab. Avoid aligning screws with electrical boxes or areas you suspect might have wiring; when in doubt, stay within stud lines.
Pre-drill pilot holes for each hook to avoid splitting the wood and make installation easier. Fasten hooks with the screws provided, or upgrade to longer screws if you’re going into solid backing and studs. Give each hook a firm downward tug to confirm it’s secure. If anything feels weak and you’re not on a stud, switch to a heavy-duty wall anchor rated for at least 25–50 pounds.
Finish the look with a narrow shelf above the hooks if you have ceiling height to spare. A simple 1x6 or similar board, supported by small brackets into studs, can hold hats, small baskets, or seasonal items that don’t need daily access.
Step 5: Add Storage, Labels, and a Simple Daily Routine
Your structure is in place; now you make it truly useful and easy to maintain.
Slide baskets or bins under the bench for shoes, sports gear, or pet supplies. Choose containers that fit the opening with a bit of wiggle room so they’re easy to pull in and out. Consider open bins for kids (so they actually use them) and lidded ones for items you don’t want visible. If your bench base is open, line it with a washable rug or mat to catch dirt from shoes.
Add small accessories where they’ll have the most impact: a tray or small dish on a narrow side shelf for keys, a wall-mounted mail sorter to prevent paper piles, or a clipboard for to-do lists or permission slips. Keep it minimal; too many little organizers can become clutter themselves.
Labels help everyone know what goes where. You can use stick-on labels, clip-on tags for baskets, or simple painter’s tape and a marker until you’re sure your system works. Label based on behavior, not your ideal vision: “Everyday Shoes,” “Work Bag,” “Kids’ Backpacks,” “Dog Walk Gear” are more effective than vague categories like “Misc.”
Finally, create a tiny routine so your drop zone stays functional:
- When you walk in: hang coat and bag, drop keys in the same place every time, shoes in the designated bin.
- Once a week: do a quick five-minute reset—put stray items back where they belong, wipe the bench, and sweep or vacuum under it.
- Once a season: rotate out heavy gear or rarely used items so the space doesn’t get overloaded.
By combining a solid build with a few simple habits, your entryway stops being a dumping ground and becomes a tool that helps your home run smoother—without needing a major renovation.
Conclusion
A well-planned entryway drop zone is one of the highest-impact DIY projects you can tackle with basic tools and a weekend of effort. By measuring carefully, building a sturdy bench, anchoring everything safely to studs, and layering in thoughtful storage, you create a space that handles real-life mess without looking messy.
You don’t need custom cabinetry or advanced carpentry skills—just a clear plan, a focus on function, and materials that can stand up to daily use. Once it’s in place, you’ll feel the difference every time you walk through the door.
Sources
- [U.S. Consumer Product Safety Commission – Anchor It! Campaign](https://www.anchorit.gov) - Guidance on safely anchoring furniture and wall units to prevent tip-overs
- [The Family Handyman – How to Build a Bench with Hidden Storage](https://www.familyhandyman.com/project/how-to-build-a-storage-bench/) - Practical tips on bench construction, dimensions, and basic joinery
- [Bob Vila – Entryway Storage Ideas](https://www.bobvila.com/articles/entryway-storage-ideas/) - Inspiration and functional design ideas for organizing small entry spaces
- [This Old House – How to Find a Wall Stud](https://www.thisoldhouse.com/walls/21016756/how-to-find-a-wall-stud) - Techniques for accurately locating studs to secure benches, cleats, and hooks
- [Sherwin-Williams – How to Choose the Right Interior Paint Finish](https://www.sherwin-williams.com/en-us/homeowners/how-to/choosing-the-right-paint-finish) - Information on durable paint finishes suitable for high-traffic areas like entryways
Key Takeaway
The most important thing to remember from this article is that this information can change how you think about DIY Projects.


