A busy entryway can make your whole home feel disorganized. Shoes pile up, bags get dumped on the floor, keys disappear, and mail travels from one random surface to another. You don’t need a full mudroom or a major renovation to fix it. With a few basic tools and simple materials, you can build a compact, wall-mounted “drop zone” that keeps everyday items contained and easy to find. This guide walks you through a practical, DIY-friendly setup you can adapt to apartments, rentals, or small homes.
Plan a Drop Zone That Fits Your Space
Before you buy anything, spend a few minutes studying how you actually use your entry. Notice where shoes collect, where you usually toss your keys, and what always ends up in your hands when you walk in (backpacks, dog leash, mail, work bag). Measure the wall space near your main door from floor to ceiling and note any outlets, light switches, or vents to work around. Decide what’s most important for your household: shoe storage, hooks for bags, a bench to sit on, or a landing spot for mail and keys. Sketch a rough layout that includes three basics: a low area for shoes, a mid-height section for bags and coats, and a small flat surface for keys, mail, or sunglasses. Finally, set a realistic budget and decide whether you want a fully custom build or a hybrid (like a store-bought bench plus DIY wall storage).
Materials and Tools: Keep It Simple and Flexible
You don’t need a full workshop to build an entryway drop zone. For most small projects, basic tools like a tape measure, pencil, level, drill/driver, stud finder, and safety gear (glasses and hearing protection) are enough. For materials, consider a simple combination: one or two pre-made wall shelves, a row of sturdy hooks, and a low shoe rack or bench. Plywood or basic pine boards (1x8 or 1x10) are affordable and easy to cut if you want custom shelves; metal or wood shelf brackets add support and style. Choose hardware that matches your wall type—wood screws into studs, and appropriate wall anchors for drywall if you’re not hitting studs. If you’re in a rental, favor removable options such as adhesive hooks or freestanding shoe storage and keep holes small and minimal.
Step 1: Locate Studs and Define Your Layout
Start by marking the area where your drop zone will go, using painter’s tape or light pencil lines to outline your plan on the wall. Use a stud finder to locate wall studs, marking their centers lightly with a pencil—these are the best places to anchor heavier items like shelves and hooks. Decide the heights for each element: shoe storage usually sits on the floor or slightly raised; hooks for bags and coats work well between about 48–60 inches from the floor; a shelf for baskets or hats can sit roughly 70–80 inches high, depending on your ceiling. Step back and visually check your layout marks to make sure they feel balanced and accessible for everyone in your household, including kids if they’ll use the hooks. If space is tight, prioritize vertical organization—stack a low shoe rack, mid-level hooks, and a single upper shelf rather than spreading items out.
Step 2: Install a Low Shoe Zone That’s Easy to Maintain
Your shoe area should be simple enough that everyone will actually use it. If you’re using a ready-made shoe rack or bench, assemble it according to the instructions and place it against the wall within your marked area. For a DIY shoe shelf, cut a board to width (matching or slightly smaller than your wall section), then mount it using two or three brackets secured into studs where possible. Keep the lowest shelf or surface about 3–6 inches off the floor to make cleaning easier and to prevent wet shoes from sitting directly on flooring. Decide how many pairs of shoes you realistically want stored here—often 1–2 pairs per person—then size your rack accordingly rather than trying to fit your entire collection. Use trays or low plastic bins for winter boots or muddy shoes to contain mess and protect flooring. If you’re in a small space, consider a slim vertical shoe organizer that hugs the wall to keep foot traffic paths clear.
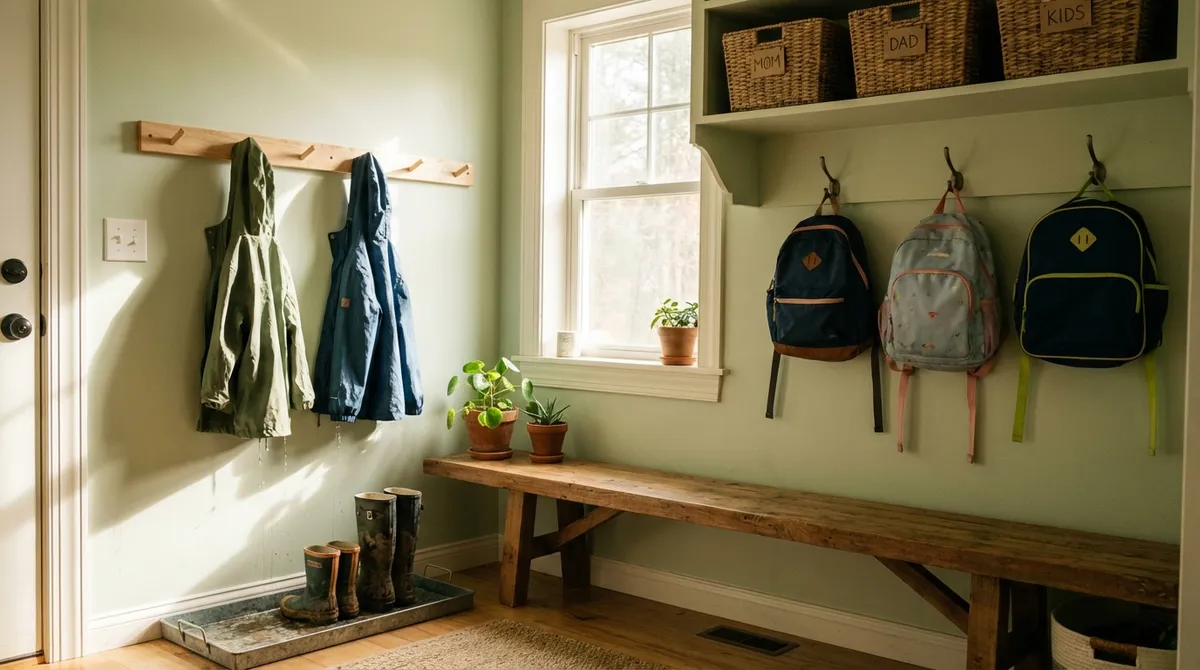
Step 3: Add Hooks for Coats, Bags, and Everyday Gear
Hooks are the workhorses of any entryway. First, mark a straight horizontal line at your chosen hook height using a level so everything looks clean and intentional when installed. For heavier items like backpacks, coats, or grocery totes, aim to secure the hook screws into wall studs for strength; if you can’t hit studs exactly where you want hooks, use high-quality drywall anchors rated for at least 15–25 pounds. You can mount hooks individually or attach several hooks to a horizontal board (a hook rail) and fasten that board into studs for more flexibility on hook placement. Space hooks roughly 6–8 inches apart to avoid crowding and to keep items easy to hang and remove. Consider adding a lower row of hooks for kids’ backpacks and jackets so they can manage their own gear. Keep at least one hook dedicated to a daily “go bag” (work bag, diaper bag, or gym bag) so you’re not hunting for it every morning.
Step 4: Create a Small Command Center for Keys and Mail
A compact “command center” keeps small items from ending up all over the house. Install a narrow wall shelf or floating ledge above your hooks or beside the door at a comfortable standing height (around 48–54 inches). Make sure the shelf isn’t so deep that it blocks the walkway—usually 4–6 inches is enough for a tray and a small organizer. Place a small dish or tray on the shelf dedicated to keys and loose items, and add a vertical file or divided organizer for incoming mail and important papers. Label sections like “To Sort,” “To Pay,” or “This Week” if you handle a lot of mail or paperwork. For renters or drill-free setups, use adhesive-backed key hooks and a freestanding organizer on top of a narrow console table instead of a mounted shelf. Commit to a simple habit: everything in your pockets goes directly into this spot when you walk through the door, and mail doesn’t leave this zone until you’ve dealt with it.
Step 5: Finish, Secure, and Fine-Tune for Daily Use
Once everything is installed, go back and double-check that all screws are tight, shelves are level, and nothing wobbles under normal use. If you used unfinished wood, lightly sand sharp edges and apply paint, stain, or a clear protective finish to make surfaces easier to wipe clean. Add labeled baskets or bins on your upper shelf for things like hats, gloves, dog gear, or reusable shopping bags so they’re contained but still easy to grab. Test the setup by walking in as you normally would: where do your shoes go, where do you drop your bag, how quickly can you find your keys? Adjust hook positions, bin labels, or shelf contents based on what feels natural. If you share the space with others, spend a minute walking everyone through the “home” for each item so the system doesn’t fall apart. Revisit the area after a week or two and remove anything that’s not being used or is getting in the way—your drop zone should make life easier, not more complicated.
Conclusion
A well-planned entryway drop zone can transform the way your home feels without major construction or a big budget. By carving out dedicated spots for shoes, bags, keys, and mail, you cut down on daily frustration and make it easier for everyone to keep clutter under control. Start with what your household actually needs, use simple, sturdy materials, and focus on a setup that supports your real routines. With a weekend’s effort and some basic tools, you’ll walk into a home that feels more organized from the moment you open the door.
Sources
- [U.S. Department of Energy – Energy Savers: Doors and Windows](https://www.energy.gov/energysaver/doors-and-windows) - General guidance on entries and doors, helpful when planning around existing doorways and clearances
- [Consumer Product Safety Commission – Furniture and TV Tip-Over Information](https://www.cpsc.gov/Tips-Safety/Furniture-and-TV-Tipovers) - Safety guidance on securing furniture and wall-mounted items to prevent accidents
- [Family Handyman – How to Use Wall Anchors](https://www.familyhandyman.com/project/how-to-use-wall-anchors/) - Detailed explanation of choosing and installing wall anchors safely in drywall and other materials
- [Lowe’s – How to Install Shelves](https://www.lowes.com/n/how-to/install-shelves) - Step-by-step instructions and diagrams for safely installing wall shelves
- [This Old House – Entryway Organization Ideas](https://www.thisoldhouse.com/entryways-mudrooms/21016460/entryway-organization-ideas) - Practical inspiration and examples of functional entryway storage and layouts
Key Takeaway
The most important thing to remember from this article is that this information can change how you think about DIY Projects.


