A cluttered entryway makes your whole home feel chaotic. Shoes pile up, keys disappear, bags land wherever they fit. This DIY entryway organizer is a straightforward weekend project that solves those daily headaches without requiring a full workshop or advanced carpentry skills. You’ll combine wall hooks, a small bench, and smart storage to create a landing zone that fits your space and your routine.
This guide walks you through planning, building, and installing a compact organizer you can customize for an apartment, condo, or house. If you can measure, drill, and drive a few screws, you can do this.
Plan Your Layout Around How You Actually Live
Before you touch a tool, figure out what your organizer needs to handle. A good design is less about Pinterest photos and more about your daily patterns.
Think about:
- What lands near the door now? Shoes, backpacks, mail, dog leash, sports gear?
- Who’s using it? Adults, kids, guests, pets—all have different height and storage needs.
- How much wall space do you really have? Measure from floor to ceiling and left to right.
- What’s in the way? Note outlets, light switches, baseboard heaters, and vents.
Grab a tape measure and painter’s tape:
- Mark the width you want to use (common: 30"–48" wide).
- Mark seat height for a bench (17"–19" from floor is typical chair height).
Mark hook height:
- Adults: 66"–70" from floor - Kids: 48"–54" from floor 4. Stand in front of the taped area as if you’re coming home: mimic taking off shoes, hanging a coat, dropping a bag. Adjust the tape until it feels natural.
Take a photo of your taped layout. This becomes your reference as you build and helps you avoid buying the wrong-size materials.
Gather Simple Materials and Tools (No Fancy Gear Required)
You don’t need a full shop to pull this off. Stick to easy-to-find materials and basic tools.
Suggested materials (adjust sizes to your wall):
- 1 pre-cut laminated pine or hardwood board for the bench top (e.g., 1" x 12" x 36")
- 2–3 “L” or “U” style metal bench legs or 2x2 lumber for simple box legs
- 1–2 boards for a hook rail and/or small shelf (1" x 4" or 1" x 6", 3–4 ft long)
- 4–8 sturdy wall hooks (single or double)
- 2–3 shallow baskets or bins for under-bench storage
- Wood screws (1 ¼" to 2", depending on material)
- Wall anchors suitable for your wall type (drywall, plaster, masonry)
- Wood finish, paint, or clear sealer (optional but recommended)
- Felt pads or rubber feet for bench legs
Basic tools:
- Tape measure and pencil
- Stud finder (for drywall/wood stud walls)
- Level (24" or longer is ideal; a small torpedo level works in a pinch)
- Drill/driver with assorted bits
- Sandpaper (120- and 220-grit) or sanding sponge
- Paintbrush or small foam roller
- Safety glasses and dust mask
Lay everything out before starting. Dry-fit your bench on the floor and your hook board against the wall to confirm the scale feels right.
Build and Finish a Sturdy Bench You’re Not Afraid to Sit On
The bench is the workhorse of your entryway organizer. It needs to be comfortable, stable, and sized so you’re not tripping over it.
1. Cut or Confirm Bench Size
If you bought a pre-cut board, confirm the length fits your taped layout. If you’re cutting:
- Ideal bench depth: 11"–14" (enough for adults to sit and tie shoes).
- Ideal bench length: 30"–48" depending on wall space.
Mark your cut line, support the board on sawhorses or a sturdy surface, and cut using a circular saw or hand saw. Lightly sand the cut edge.
2. Attach Legs or Build Simple Box Supports
Using metal bench legs:
- Flip the bench top upside down.
- Position legs 1"–2" in from each end for stability.
- Pre-drill pilot holes (slightly smaller than your screws) to prevent splitting.
- Attach legs with the provided screws or wood screws of appropriate length.
Building simple 2x2 box legs:
- Cut four 2x2 legs to 17" length (for an ~18" finished bench height with a 1" top).
- Cut four 2x2 pieces for side rails (depth minus ~3"; example: for a 12" deep bench, cut 9" rails).
- Screw rails between pairs of legs to form two rectangular “U” frames.
- Attach each “U” frame to the underside of the bench with wood screws, making sure everything is square.
Check for wobble on a flat surface. If the bench rocks, adjust by loosening screws, shifting slightly, and re-tightening. Add felt pads or rubber feet to protect floors and improve grip.
3. Sand and Seal
Even a quick finishing pass makes the bench look cleaner and last longer.
- Sand all surfaces with 120-grit, then 220-grit.
- Wipe dust with a slightly damp cloth.
- Seal with:
- Clear polyurethane for a natural wood look, or
- Paint + clear topcoat for color and durability.
Apply at least two coats, lightly sanding with 220-grit between coats. Let it cure according to the product instructions before regular use.
Create a Wall-Mounted Hook Rail That Hits the Studs
Loose hooks are frustrating and unsafe. Mounting them to a board that’s anchored into studs gives you a strong, clean-looking solution.
4. Build and Mount the Hook Rail
Prepare the rail:
- Cut your hook rail board to match or slightly exceed the bench width.
- Lightly sand edges and surfaces.
- Optionally paint or stain the board now; it’s easier before mounting.
Find wall studs:
- Run the stud finder along the taped area where your hook rail will go.
- Mark stud locations lightly with pencil.
- Most studs are spaced 16" apart, center-to-center.
Pre-drill rail mounting holes:
- On your rail board, mark screw locations so at least 2 screws line up with studs.
- Pre-drill countersunk holes (so screw heads sit flush or slightly recessed).
Attach rail to wall:
- Hold the rail at your intended height (use your tape marks).
- Place a level on top to ensure it’s straight.
- Have a helper hold it OR temporarily support it with screws in wall anchors at each end.
- Drive long wood screws through the pre-drilled holes into the studs.
If you can’t hit a stud at a needed point, use heavy-duty wall anchors rated for at least 25–50 lbs each.
Install hooks:
- Mark equally spaced positions along the rail (common spacing: 6"–8" apart).
- Pre-drill pilot holes for hook screws.
- Attach hooks according to the manufacturer’s instructions, staying straight and level.
Aim to provide:
- 3–4 hooks for a small household
- 6–8 hooks for families or shared spaces
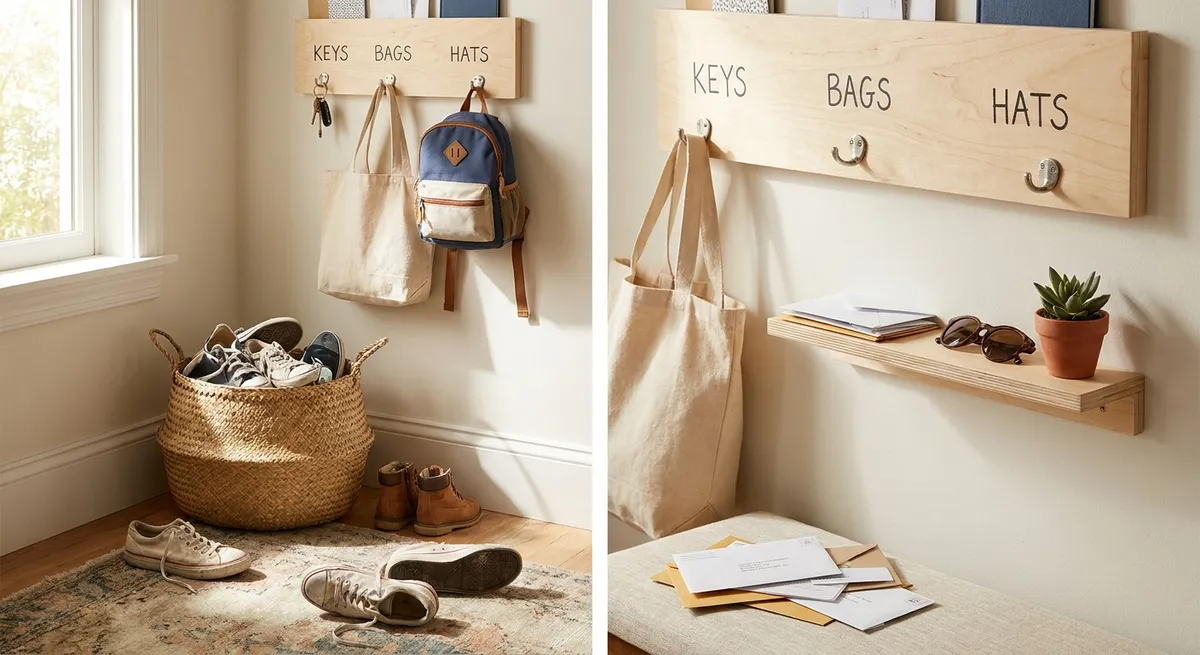
Add Storage That Matches Real-Life Clutter (Shoes, Keys, Bags, Mail)
The final step is making sure everything has a home. Think in layers: floor, bench, hooks, and a small “catch-all” zone.
5. Dial In Smart Storage Details
Under-bench storage:
- Choose low baskets or bins that slide easily under the bench.
- Open bins for shoes and boots.
- Lidded bins for seasonal gear (hats, gloves, scarves).
- If your floor is uneven, use bins with a bit of flexibility, like fabric or woven baskets.
Above-bench add-ons (optional):
- Install a narrow shelf (1" x 6" board) above the hook rail for hats or decor.
- Use small labeled boxes for keys, wallets, and sunglasses.
Micro-organization tweaks:
- Mount a small key rack or magnetic strip near the door handle.
- Add a wall-mounted mail sorter for incoming/outgoing mail to avoid counter piles.
- Use labels on baskets—simple painter’s tape and marker is enough—to train everyone where things go.
Test and adjust:
Live with the organizer for a week:
- Notice what still ends up on the floor or nearby surfaces.
- Add a hook, basket, or tray specifically for that item instead of fighting the habit.
- If kids can’t reach their hooks, add a lower row or individual hooks at their height.
The goal is not a perfect, showroom entryway—it’s a system that quietly handles your daily mess with minimal effort.
Conclusion
This entryway organizer project turns a chaotic drop zone into a simple, dependable system you’ll use every single day. By planning around your habits, sticking to basic materials, and anchoring things properly, you get a sturdy bench, reliable hooks, and storage that matches real life—not just a staged photo.
Once you’ve built this, you’ll be more confident tackling other DIY upgrades: wall shelves, simple storage furniture, or even a full mudroom expansion. Start with one small, high-impact project like this, and your home—and routines—will feel noticeably more manageable.
Sources
- [U.S. Consumer Product Safety Commission – Anchor It! Campaign](https://www.cpsc.gov/Safety-Education/Safety-Education-Centers/Anchor-It) - Guidance on safely anchoring furniture and wall-mounted items to prevent tip-overs
- [Family Handyman – How to Use a Stud Finder](https://www.familyhandyman.com/project/how-to-use-a-stud-finder/) - Practical tips for locating studs accurately in typical home walls
- [This Old House – How to Build a Storage Bench](https://www.thisoldhouse.com/furniture/21017757/how-to-build-a-storage-bench) - Detailed overview of bench dimensions, basic construction, and finishing ideas
- [Lowe’s – How to Install Wall Anchors](https://www.lowes.com/n/how-to/install-wall-anchors) - Explains different anchor types and how to choose and install the right ones for your wall
- [Benjamin Moore – How to Choose Interior Paint Finishes](https://www.benjaminmoore.com/en-us/interior-exterior-paints-stains/how-to-advice-interior-painting/how-to-choose-an-interior-paint-finish) - Useful for selecting durable finishes for benches, trim, and high-traffic areas
Key Takeaway
The most important thing to remember from this article is that this information can change how you think about DIY Projects.


