Floating shelves are one of the most useful and beginner‑friendly DIY projects you can tackle. They add storage, show off your favorite items, and make a room feel more polished—all without taking up floor space. This project works in living rooms, bedrooms, kitchens, and even bathrooms, and you can customize it to match almost any style.
Below is a straightforward guide with five clear steps to plan, build, and install strong, level floating shelves that actually stay on the wall.
Step 1: Plan Your Shelf Layout and Dimensions
Before you pick up a tool, decide exactly what you want your shelves to do.
Think about:
- Location and purpose: Over a sofa for decor? In a kitchen for dishes? Above a desk for office storage? The use will decide how deep and strong they need to be.
- Height and spacing:
- For books or decor: 10–14 inches between shelves.
- For dishes: 12–16 inches.
- For above a desk: 18–24 inches above the work surface.
- Shelf length: Longer shelves look great but need more support. Beginners often do best around 24–48 inches long.
- Shelf depth:
- Light decor: 6–8 inches.
- Books, dishes, storage: 9–12 inches.
Grab a tape measure and painter’s tape. Mark the proposed shelf locations on the wall with tape so you can step back and see if the layout looks balanced relative to furniture, windows, and outlets.
Write down:
- Number of shelves
- Length, depth, and thickness (e.g., 36" long x 10" deep x 1 1/2" thick)
- Where they’ll go on the wall (height from floor or from a reference, like a countertop)
This planning step prevents surprises once you start drilling holes in the wall.
Step 2: Choose Materials and Hardware That Can Handle the Load
The strength of a floating shelf comes from the combination of shelf material, internal support (or bracket), and how it’s anchored to the wall.
Shelf materials (common beginner‑friendly options):
- Solid wood boards (pine, poplar, oak)
- Easy to cut and finish.
- 1" or 2" thick boards work well for most home use.
- Plywood (3/4") with edge banding
- More stable, less likely to warp.
- Great if you want a modern, painted or veneered look.
Support options for “floating” look:
Heavy‑duty floating shelf brackets
- Metal brackets that mount to the wall and slide into holes in the shelf. - Choose brackets rated for more weight than you plan to store.
DIY cleat system (hidden inside a hollow shelf box)
- A 2x2 or 1x3 board (the cleat) is screwed into studs. - A hollow “box” shelf slides over and is screwed in from underneath.
If this is your first project, floating shelf brackets are usually simpler and cleaner.
Hardware you’ll need:
- 2 ½" to 3" wood screws (for studs)
- Quality wall anchors (if you must mount between studs, for light loads only)
- Wood glue (for laminating boards or building a box shelf)
- Sandpaper (120, 180, and optionally 220 grit)
- Wood finish: paint, stain + clear coat, or clear polyurethane
Always check the weight rating of the brackets and anchors and compare it to what you plan to store. Books and dishes are heavier than they look.
Step 3: Cut, Assemble, and Finish Your Shelves
With your dimensions decided and materials ready, it’s time to build the shelves themselves.
1. Cut to size
- Use a circular saw, miter saw, or handsaw to cut your boards or plywood to length.
- If you’re using plywood, clamp a straightedge as a guide for cleaner cuts.
2. Optional: Build thicker shelves or a box
- For a chunky look, you can:
- Glue two boards together face‑to‑face, or
- Build a hollow “U” or box from plywood: top, bottom, and front piece, leaving the back open to fit over a cleat or bracket.
- Use wood glue along edges and clamp until dry. Add brad nails or screws for extra strength if needed.
3. Sand everything smooth
- Start with 120‑grit sandpaper to remove saw marks and soften edges.
- Move to 180‑grit (and 220‑grit if you want a very smooth finish).
- Lightly round over front corners and edges so they’re comfortable to touch and less prone to chipping.
4. Apply your finish
- Staining:
- Wipe off dust.
- Apply wood conditioner on softwoods like pine if you want a more even stain.
- Apply stain with a brush or rag, wipe off excess, and let dry.
- Seal with 2–3 coats of clear polyurethane or water‑based topcoat, sanding lightly between coats.
- Painting:
- Prime first, especially on bare wood or MDF.
- Apply 2 coats of paint with a foam roller or quality brush.
- Optionally topcoat with a clear finish for durability, especially in kitchens and baths.
Finishing the shelves before mounting them is much easier and gives you a cleaner result.
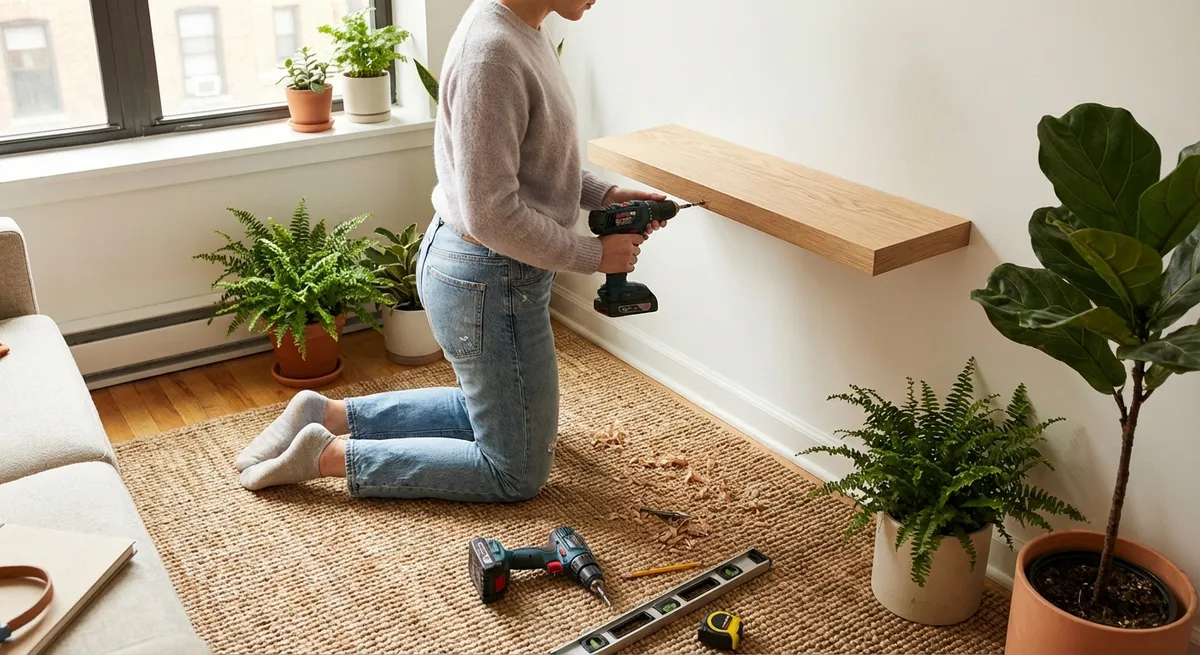
Step 4: Find Studs and Install the Supports Accurately
For strong, sag‑free shelves, your brackets or cleats must be anchored securely and leveled carefully.
1. Locate studs
- Use a stud finder to scan the wall where you plan to install each shelf.
- Mark each stud center lightly with a pencil at the approximate shelf height.
- Confirm by driving a thin nail or screw through the drywall at one mark—you should feel solid wood. Patch any test holes later if misplaced.
2. Mark bracket or cleat positions
- Hold the bracket or cleat against the wall at your planned shelf height.
- Use a level to get it perfectly horizontal.
- Mark the screw hole locations on the wall over studs whenever possible.
3. Pre‑drill and mount
- Drill pilot holes slightly smaller than your screws at the marked locations.
- For holes that don’t land on studs and are only carrying light decor, use appropriate wall anchors—never cheap plastic ones for heavy loads.
- Attach the bracket or cleat with 2 ½"–3" wood screws into studs. Tighten firmly but don’t overtighten and strip the wood.
4. Double‑check alignment
- If your shelf uses multiple brackets, use a long level or a straight board across them to make sure they line up in both height and depth.
- Misaligned brackets will twist the shelf or make it hard to slide on. Take the time to adjust now before moving on.
Accurate support installation is the difference between shelves that feel solid and shelves that wobble or sag.
Step 5: Mount the Shelves and Test Their Strength
With your shelves finished and supports installed, final assembly is straightforward—but still worth doing carefully.
1. Fit the shelves on the supports
- Slide the shelves onto the floating brackets or over the cleat.
- If you drilled holes for rods, they should slide on snugly but not require force.
- If you built a box shelf over a cleat, push it fully back until the rear edge meets the wall.
2. Secure the shelves to the supports
- From underneath, use short screws (that won’t poke through the top) to secure the shelf to the bracket or cleat, if your design allows.
- Pre‑drill small pilot holes to prevent splitting.
- For box shelves, drive screws through the underside into the cleat to lock everything in place.
3. Check for level and adjust if needed
- Place a level on the front edge of each shelf.
- If a shelf is slightly off, you may be able to loosen the screws, shim behind the bracket or cleat with thin cardboard or wood shims, then retighten.
4. Load gradually and test
- Start with a moderate load—books, dishes, or decor—rather than the heaviest items you own.
- Watch and feel for any sagging, movement, or creaking.
- If a shelf flexes noticeably, reduce the load immediately and reassess:
- Are enough brackets attached to studs?
- Is the shelf material too thin for the span and weight?
- Do you need an additional bracket in the center?
Once the shelves prove stable, you can arrange your items and enjoy the extra storage and cleaner look of your room.
Conclusion
A floating shelf system is a practical DIY project that delivers real improvements in storage and style without needing advanced tools or skills. By planning your layout, choosing the right materials, installing supports into studs, and taking the time to finish the wood properly, you’ll end up with shelves that look good and hold up to everyday use.
You can repeat this same five‑step process for other areas of your home—over the toilet in a bathroom, above a dresser in a bedroom, or next to a range hood in the kitchen—adjusting shelf size and bracket strength to match what you plan to store. Done right, these shelves will feel like built‑ins at a fraction of the cost.
Sources
- [Family Handyman – How to Build Floating Shelves](https://www.familyhandyman.com/project/how-to-build-floating-shelves/) - Step-by-step example of building and mounting floating shelves, including a cleat-style design.
- [This Old House – Building and Installing a Floating Shelf](https://www.thisoldhouse.com/shelving-storage/21015109/how-to-build-a-floating-shelf) - Detailed tutorial on floating shelf construction and installation tips.
- [Lowe’s – How to Use a Stud Finder](https://www.lowes.com/n/how-to/use-a-stud-finder) - Explains how to accurately locate wall studs for secure mounting.
- [U.S. Consumer Product Safety Commission – Anchor It!](https://www.cpsc.gov/AnchorIt) - General safety guidance on securing items to walls to prevent tip-overs and accidents.
- [Minwax – Wood Finishing How-To](https://www.minwax.com/wood-projects/how-to) - Guides on staining, sealing, and protecting wood surfaces for durable finishes.
Key Takeaway
The most important thing to remember from this article is that this information can change how you think about DIY Projects.


