Floating shelves are one of those DIY projects that look advanced but are totally doable with basic tools. They add storage, clean up clutter, and instantly make a room look more finished. This guide walks you through building a sturdy, level floating shelf from scratch—no kits required.
You’ll learn how to plan, cut, assemble, mount, and finish your shelf so it looks clean and stays solid on the wall.
Plan Your Shelf (Size, Location, and Load)
Before you touch a tool, decide exactly what your shelf needs to do. A little planning here prevents sagging, crooked shelves later.
First, choose the wall and purpose. A bookshelf, a plant shelf, and a bathroom shelf all have different depth and weight demands. For most rooms, a depth of 8–10 inches works well for decor; 10–12 inches is better for books or heavier items. Make sure there’s no obvious obstruction: check for light switches, outlets, window trim, and nearby doors.
Next, decide on length. Longer shelves look great but need more support. As a rule of thumb, anything over 36 inches should hit at least two wall studs for solid anchoring. Measure the wall, mark a realistic length, and leave a bit of visual margin from the corners or other furniture.
Now think about weight. If you plan to store books, speakers, or heavy kitchen items, rely on studs—skip the idea of just wall anchors. For lighter decor, good-quality heavy-duty wall anchors can work, but studs are always safer. Sketch your shelf: note the length, depth, thickness (typically 1.5–2 inches for a floating look), and mounting height.
Finally, make a simple materials list. At minimum, you’ll need: a 2x2 or 2x3 for the hidden bracket, plywood or board for the shelf “box,” wood screws, wall anchors or lag screws (if hitting studs), wood glue, sandpaper, and your chosen finish (paint or stain). Planning these details up front keeps you from making an extra run to the hardware store mid-project.
Gather Tools and Materials Before You Start
Having everything ready makes the build smoother and safer. You don’t need a full workshop—just the essentials.
At a minimum, you’ll want a tape measure, pencil, and a reliable level (a 24-inch level is ideal so you can check more of the shelf at once). A stud finder is highly recommended; it helps you anchor into solid framing instead of just drywall. You’ll also need a drill/driver with bits for drilling pilot holes and driving screws.
For cutting, a circular saw, miter saw, or even a good handsaw can work. A clamp or two helps keep pieces steady when cutting or assembling. If you’re working with plywood, a straightedge guide (even a long scrap board) helps keep cuts straight. Safety gear—safety glasses, hearing protection, and a dust mask when sanding—should be non-negotiable.
In terms of materials, pick straight, dry boards. For the hidden bracket, a 2x2 or 2x3 is usually enough strength for standard shelves. For the shelf itself, you can use ¾-inch plywood or a solid wood board. If you want a thick, modern look, you’ll build a hollow box around the bracket so it appears chunky without being heavy.
Set up a work area with good lighting and a sturdy surface. A pair of sawhorses and a sheet of plywood or a workbench works well. Laying everything out within reach makes each step faster and reduces mistakes caused by rushing or improvising.
Build the Hidden Support Frame
The strength of your floating shelf depends on the hidden frame (or cleat) you attach to the wall. This step is all about making that support straight, secure, and sized correctly.
Start by cutting your 2x2 or 2x3 to the length of your desired shelf minus about ½–1 inch. This gives you a little wiggle room inside the hollow shelf box. If you want extra support on a longer shelf, you can add perpendicular “arms” that extend out from this back piece, forming a simple bracket frame that slides into the shelf.
Find the studs in your wall with a stud finder and lightly mark them with a vertical pencil line. You want your support board to span at least two studs. If your planned shelf length doesn’t hit two studs, consider slightly adjusting the length or position so it does—this dramatically increases strength.
Hold the support board against the wall at your planned height and use a level to get it perfectly horizontal. Lightly trace the top edge and mark where it crosses the stud lines. Take the board down and drill pilot holes through the board at those mark points—these will be the screw locations that go into the studs.
Finally, pre-drill matching pilot holes in the wall into the studs. Mount the support board with heavy-duty wood screws or lag screws (2.5–3 inches long for typical drywall over studs). As you tighten the screws, recheck with the level to make sure the support doesn’t twist out of level. A solid, level support frame is the backbone of a good floating shelf.
Build and Attach the Shelf “Box”
Now you’ll build the visible shelf that slides over the hidden frame. This gives you the clean, floating look.
Cut the top and bottom pieces from ¾-inch plywood or solid wood to match your desired shelf length and depth. Then cut the front face strip and any side pieces (if you want the shelf to be closed on both ends) from the same material, usually 1.5–2 inches wide to create a thick profile. Dry-fit these pieces around your mounted support to confirm they slide over it without binding.
Assemble the box on your work surface, not on the wall. Lay the bottom piece down, apply wood glue along the edges where the front and sides will go, and clamp if available. Pre-drill small pilot holes and use short wood screws or brad nails to secure the front and side faces to the bottom. Repeat with the top piece, forming a hollow box. Wipe away any squeeze-out glue with a damp cloth before it dries.
Once assembled, test-fit the box over the wall-mounted support. It should slide on snugly but not so tight that you have to force it. If it’s too tight, lightly sand the inside surfaces or adjust any interference points. When the fit is right, mark inside the box where the support sits to guide your final fastening.
To attach the box permanently, slide it onto the support and drill upward or downward through the top or bottom into the support frame, using countersunk wood screws. Place screws near the studs for added strength and hide them toward the back where they’re less visible. The result should be a solid, wobble-free shelf that looks like a single, thick plank floating on the wall.
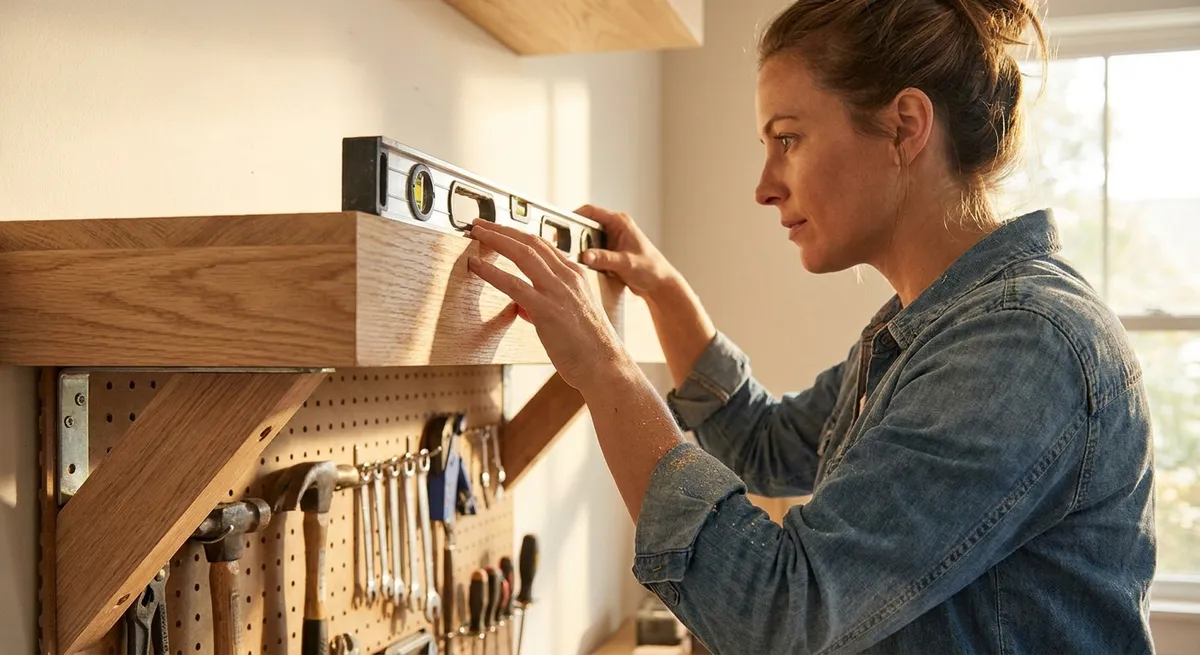
Sand, Finish, and Check for Level
The final step is all about making the shelf look good and ensuring it stays straight over time.
Start with sanding. Use medium-grit sandpaper (around 120–150 grit) to smooth all visible surfaces and slightly break sharp edges. Then move to a finer grit (180–220) for a smoother finish, especially if you’re staining. Always sand in the direction of the wood grain to minimize scratches that will show up after finishing.
Choose your finish based on the room and look you want. For a natural wood look, apply a wood stain followed by a clear polyurethane or water-based topcoat for protection. For a painted shelf, use a primer first (especially on bare wood or MDF) and then a durable trim or furniture paint. Apply thin, even coats and allow proper drying time between coats according to the product instructions.
Once the finish is dry, load the shelf gradually. Before stacking it full, use your level to check that it’s still perfectly level and hasn’t pulled or sagged under weight. If you see sagging or movement, reduce the load and reassess your fasteners and stud placement.
Consider adding small felt pads or clear bumpers along the wall edges if you notice any tiny gaps; this can help keep the shelf from shifting and reduce vibration. Finally, style the shelf with a mix of lighter and heavier items, placing the heavier objects closer to where the hidden support and studs are located. Done right, your floating shelf will look clean, modern, and remain rock-solid for everyday use.
Conclusion
A solid, level floating shelf is a great “confidence builder” project for any DIYer. You learn how to plan for weight, find studs, build a simple structure, and finish wood so it looks good in your space. Once you’ve done one, you can repeat the process for multiple rooms—adjusting size, finish, and style to suit each area of your home.
Take your time with measuring, leveling, and fastening into studs. Those steps matter more than fancy tools. When you’re ready, you can adapt this basic method to corner shelves, longer runs of shelving, or even built-in style feature walls.
Sources
- [U.S. Consumer Product Safety Commission – Anchor It!](https://www.cpsc.gov/anchorit) - Guidance on safely anchoring furniture and shelving to prevent tip-overs
- [Family Handyman – How to Build and Install Floating Shelves](https://www.familyhandyman.com/project/how-to-build-and-install-floating-shelves/) - Practical reference for construction methods and mounting options
- [Lowe’s – How to Find a Wall Stud](https://www.lowes.com/n/how-to/find-a-wall-stud) - Explains different techniques and tools for accurately locating studs behind drywall
- [Minwax – Staining Interior Wood](https://www.minwax.com/how-to-advice/wood-staining-how-to) - Detailed instructions on choosing and applying wood stain and protective finishes
Key Takeaway
The most important thing to remember from this article is that this information can change how you think about DIY Projects.


