A wall-mounted pegboard station is one of the quickest ways to get your home, tools, or hobby supplies under control without building bulky furniture or doing major remodeling. This project works in garages, laundry rooms, home offices, craft corners, or even entryways. You’ll end up with a flexible storage system you can easily reconfigure as your needs change—no advanced carpentry skills required.
Below is a practical, step-by-step guide to building a pegboard station that looks clean, holds up over time, and actually gets used.
Plan Your Pegboard Station with a Purpose
Before you buy materials, decide exactly what this pegboard needs to do. Planning first saves time, holes in your wall, and wasted money.
Think about location: garage wall, inside a closet, above a desk, near a workbench, or by the back door for keys and bags. Stand in that spot and ask what you want within arm’s reach: hand tools, cleaning supplies, mail, kids’ art supplies, or craft gear. Use painter’s tape to mark a rough outline of where the pegboard might go and see if doors, cabinets, or appliances will interfere.
Measure the width and height of the open wall space, then subtract a couple of inches on each side so the board doesn’t crowd nearby trim or outlets. Decide if one large sheet or two smaller panels will work better. Smaller panels are easier to handle and can be arranged in a grid or side-by-side. Finally, sketch a simple layout: where hooks, small shelves, or baskets might go. You don’t have to be exact, but a rough drawing helps you buy the right hardware in one trip.
Gather the Right Materials and Tools
Once you know the size and location, gather materials that will support the weight of what you’re hanging. Pegboards are simple, but the wrong hardware can make them sag, pull away, or feel flimsy.
Most home centers sell standard hardboard pegboard (often 1/4" thick with 1/4" holes), as well as metal or MDF versions. For most indoor home uses, traditional hardboard is fine, but in damp garages or basements, consider metal or moisture-resistant panels. You’ll also need a way to create a gap between the pegboard and wall so hooks can slide into the holes—usually wood furring strips or a ready-made pegboard mounting kit.
A basic supply list typically includes: pegboard panels cut to size, 1x2 furring strips or a metal mounting system, wood screws, wall anchors (for drywall), and a variety pack of pegboard hooks and accessories. For tools, you’ll want a stud finder, drill/driver with bits, level, tape measure, pencil, and a saw if you need to cut furring strips or pegboard to fit. Safety glasses and a dust mask are smart if you’re cutting or drilling overhead.
Step 1: Locate Studs and Prep the Wall
This first step determines how secure your pegboard will feel. Properly attached to studs, it can hold tools, hardware, and small shelves without flexing or pulling out.
Use a stud finder to locate the vertical studs behind your drywall or plaster where the pegboard will hang. Mark their centers lightly with pencil at the top and bottom of your planned area. If your wall is unfinished (like an open stud garage wall), you can screw directly into the exposed studs and skip anchors.
Clear the working area: move furniture, remove any existing hooks or art, and give the wall a quick wipe so tape and marks stick. If there are outlets or switches inside your planned pegboard zone, note their positions carefully. You can either plan your pegboard to stop above them, or you’ll need to cut openings in the panel to keep them accessible. Finally, lay the pegboard panel(s) on the floor where you can reach them easily; it’s easier to pre-mark mounting holes now than while holding the board on the wall.
Step 2: Build the Spacer Frame for Air Gap
Pegboard only works if there’s space behind it for hooks. Without that gap, hooks won’t go in fully or will constantly pop out. A simple spacer frame made from 1x2 boards or furring strips solves this.
Measure and cut horizontal and vertical strips to create a simple rectangle the size of your pegboard. You can run strips across the top and bottom, plus at each stud location you marked earlier. Hold a strip against the wall at one of your stud marks and use a level to ensure it’s straight. Pre-drill through the strip into the stud (or use wall anchors if there’s no stud) and fasten it securely with wood screws.
Repeat for the remaining strips, creating a flat “grid” that stands off the wall by about 3/4". This wooden frame is what your pegboard will attach to. Before moving on, stand back and check that all strips are roughly in the same plane. Any major high or low spots will make the pegboard twist or flex later. If needed, adjust screws or add a thin shim behind a strip to get everything aligned.
Step 3: Mount the Pegboard Panel Securely
With the spacer frame in place, you can now attach the pegboard itself. This step transforms your blank wall into a usable surface, so take your time to get it straight and solid.
Lift the pegboard into position (having a second person helps) and rest it temporarily on a sturdy box or step stool so you don’t have to hold the full weight. Align the edges with your frame and use a level to make sure the top edge is perfectly horizontal. Once you’re happy with the position, mark several mounting points through the pegboard holes into the wood strips behind—aim for at least one screw near each corner and every 12–16" along the edges and across the middle.
Take the board down briefly and pre-drill small pilot holes where you marked to make driving screws easier and reduce the risk of chipping. Then place the pegboard back on the frame, line up the holes, and drive your screws with a drill/driver, but don’t over-tighten—you want the board snug, not crushed. Check alignment as you go; minor adjustments now will prevent a crooked look that’s obvious once the wall is full of hooks.
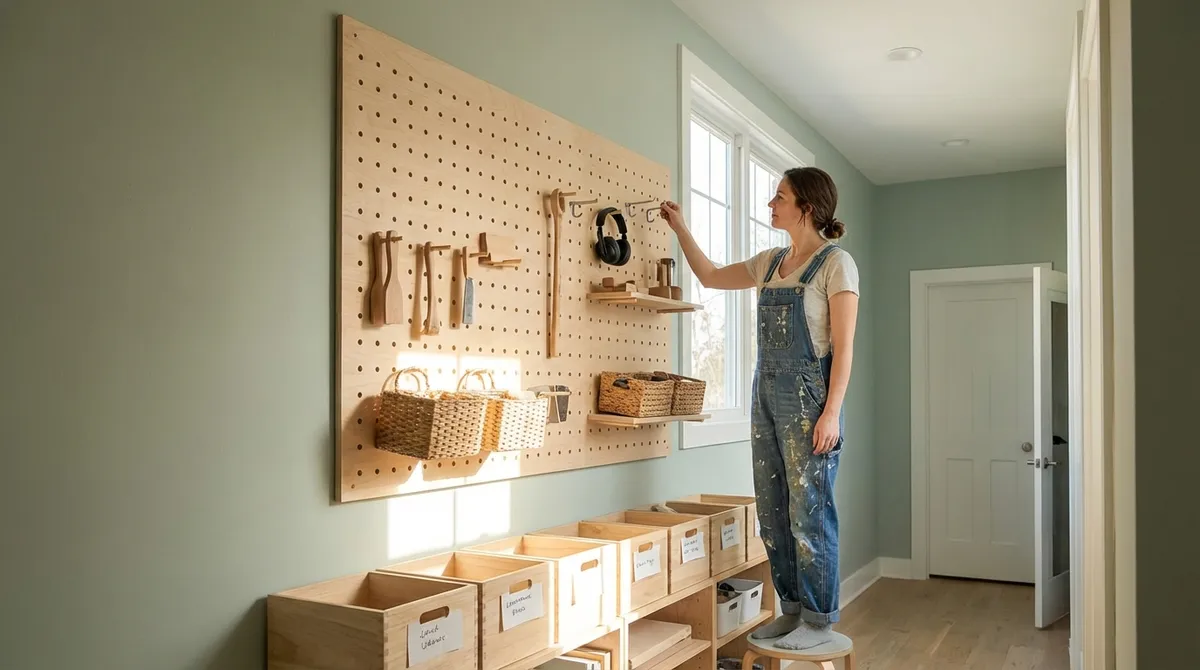
Step 4: Add Hooks, Bins, and Mini-Shelves Thoughtfully
With the board mounted, it’s tempting to throw hooks up randomly, but a little planning creates a station that’s genuinely efficient. Think in zones: frequently used items in the center at eye level, heavier things lower down, and lighter or less-used items higher.
Start by laying your tools or items on a table and grouping them: hand tools together, cleaning supplies together, craft tools together, etc. Then begin placing hooks: single hooks for items with holes, double hooks for things like tape rolls or hand saws, and longer hooks or brackets for small shelves. Pegboard accessory kits often include baskets and small bins—use these for items that don’t hang well, like glue sticks, screws, or markers.
As you hang items, step back a few times and see if the layout feels intuitive. Items you grab daily should be within one or two steps and easy to return to their spot. If something feels awkward, adjust the hooks. That’s the benefit of pegboard: you can rearrange without tools or new holes. Consider labeling certain sections (with small tags or tape) if multiple people in the home will use the area; this helps everyone put things back consistently.
Step 5: Customize Finishes and Maintain Over Time
A basic pegboard station works fine, but small custom touches can extend its life and make it fit your space better. Paint the pegboard and frame before or after installation to match your wall or provide contrast. Use a primer suitable for hardboard or MDF, then a durable topcoat—semi-gloss is easier to wipe clean, especially in messy zones like laundry rooms or workshops.
You can also screw narrow boards or trim pieces to the front of the pegboard to create defined “lanes” or to support deeper shelves. For example, a small painted shelf can hold jars of hardware or craft supplies, while magnetic strips mounted on the board can store bits, blades, or small metal tools. If you’re in a damp area like a basement or garage, periodically check the board for swelling or warping; if you see damage, consider sealing exposed edges with paint or upgrading to metal panels.
Maintenance is simple: every few months, take five minutes to declutter the station. Remove tools or items you never use, wipe down dusty surfaces, and re-balance the load so heavy items are still anchored over studs. As your needs change—new hobbies, new tools, kids getting older—treat the pegboard like a living layout. Swap hooks, move bins, and adjust zones so the station stays useful instead of becoming another cluttered corner.
Conclusion
A wall-mounted pegboard station is a straightforward DIY project that delivers real, everyday benefits: less clutter, faster access to tools and supplies, and a workspace that’s easier to keep organized. By planning your layout, anchoring into studs, adding a proper spacer frame, and arranging hooks with intention, you’ll build a storage solution that can evolve with you. It’s a low-cost, high-impact upgrade you can finish in an afternoon—and enjoy every time you reach for the right tool in the right place.
Sources
- [Family Handyman – How to Install Pegboard](https://www.familyhandyman.com/project/how-to-install-pegboard/) - Step-by-step pegboard installation guidance and layout tips for garages and workshops
- [Lowe’s – How to Hang and Use Pegboard](https://www.lowes.com/n/how-to/hang-and-use-pegboard) - Practical overview of materials, mounting options, and accessory choices
- [This Old House – Organizing Tools with Pegboard](https://www.thisoldhouse.com/garages/21017711/organizing-tools-with-pegboard) - Ideas for tool arrangement, zoning, and pegboard customization
- [U.S. Consumer Product Safety Commission – Anchoring and Mounting Safety](https://www.cpsc.gov/Safety-Education/Safety-Education-Centers/Anchor-It) - General guidance on safely anchoring items to walls to prevent tipping and failure
Key Takeaway
The most important thing to remember from this article is that this information can change how you think about DIY Projects.


