If your counters, floors, and tables are turning into storage zones, wall-mounted solutions are one of the fastest ways to take control. This guide walks you through a practical project you can tackle in a weekend: building and installing simple wall-mounted storage that actually fits your space and stuff. You’ll learn how to plan, safely mount to studs or anchors, and finish it in a way that looks intentional—not improvised.
Plan a Wall Storage System That Fits Your Space
Before you touch a tool, spend a few minutes figuring out what you’re solving.
Walk the space and list what needs a home: tools, cleaning supplies, pantry items, bathroom products, or kids’ gear. Group similar items by size and weight—heavy power tools and paint cans need deeper, stronger shelves than light decor or toiletries.
Measure the wall area you plan to use: width, height, and any obstacles (outlets, switches, doors, windows). Note how high you can comfortably reach; storage you can’t access easily will just collect dust. Take photos and rough sketches with measurements—this makes it easier to double-check before you cut or buy anything.
Decide on your main storage type: open shelves, a rail with hooks, shallow wall cabinets, or a mix. For multipurpose spaces (like entryways or laundry rooms), combining a small shelf with hooks underneath often gives the best daily-use payoff. Finally, set a simple goal (for example: “All cleaning supplies off the floor” or “All hand tools off the workbench”) so you know when the project is “done” and not an endless upgrade.
Choose the Right Materials and Hardware
The materials you choose determine how long your storage lasts—and how safe it is.
For most indoor projects, 3/4-inch plywood or solid wood boards (like pine or poplar) work well for shelves. Avoid thin particleboard for heavy loads; it sags and fails faster. If you’re storing heavier items (like paint, books, or tools), aim for shelves no deeper than 12 inches to reduce leverage on the wall.
Use sturdy metal brackets or wood cleats for support. Check the bracket’s weight rating and remember it’s per bracket, not per shelf. If you can, choose hardware with mounting holes that align with standard stud spacing (typically 16 inches on center in many U.S. homes) so you can hit at least two studs.
Gather these basics:
- Stud finder (or alternative methods like measuring from corners and verifying with a small nail)
- Tape measure and pencil
- Level (2-foot or longer is best)
- Drill/driver with wood and masonry bits (if needed)
- Wood screws rated for structural use
- Wall anchors rated for the load if you can’t hit studs everywhere
- Sandpaper (120–220 grit), paint or clear finish, and a brush or roller
If you’re renting or want minimal wall damage, consider French cleats or track systems that spread weight across multiple fasteners in fewer locations.
Step 1: Map and Mark Your Layout on the Wall
Start by marking where everything will go before drilling.
Lightly pencil a horizontal line on the wall where you want the top of your lowest shelf or rail. Use a level so the line is perfectly straight; even a small tilt will be noticeable once items are on the wall. From that line, mark additional lines above it for more shelves or hooks, keeping at least 12–16 inches vertically between shelves for most household items.
Use your stud finder along each horizontal line to locate wall studs. Mark the stud centers with small vertical ticks. If your stud finder is uncertain, verify by driving a small finish nail through the drywall where a stud should be. A solid feel and resistance usually means you’ve hit wood; patch and move slightly if you haven’t.
Once studs are marked, decide where your brackets or cleats will land. Try to align as many fastener points as possible with studs, especially for the heaviest sections. Step back and visually check your layout: Does the spacing look balanced? Are you clear of outlets and switches? Make any adjustments now—it’s easier to erase pencil lines than patch holes.
Step 2: Cut, Smooth, and Pre-Finish Your Shelves
Cutting and finishing before installation makes the job cleaner and faster.
Based on your wall measurements, cut your boards or plywood to length. Leave a little clearance (about 1/8 inch) on each end if you’re fitting between walls or tight spaces so you can angle shelves into place without jamming. Label each piece lightly in pencil (e.g., “Top,” “Middle,” “Bottom”) to keep track.
Round over any sharp front edges with sandpaper or a sanding block—this not only feels better in daily use but also reduces chipping and splinters. Sand all surfaces with 120–150 grit, then finish with 180–220 grit for a smoother surface. Wipe off sanding dust with a slightly damp cloth or tack cloth.
Apply your chosen finish before mounting: paint, stain with clear topcoat, or just a clear polyurethane or water-based protective finish. Pre-finishing means you’re not trying to paint around brackets and walls later. Let everything dry completely per the product instructions, and avoid stacking freshly finished boards directly on each other so they don’t stick or mar.
Step 3: Secure Brackets or Cleats Safely to the Wall
The wall attachment is where safety really matters, especially for heavier loads.
Start with the first bracket or cleat at one end of your planned shelf. Line it up with your pencil marks and check it with a level vertically. Pre-drill pilot holes into studs where you’ve marked them—this reduces the risk of splitting and makes screws drive straighter. Use screws long enough to penetrate at least 1–1.5 inches into the stud, typically 2.5–3 inches total length for standard drywall and stud construction.
If you must mount into drywall where no stud exists, use heavy-duty wall anchors rated for the expected weight plus a safety margin. Follow the anchor manufacturer’s instructions closely: some require pre-drilling, others are self-drilling. Avoid using plastic expansion anchors for anything more than very light loads.
Install the second bracket or cleat at the other end of the shelf location and use your level across both to ensure they’re perfectly aligned before fully tightening the screws. For longer spans, add a middle bracket or cleat for extra support; this is especially important for loads like books or tools that concentrate weight in a small space.
Double-check all brackets once installed by giving them a firm upward and downward tug. There should be no noticeable movement. If something feels loose, fix it now rather than after the shelf is loaded.
Step 4: Mount Shelves and Add Edge Protection or Rails
Once your supports are secure, it’s time to put the storage surface in place.
Set each shelf on its brackets or cleats and slide it into final position. Use a level on top to confirm it’s flat front-to-back and side-to-side; minor wall irregularities can throw things off. If everything is level and aligned, secure the shelf to the brackets using the pre-drilled holes in the brackets themselves, or drive short wood screws up through cleats into the bottom of the shelf.
For open shelves storing items that might slide (like jars, small boxes, or bathroom products), consider adding a simple front lip. You can attach a thin strip of wood (1x2 or similar) to the front edge of the shelf to act as both a stop and a finished trim piece. This also stiffens the front edge, helping to prevent sagging.
In high-traffic areas or for taller shelves, you can add a low side or back rail using thin wood strips or metal rod to keep items from being pushed off accidentally. For kids’ spaces, this is especially useful for lightweight bins or toys.
After everything is secured, load your shelves gradually. Start with lighter items to make sure the system feels solid, then add heavier ones. If you notice any movement or sagging, redistribute weight, add another bracket, or reinforce with an additional cleat.
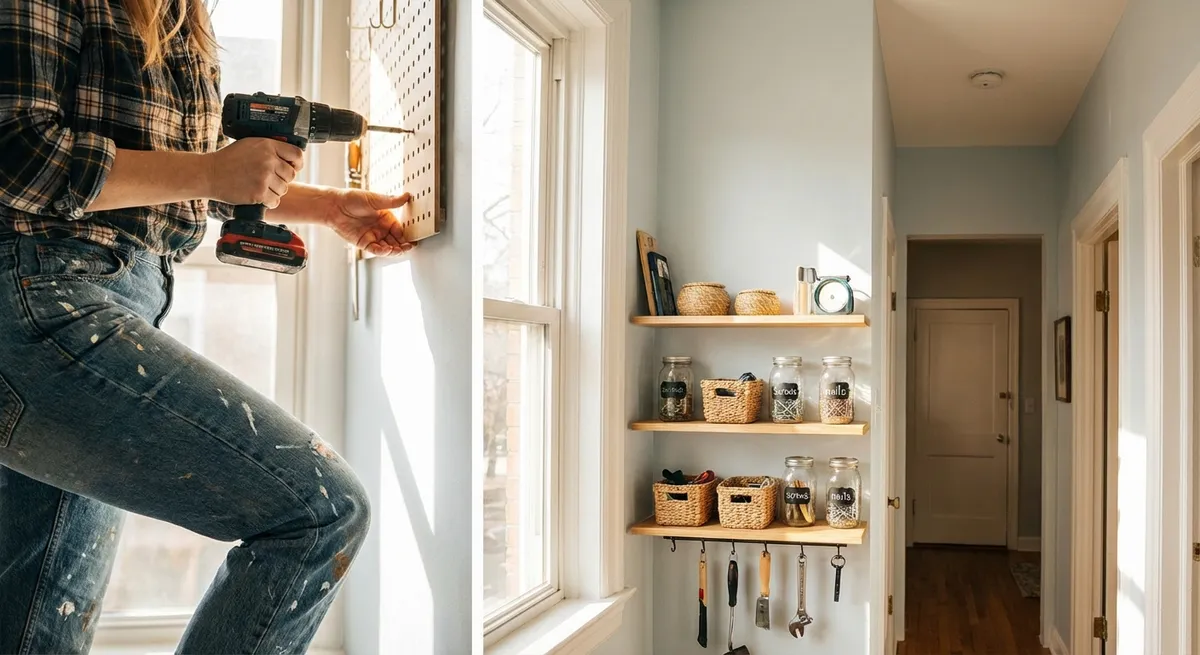
Step 5: Add Hooks, Bins, and Labels for Everyday Use
Shelves alone help, but small add-ons make the storage practical for daily life.
Under shelves, install hooks or a rail for items that are easier to hang: bags, coats, frequently used tools, brooms, or reusable shopping bags. Keep hooks at a height that matches your actual users—lower for kids’ gear, higher for adult coats or tools.
On the shelves, use bins, baskets, or small containers to group loose items. Clear bins or labeled opaque bins make it easier to find what you need without digging. For deep shelves, use shorter containers at the front and taller ones at the back so you can still see everything.
Label shelves or bins in simple, obvious language: “Cleaning,” “Lightbulbs & Batteries,” “Hand Tools,” “Snacks.” This doesn’t have to be fancy; masking tape and a marker are enough. Labels help everyone in the household put things back in the right place, which is what keeps your project useful long-term.
Finally, live with the setup for a week or two and then adjust. If something always ends up on the counter, it might need its own hook or dedicated bin. If a shelf is too high or too low, it’s worth moving it. Small tweaks after real-world use often make the biggest difference in how “right” the storage feels.
Conclusion
Wall-mounted storage is one of the most effective DIY upgrades you can make for both small and busy homes. By planning around your actual belongings, using the right hardware for safe mounting, and finishing with simple organizing touches like hooks and bins, you can clear floors and surfaces without adding bulky furniture. Take your time with layout and fastening, start with realistic weight limits, and treat this as a system you can adjust—not a one-shot, permanent decision. The result is a cleaner, more functional space that actually works with how you live.
Sources
- [U.S. Consumer Product Safety Commission – Anchor It!](https://www.cpsc.gov/safety-education/safety-education-centers/tipover/anchor-it) - Guidance on safely anchoring furniture and storage to prevent tip-overs and injuries
- [Family Handyman – How to Find a Stud](https://www.familyhandyman.com/project/how-to-find-a-stud/) - Practical methods for locating wall studs behind drywall
- [Home Depot – Types of Wall Anchors](https://www.homedepot.com/c/ab/types-of-wall-anchors/9ba683603be9fa5395fab909ee4b4e3) - Overview of different wall anchor types and their appropriate uses
- [Fine Woodworking – How Much Load Can a Shelf Hold?](https://www.finewoodworking.com/2009/05/19/how-much-load-can-a-shelf-hold) - Discussion of shelf strength, sagging, and material choices for safe shelving
- [OSHA – Hand and Power Tools Safety](https://www.osha.gov/hand-power-tools) - General safety practices when using tools for DIY building and installation
Key Takeaway
The most important thing to remember from this article is that this information can change how you think about DIY Projects.


