A bathroom renovation doesn’t have to mean tearing everything down to the studs or spending a small fortune. With a clear plan and a realistic budget, you can refresh a tired bathroom into a cleaner, brighter, more functional space using basic tools and weekend-sized projects. This guide walks you through a practical approach with five clear steps that DIY enthusiasts can tackle without getting overwhelmed.
Start With a Simple Plan (and a Hard Budget)
Before you touch a tile or buy paint, decide what “renovation” means for this bathroom.
Think in terms of three key questions: What must be fixed (leaks, peeling paint, mold)? What bothers you the most (dark lighting, old faucet, not enough storage)? What’s your maximum total budget? Write these down so every decision ties back to them.
Take measurements of the room, vanity, tub/shower, and existing fixtures. Photograph every wall and corner. This helps when you’re in the store trying to remember clearances and finishes. Decide early what stays and what can go: keeping the toilet, tub, and plumbing locations where they are will save a lot of money and complexity.
Set a simple budget breakdown, for example: 40% on fixtures and hardware (faucet, shower head, lights), 30% on finishes (paint, grout, caulk, accessories), 20% on storage/organization, and 10% as a buffer. Prioritize fixes that protect your home first (moisture control, damaged caulk, leaks), then move to aesthetics.
Check local building codes if you’re changing electrical, ventilation, or moving plumbing. Many cosmetic changes (paint, replacing faucets or lights on existing circuits) don’t require a permit, but adding outlets or relocating major fixtures often does. If a task feels beyond your skill or seems unsafe, plan to bring in a pro for that part.
Step 1: Tackle Moisture Issues and Prep the Space
A good bathroom renovation starts with controlling moisture and prepping surfaces; otherwise, your cosmetic upgrades won’t last.
Begin by inspecting the ceiling and corners for discoloration, peeling paint, or spots that might indicate mold or past leaks. Clean off any surface mildew with a bathroom cleaner containing bleach or a vinegar-and-water mix (never mix the two). If you find soft drywall, bubbling paint, or a musty smell behind baseboards, pause and investigate further—you may need a professional if damage is extensive.
Check your exhaust fan: turn it on and hold a tissue up to the grille. If the tissue barely moves, your fan may be underpowered, clogged, or venting poorly. Remove the cover, vacuum off lint and dust, and wipe the blades and housing. If your fan is older or too weak for the room size, consider replacing it with a properly rated, quieter model; improved ventilation protects paint, grout, and drywall.
Next, clear the bathroom as much as possible: remove shower curtains, rugs, wall decor, and countertop items. Take off outlet covers and switch plates. Tape and plastic sheeting are your friends—cover the vanity top, toilet, and floor if you’re painting or working overhead. Good prep (cleaning surfaces, light sanding, and masking) makes every later step easier and helps achieve a more professional finish.
Finally, address any damaged or missing caulk around the tub, shower, or sink. Use a caulk removal tool or utility knife to carefully scrape out old, cracked caulk. Clean the joint with a mild cleaner and let it dry fully. You’ll re-caulk in a later step once painting and other work are finished.
Step 2: Refresh Walls and Ceiling With the Right Paint
A fresh coat of paint is one of the highest-impact changes you can make in a bathroom, especially if humidity has taken a toll.
Start by cleaning walls and the ceiling with a mild detergent solution to remove soap scum, hairspray, and dust. Any grease, residue, or mildew will interfere with paint adhesion. Rinse with clean water and let everything dry completely. Patch nail holes, small dents, and cracks with a lightweight spackle. Once dry, sand smooth with fine-grit sandpaper and wipe down with a damp cloth.
For bathrooms, choose a paint labeled for “bath and kitchen” or “mildew-resistant,” typically in an eggshell, satin, or semi-gloss finish. These are easier to wipe down and stand up better to steam. If there are stains or you’re painting over dark colors, apply a stain-blocking primer first; this prevents bleed-through and helps your topcoat last longer.
Use painter’s tape to mask trim, tile edges, and around the vanity and fixtures. Cut in along edges and corners with an angled brush, then use a roller for larger areas. Paint ceilings first, then walls. Allow each coat to dry fully according to the manufacturer’s instructions before applying the next. Rushing between coats can cause peeling or uneven sheen.
If you want a subtle design upgrade without complex tiling, consider using color blocking or a simple accent wall behind the vanity. A slightly darker shade on the lower portion of the walls, with a crisp line and lighter color above, can add dimension without making the room feel smaller. Keep the palette light and neutral if you’re working with a small or windowless bathroom.
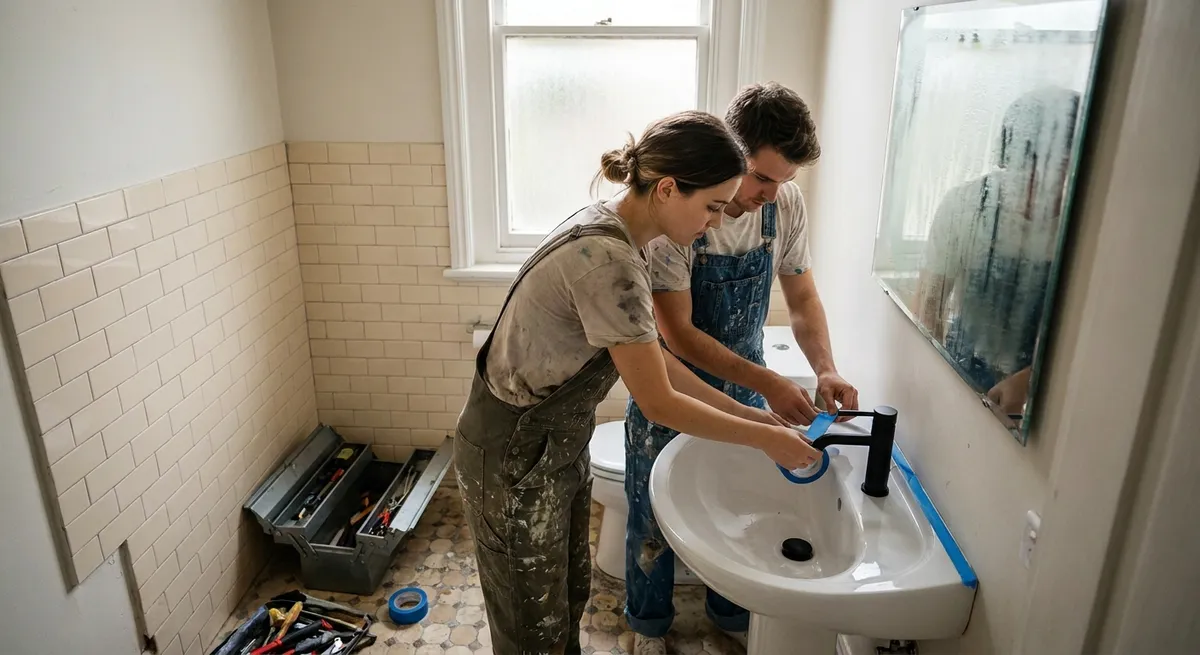
Step 3: Upgrade Fixtures and Hardware for a Modern Look
Swapping out outdated fixtures and hardware can dramatically modernize a bathroom without altering the layout.
Turn off water to the sink and, if necessary, the whole bathroom before touching any plumbing. Open the faucet to relieve pressure and place a towel and bucket under the vanity. Replacing a faucet is a manageable DIY project: disconnect supply lines, remove the old faucet, clean the sink surface, and install the new fixture following the manufacturer’s instructions. Use plumber’s tape on threaded connections if recommended. Choose a finish that coordinates with your existing shower fixtures or plan to update those as well for a cohesive look.
While you’re at it, upgrade the shower head to a more efficient model with good spray settings. Many modern heads screw directly onto the existing shower arm with minimal tools. Wrap the threads with plumber’s tape to help prevent leaks. If your old tub spout is corroded or leaking, consider replacing it with a matching one designed for your valve type (slip-on or threaded).
Electrical work demands extra caution. If you’re only changing light fixtures on an existing circuit, make sure the power is off at the breaker, not just the wall switch. Use a non-contact voltage tester before touching wires. Match wire colors (hot, neutral, ground) and secure all connections with wire nuts and electrical tape. If your bathroom doesn’t have a GFCI outlet or you’re unsure about wiring, hire a licensed electrician; this is one area where DIY mistakes can be serious.
Round out the hardware refresh by replacing towel bars, robe hooks, and toilet paper holders. Use a level to keep everything straight and anchors appropriate for your wall type. For a quick style update, match the finish of your faucet (e.g., brushed nickel, matte black) with cabinet hardware and accessories so the room feels deliberately designed instead of pieced together.
Step 4: Improve Storage and Function Without Rebuilding
Many bathrooms feel cramped not because they’re too small, but because storage is disorganized or poorly planned.
Start by emptying your vanity and medicine cabinet completely. Group items by category (daily use, occasional use, backups, expired or unused). Toss anything out of date or clearly unused. Measure the interior of your vanity and drawers, then add bins, drawer organizers, or tiered shelves to keep things accessible. Clear containers help you see what you have; labels prevent future clutter from creeping back.
If your bathroom lacks a medicine cabinet, consider installing a surface-mount cabinet above the sink or on a free wall. This gives shallow, organized storage for small items that otherwise clutter counters. For renters or non-invasive solutions, over-the-toilet shelving units or narrow rolling carts can add vertical storage without drilling into tile.
Add smart wall storage where it makes sense: a narrow shelf above the door, hooks behind the door for robes and towels, or a slim shelf near the tub for bath essentials. Just avoid placing open shelves where they’ll get splashed constantly, which can lead to warped materials or constant cleaning.
Evaluate how many towels and linens you actually need in the bathroom versus what can live in a hallway closet. Reducing the volume kept in the room often makes it feel larger and more manageable. Use baskets or lidded bins for items you don’t need every day, like spare toilet paper or guest toiletries, to keep visual clutter minimal.
Lastly, think about function for everyone using the space. Add non-slip bath mats, consider grab bars if older family members or children use the tub, and ensure essentials are reachable without stretching or stepping on anything unstable. A bathroom that works well day to day is just as important as one that looks good.
Step 5: Finish With Details That Protect Your Work
The final step is all about sealing, protecting, and adding finishing touches so your renovation holds up over time.
Re-caulk around the tub, shower, and sink with a high-quality, mold-resistant bathroom caulk. Cut the tip at a small angle, run a steady bead, and smooth it with a damp finger or caulk tool. This seals gaps, keeps water out of walls, and makes joints look clean. Give caulk the full recommended cure time before using the shower.
Inspect grout lines in tile floors and shower surrounds. Clean dirty grout with a grout cleaner or a paste of baking soda and water, then scrub with a stiff brush. If grout is missing or crumbling in small areas, re-grout those sections following product instructions. Once fully dry, apply a grout sealer to help resist stains and moisture—especially in high-splash areas.
Install or re-hang accessories thoughtfully: a fresh shower curtain and liner, new bath mat, and simple art or a mirror frame can pull the space together. Choose materials that can handle humidity and are easy to clean. Avoid cluttering the room back up; use your new storage to keep surfaces mostly clear.
Test your exhaust fan again and get in the habit of running it during showers and for at least 15–20 minutes afterward. This habit alone extends the life of your paint and prevents many moisture-related problems. Consider a fan with a built-in timer switch if you want it to shut off automatically.
Finally, document what you’ve done: take “after” photos, save paint color names, fixture model numbers, and any manuals or receipts. This makes future touch-ups, repairs, or upgrades easier. With these five steps finished, you’ve completed a practical bathroom refresh that protects your home, improves daily function, and upgrades the look—without needing a full gut renovation.
Conclusion
A successful DIY bathroom renovation doesn’t require advanced skills, just a clear plan and a logical order of operations. By focusing first on moisture control and prep, then upgrading paint, fixtures, storage, and protective details, you get a safer, cleaner, and more modern space that holds up over time. Tackle each step at your own pace, know when to bring in a pro for complex electrical or plumbing, and treat this as a blueprint you can adapt to any bathroom in your home.
Sources
- [U.S. Environmental Protection Agency – Mold and Moisture](https://www.epa.gov/mold/mold-course-chapter-1) - Covers how moisture and mold develop in homes and why controlling humidity in bathrooms matters
- [U.S. Department of Energy – Ventilation and Air Quality](https://www.energy.gov/energysaver/ventilation) - Explains the importance of proper ventilation, including exhaust fans, for moisture control
- [Mayo Clinic – Household Chemical Safety](https://www.mayoclinic.org/healthy-lifestyle/adult-health/in-depth/household-chemicals/art-20046488) - Offers guidance on safe use of cleaners and what not to mix (like bleach and vinegar)
- [This Old House – How to Replace a Bathroom Faucet](https://www.thisoldhouse.com/plumbing/21015051/how-to-install-a-bathroom-faucet) - Step-by-step reference for DIY faucet replacement
- [Family Handyman – Bathroom Caulking Tips](https://www.familyhandyman.com/project/bathroom-caulking-tips/) - Practical techniques for removing old caulk and applying new, long-lasting caulk
Key Takeaway
The most important thing to remember from this article is that this information can change how you think about Renovation.


