If your feed looks anything like the rest of the internet right now, you’ve probably seen the viral “I Did This For My Dog” challenge on Facebook. Dog owners are proudly sharing the over-the-top things they’ve built for their pets—custom dog rooms, tiny under‑stairs suites, backyard playgrounds, and full-on “barkitecture” remodels. It’s cute, but it also reflects a real design trend: more homeowners are planning renovations around their pets from day one.
Instead of adding a random dog bed after your remodel is done, you can bake pet-friendly features right into your next project. That means less mess, less damage, and a home that works for both humans and animals—without looking like a kennel.
Below is a practical, step‑by‑step guide to help you create a dog‑friendly home that still looks clean, modern, and resale-ready.
Step 1: Plan Your “Dog Zones” Before You Pick Up a Tool
Before you start ripping out walls or shopping tile, map out where your dog actually lives their life. The mistake many renovators make is designing for themselves and then trying to squeeze the dog in after.
- Track traffic patterns for a week. Notice where your dog sleeps, where they like to look out the window, where accidents tend to happen, and the path they run to the yard. These are your priority “dog zones.”
Decide on three key areas:
- A rest zone (sleeping/crate area) - A mess zone (feeding, water, muddy paws, grooming) - A play/observation zone (window spot or yard access) 3. Put these zones near logical human functions. - Rest zone under stairs, in a mudroom, or in a quiet corner of the living room. - Mess zone near an exterior door, laundry room, or kitchen. - Play/observation near a window, patio door, or backyard access. 4. Think vertically as well as horizontally. If you have a large dog, allow space for them to stretch out and turn freely. For small dogs, you can go vertical with shelves or cubbies for storage above their bed. 5. Future-proof the layout. Even if you might move or get another pet, design zones that still work as storage nooks, reading corners, or utility spaces if the dog setup changes.
Planning these zones up front prevents you from ending up with a brand‑new kitchen and a giant plastic dog crate plopped in the middle of it.
Step 2: Choose Surfaces That Survive Claws, Drool, and Mud
The “I Did This For My Dog” photos are cute, but some of those builds are clearly not made for real life. If you’re renovating, your surfaces need to handle claws, water bowls, and the occasional accident.
- Floors: think “scratch‑resistant and wipeable,” not “indestructible.”
- Good options: Luxury vinyl plank (LVP), high-quality laminate, ceramic/porcelain tile, sealed concrete, or site-finished hardwood with a strong polyurethane topcoat.
- Risky options: Soft pine, unsealed hardwood, cheap laminate that swells with moisture, glossy tile that gets slippery.
- Add texture where it counts.
- Walls: upgrade the bottom 3–4 feet.
- Use washable, scrubbable paint (look for “scrubbable” or “kitchen & bath” formulas).
- In mudrooms or feeding zones, consider beadboard, wainscoting, or tile on the lower half of the wall for easy wipe‑downs.
Smooth ceramic on an entryway looks nice until a wet dog runs across it. Choose matte or textured finishes in high-traffic dog areas to improve traction.
Countertops and built‑ins:
If you’re building a feeding or grooming station into cabinetry, go for solid surfaces that can handle water—quartz, solid surface, or a well‑sealed butcher block (re-oiled regularly).
Rugs and soft surfaces:
- Choose low‑pile indoor/outdoor rugs that can be hosed off or thrown in the wash. - Avoid thick shag rugs in dog routes and near water bowls.
The goal is not to make your home bulletproof, but to pick materials that won’t punish you for having a dog.
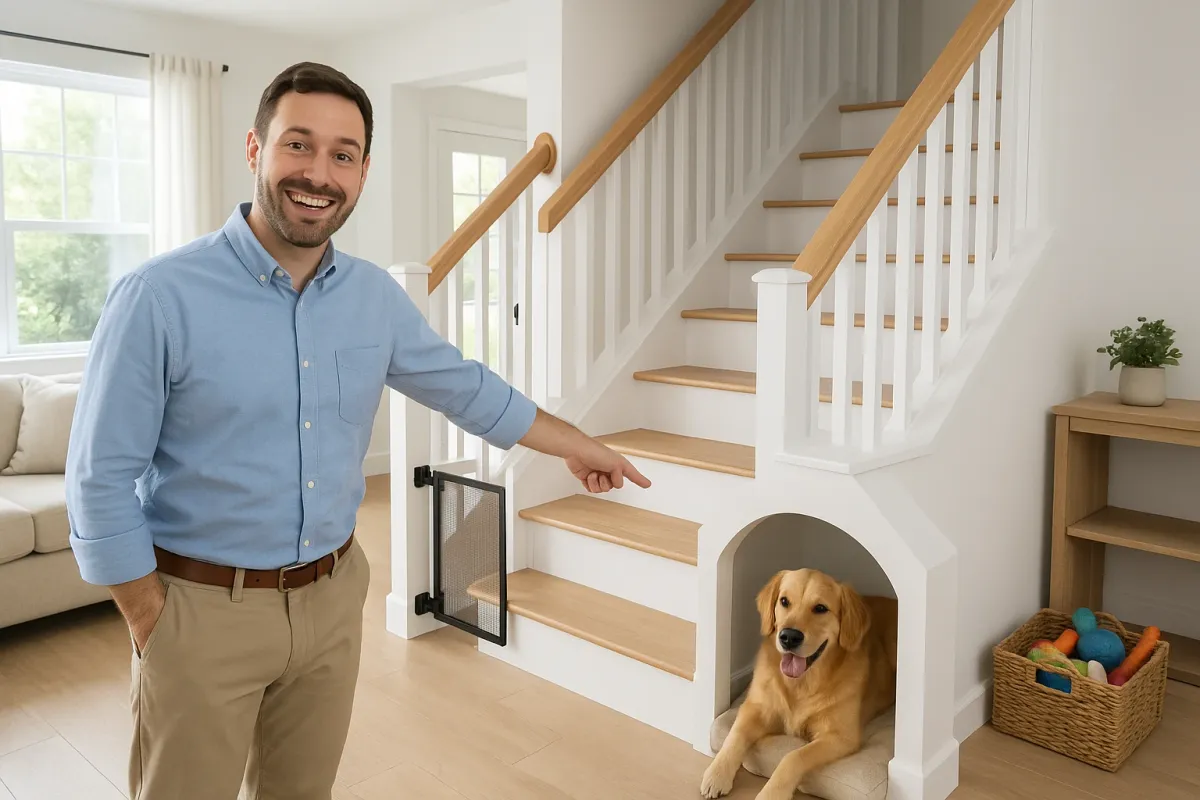
Step 3: Build a Hidden (But Practical) Dog Bed or Crate Nook
The Facebook challenge is full of fancy dog rooms, but you don’t need a full renovation to make a big difference. One of the most practical upgrades is a built‑in dog bed or crate nook that blends with your existing cabinetry or storage.
- Pick the location based on your dog’s temperament.
- Nervous or older dogs usually prefer a quiet, low‑traffic corner.
- Social dogs often like to be near the kitchen or living room action.
Under‑stair or cabinet conversions:
- Under stairs: Remove existing access panels and frame in a small door or open arch. Line the inside with durable paint or thin plywood for a clean finish. - Cabinet conversion: Replace two base cabinet doors with a matching, open-faced frame. Reinforce the base with plywood if your dog is heavy.
Ventilation and safety:
- If your dog will be crated, ensure there’s adequate airflow—no sealing them into a closed cabinet. - Keep electrical outlets, cords, and cleaners out of reach inside the nook.
Flooring inside the nook:
- Use a removable, washable bed on top of a waterproof liner or mat. - Avoid bare wood if your dog tends to drool or have accidents.
Make it look intentional:
- Trim the opening to match nearby doors or baseboards. - Paint or stain to match existing finishes so it reads as built‑in furniture, not an improvisation.
A well-planned dog nook turns a visual eyesore (a bulky crate) into a custom feature that actually adds perceived value to your home.
Step 4: Create a Mud Management Station Near the Door
The cutest part of the “I Did This For My Dog” trend might be the mini dog showers and grooming corners people are posting. You might not need a full spa, but a simple mud management station near your most-used door can save your floors and your sanity.
- Choose the right spot.
- Hard, water‑resistant floor zone.
Ideally, use a mudroom, laundry room, garage entry, or back door that your dog uses most. If that doesn’t exist, pick the most practical access point and upgrade that area.
Extend tile, LVP, or sealed concrete at least 3–6 feet inside the door, giving you space to towel off paws before hitting softer flooring.
Built‑in or add‑on wash solution:
- Full DIY dog wash (if you’re renovating plumbing anyway): - Add a 36–42" wide, 12–18" high tiled platform with a handheld shower head and drain. - Tile the walls around it at least 3 feet up. - Budget option: - Install a hose bib or utility sink in the garage or laundry room. - Use a stable, shallow plastic tub or mat for quick rinses.
Storage and organization:
Install simple hooks, shelves, or wall-mounted baskets for: - Leashes and harnesses - Towels and wipes - Brushes and nail clippers - Enzyme cleaner for accidents
Contain the chaos:
- Add a boot tray or low pan by the door for wet paws and boots. - Use door mats inside and outside (rough texture outside, absorbent inside) to capture dirt before it spreads.
You’re not just making life easier for your dog—you’re cutting your own cleaning time dramatically.
Step 5: Dog‑Proof Your Renovation So It Lasts Longer (And Looks Better)
Those “I Did This For My Dog” photos rarely show what the space looks like a year later. That’s where real renovation planning matters. You want your upgrades to survive daily use without constant repair.
- Protect baseboards and corners.
If your dog is a scratcher or chewer:
- Use taller, thicker baseboards and semi‑gloss or satin paint for easier cleaning.
- In problem areas, add corner guards or tile up to 36" on the wall (like a half-height backsplash).
- Upgrade door hardware and screens.
- Choose solid-core or hardboard doors if your dog jumps or scratches.
- Consider heavy-duty pet‑resistant screens on doors and porches.
- Think about noise control.
- Add solid-core interior doors,
- Use area rugs and soft furnishings in large echoey rooms,
- Consider weatherstripping around exterior doors to cut outside triggers.
For barky dogs, include basic sound management in your renovation:
Electrical and safety:
- Install outlets higher on the wall in areas where dogs sleep or chew. - Route cords through conduit, cable covers, or behind furniture when planning TV or home office layouts. 5. Design for easy deep cleaning. - Make sure large furniture and built‑ins still allow access under/behind them for vacuuming. - If you’re building bench seating or dog nooks, leave at least 3–4" of clearance at the floor front or sides for cleaning tools.
Dog‑proofing doesn’t mean turning your home into a bunker. It just means making small, smart choices during a renovation so that daily pet life doesn’t undo your hard work.
Conclusion
The viral “I Did This For My Dog” challenge is fun to scroll through, but it also highlights a real shift in how people think about home design. Pets aren’t an afterthought anymore—they’re part of the floor plan.
By planning dog zones up front, choosing durable surfaces, integrating a hidden bed or crate nook, adding a simple mud management station, and dog‑proofing the details, you can create a home that works for you now and still looks great (and marketable) later.
If you’re about to start a renovation, this is the perfect moment to ask: What can I quietly build in for my dog now, so I’m not fighting their habits later? That’s how you go from “I bought another dog bed” to “I did this for my dog—and my house is better for it.”
Key Takeaway
The most important thing to remember from this article is that following these steps can lead to great results.


