A tired kitchen can make your whole home feel dated, but a full remodel is expensive and disruptive. A removable DIY backsplash is a smart middle-ground: it looks like a serious upgrade, but you can install it in a weekend with basic tools—and take it down later without wrecking your walls. This guide walks you through each step, from planning and prep to clean, pro-looking results using peel-and-stick or adhesive tile panels.
Plan Your Design and Choose the Right Materials
Before you buy anything, define the look and the limitations of your space. Decide whether you want a classic subway-tile look, bold patterned panels, or a simple solid texture to clean up a messy wall. Take photos of your kitchen in daylight and at night; this will help you choose colors and finishes that work with your cabinets, counters, and lighting (glossy tiles reflect more light, matte tiles hide smudges better).
Measure the total backsplash area: height (typically from countertop to bottom of upper cabinets) times length of each wall section. Add at least 10–15% extra for cuts, mistakes, and future repairs. Check that your wall surface is compatible with removable products: most peel-and-stick tiles work best on smooth, painted drywall or primed surfaces—not on heavily textured walls, brick, or raw plaster. If your walls are textured, plan to skim-coat or choose a product specified for that surface.
Look for backsplash materials labeled “removable,” “renter-friendly,” or “peel-and-stick” with low- or medium-tack adhesive. Read the manufacturer’s instructions and temperature/humidity limits; some adhesives can fail near gas ranges without a proper clearance or metal heat shield. Also confirm whether the product is safe behind stoves or only on side walls—some may require a different material (like metal or glass) directly behind a cooktop.
Gather your tools before you start: a tape measure, level, pencil, straightedge, utility knife with sharp blades, scissors, a plastic smoothing tool or clean drywall knife, cleaning supplies, and painter’s tape. Having everything at hand makes it much easier to work methodically and avoid rushed cuts or crooked lines.
Prep the Walls for a Long-Lasting Install
The difference between “Pinterest-worthy” and “peeling at the corners” is almost always surface prep. Start by clearing your counters and removing anything attached to the wall: outlet and switch covers, utensil hooks, command strips, old caulk beads, or decorative rails. Turn off power at the breaker to any outlets or switches in your backsplash area; you’ll be working around electrical boxes and don’t want any surprises.
Clean the walls thoroughly with a degreasing cleaner or a mix of warm water and a small amount of dish soap. Kitchens accumulate an invisible film of grease, especially near stoves, and it will absolutely undermine adhesive. Rinse with clean water so no soap residue remains, then let the wall dry completely. If there are glossy paint sections, lightly scuff with fine-grit sandpaper (220-grit works well) to help adhesion, then wipe off dust with a damp cloth and let dry.
Inspect for damage: fill small holes and hairline cracks with lightweight spackle, then sand flush when dry. For larger dips or uneven seams, use joint compound to create a smooth plane. Removable backsplash products follow the surface underneath—if you see a bump or gouge now, you’ll see it even more after installation. Once repairs are smooth and clean, consider a quick coat of primer if the manufacturer suggests it (especially if the existing paint is very flat or chalky).
Finally, do a small adhesion test in an inconspicuous corner. Apply a short offcut or sample of the tile, press firmly, and leave it for 24 hours. If it peels up cleanly and holds well without sliding or curling, your surface is ready. If it either won’t stick or bonds too aggressively and tears the paint off when removed, reconsider your product choice or prep strategy before covering the whole wall.
Cut and Dry-Fit Panels So Everything Lines Up
Rushing into peeling and sticking is how you end up with crooked lines, awkward seams, and half tiles in all the wrong places. Begin by planning your layout visually. Use a level and pencil to draw a light reference line along the wall where the bottom of the tiles will sit—most often just above the countertop, leaving a tiny expansion gap that can be hidden with caulk. If your counter isn’t perfectly level (many aren’t), follow your level, not the counter; you can fill small gaps at the bottom later.
Unbox your tiles or panels and lay them out on a table or the floor to see pattern direction and color variation. Some products have a repeating pattern that looks best when centered behind the sink or stove, while others need the grout lines to align from panel to panel. Identify where you want full tiles to be most visible—commonly the focal point over the sink or range—and plan cut pieces to be in less noticeable corners or edges.
Measure each wall section and mark the cut lines on the back of the panels. For simple rectangular cuts, a straightedge and utility knife score-and-snap method works well; for curves around outlets or trim, make a paper template first, then transfer that shape to the tile backing. Always double-check measurements: “measure twice, cut once” is even more important with patterned or directional tiles where a wrong cut is obvious.
Dry-fit your pieces on the wall with painter’s tape before removing any backing. This is your rehearsal: check that patterns line up across seams, that outlet cutouts align with electrical boxes, and that you haven’t created slivers of tile narrower than the manufacturer recommends. Adjust your plan now while everything is still easy to move and re-cut. Taking an extra hour in this stage can save you from having to redo an entire section later.
Install the Tiles for a Clean, Professional Look
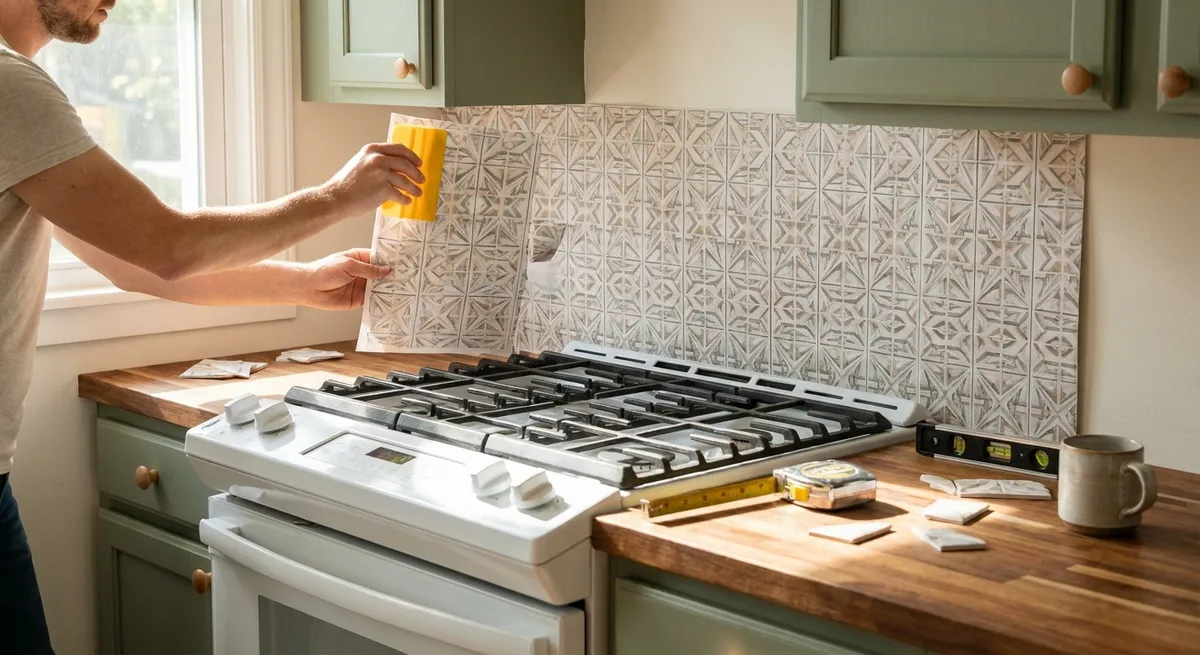
Once you’re satisfied with your dry-fit, start installing from the most visible central area—usually behind the sink or stove—and work outward to corners. This keeps any small discrepancies or slimmer pieces at the ends where they’re less noticeable. Peel a small portion of the backing from your first tile, align its bottom edge with your level line, and lightly tack the top edge to the wall without pressing it firmly yet.
Use your level on the exposed face of the tile to confirm it’s perfectly plumb and aligned with your layout. When you’re confident in the position, gradually peel off more of the backing while smoothing the tile from the center outward with your hand or a plastic smoothing tool. This pushes out air bubbles and ensures consistent contact. Avoid over-stretching any flexible tiles; stretching can cause them to shrink back later and expose gaps.
Work one tile or panel at a time, overlapping or butting edges exactly as the manufacturer instructs. Some systems are designed to overlap faux “grout lines,” while others require a tight seam. Keep checking alignment as you go; a small error at the beginning can compound several tiles later. Around outlets and switches, make sure the tile edges sit flat against the wall so the cover plates will screw back on snugly without bowing.
At inside corners where two walls meet, don’t try to bend a stiff tile around the corner. Instead, end one wall with a clean, straight cut about 1/8 inch from the corner, then start the adjacent wall with another tile that meets it. Overlap patterns visually when possible. For outside corners or exposed edges, some products offer matching trim pieces; if not, you can create a finished look with a narrow line of caulk or a simple metal or plastic edge trim.
As you complete each section, step back and eyeball the whole wall in normal room lighting and with task lights on. Fix bubbles immediately by lifting gently from the nearest edge and re-smoothing. If a piece is utterly misaligned, remove it slowly at a low angle to avoid pulling paint, then replace it with a fresh tile. Most quality peel-and-stick tiles allow some repositioning during install, but don’t rely on it—adhesive strength often increases over the first 24 hours.
Finish the Edges and Make It Truly Removable-Friendly
With the main field of tiles installed, focus on details that make the backsplash look intentional and protect it from everyday wear. Reinstall outlet and switch covers with the power still off, making sure no adhesive or tile blocks screw holes. If covers no longer sit flush, gently trim tile edges with a sharp utility knife until everything seats properly. Confirm that all switches and outlets operate normally, then restore power at the breaker once you’re done.
Along the bottom edge where the backsplash meets the countertop, run a thin, continuous bead of flexible, paintable kitchen-and-bath caulk. This seals out water and crumbs and hides minor gaps caused by uneven counters. Smooth the bead with a damp finger or caulk tool for a clean line, wiping away excess immediately. At exposed vertical edges, you can either use matching trim, color-matched caulk, or leave a crisp, straight cut if the product allows it and the cut edge looks finished.
To keep the installation truly renter-friendly, avoid additional permanent adhesives, nails, or staples. If a section seems like it might peel in a humid area, use more pressure with a smoothing tool rather than stronger glue. Make note of the brand and color name somewhere (a note in your phone or written on the inside of a cabinet) so you can match replacements later if needed.
For routine cleaning, follow the manufacturer’s instructions—most removable backsplashes tolerate gentle cleaning with a soft cloth and mild soap, but avoid abrasive pads or harsh chemical cleaners that can scratch or cloud the surface. Don’t place open flames or extremely hot pans against the tiles; even if they’re heat-resistant, adhesive layers may not be. If your stove manual specifies minimum clearances for combustible materials, respect those guidelines and consider a metal or glass panel behind high-output burners.
When it’s time to remove or change the backsplash, gently warm a small area with a hair dryer on low heat to soften the adhesive, then peel the tile back slowly at a low angle. Work in sections rather than yanking large panels at once. If any adhesive remains, most can be cleaned with mild adhesive remover or soapy water, but test in a small area first to avoid damaging paint. With careful removal, your wall should return to its pre-project condition with little or no touch-up needed.
Conclusion
A removable DIY backsplash is one of the fastest, lowest-risk ways to refresh a kitchen without major tools, demolition, or long-term commitment. By taking time to plan your layout, thoroughly prep the walls, cut and dry-fit carefully, and pay attention to finishing details, you’ll end up with a custom look that feels much closer to a renovation than a quick hack. When your style changes—or your lease ends—you can take it down and start fresh, confident that you upgraded your space on your own terms.
Sources
- [U.S. Department of Energy – Kitchen Remodeling Guide](https://www.energy.gov/energysaver/kitchen-remodeling) - General guidance on kitchen improvements and safe appliance clearances
- [This Old House – How to Install a Tile Backsplash](https://www.thisoldhouse.com/kitchens/21017777/how-to-install-a-tile-backsplash) - Traditional backsplash techniques that inform layout, planning, and finish details
- [The Home Depot – Peel and Stick Backsplash Installation Tips](https://www.homedepot.com/c/ab/how-to-install-peel-and-stick-backsplash/9ba683603be9fa5395fab9083fddf4d) - Manufacturer-backed best practices for installing removable tile panels
- [Consumer Product Safety Commission – Electrical Outlet Safety](https://www.cpsc.gov/Safety-Education/Safety-Guides/home) - Safety considerations when working around outlets and switches in DIY projects
- [Lowe’s – How to Use Caulk for Sealing Gaps](https://www.lowes.com/n/how-to/use-caulk) - Practical instructions for applying caulk to finish backsplash edges and protect against moisture
Key Takeaway
The most important thing to remember from this article is that this information can change how you think about DIY Projects.


