Every year, we promise we’ll finally deal with the mess: the cable jungle behind the TV, the random pile by the door, the router blinking in the middle of the room. And every year, December shows up and… there it all still is. That’s exactly why articles like the trending “It’s Almost 2026, So Here Are 23 Ways To Finally Hide The Ugly Stuff You Swore You’d Fix This Year” are blowing up right now—because people are tired of looking at visual clutter.
Instead of just scrolling past clever ideas, this guide turns that same “hide the ugly stuff” energy into real, doable DIY projects. These are simple builds and tweaks you can finish in an afternoon, using basic tools and materials from any home center. No full renovation, no specialized skills—just straightforward fixes that make your place look cleaner fast.
Below are five practical, step‑by‑step projects to actually tame the eyesores you’ve been ignoring all year.
1. Build A Simple Wall-Mounted Cable Tidy Behind Your TV
Those TikTok‑perfect living rooms never show what’s happening behind the TV. In real life, it’s usually a knot of cables, power strips, and random adapters. This wall-mounted cable tidy keeps everything off the floor and out of sight, without needing to open up any walls.
You’ll need:
- Measuring tape and pencil
- Stud finder (optional, but helpful)
- 1 thin board or shelf (approx. 1×4 or 1×6, cut to TV width)
- 2–3 cable raceways (paintable, adhesive-backed)
- Power strip with flat plug (if possible)
- Screws, wall anchors, drill/driver, level
- Velcro straps or reusable cable ties
Step-by-step:
- Plan the route.
Unplug everything and lay your cables out. Decide: do they run straight down, off to one side, or into a nearby cabinet? The cleaner the path, the easier this is to hide.
- Mount a “cable shelf” behind the TV.
Mark a horizontal line on the wall just below where the bottom of your TV sits. Cut a board to match the TV width and screw it into studs (or use proper wall anchors). This doesn’t need to hold much weight—just a power strip and cables. Think of it as a narrow hidden ledge.
- Secure the power strip.
Mount the power strip on top of or just behind the board with screws or double-sided heavy-duty tape. Plug in your TV and devices using the shortest cables that will reach. Long cables mean more slack to hide, so consider swapping any truly excessive lengths.
- Add cable raceways.
Clean the wall with rubbing alcohol where the raceways will go. Stick them vertically from your “cable shelf” down to the outlet. Snap them open, tuck in the power cord and any necessary low-voltage cables, then snap closed. Most raceways are paintable—prime and paint to match your wall if you want them to disappear even more.
- Bundle and hide the rest.
Use Velcro straps or cable ties to group cables by device (for example, all game console cables together). Rest these bundles on the hidden board or attach them to it with more Velcro. When you push the TV back into place, you should see one neat raceway going down the wall, not a tangled mess.
2. Turn An Open Entryway Pile Into A Clean “Landing Zone” Bench
That permanent pile of shoes, mail, bags, and mystery items by the door? You don’t need a full built‑in mudroom to fix it. A simple DIY landing bench with hidden storage can swallow most of that clutter and make your entry look intentional instead of chaotic.
You’ll need:
- 3 pre-cut laminated pine or plywood panels (top + 2 sides)
- 1 back panel (thin plywood)
- 2–3 interior supports (2×2 or scrap wood)
- Wood screws, drill/driver, wood glue
- L-brackets (optional, for extra rigidity)
- Bins or baskets that fit under the bench
- Sandpaper and paint or stain
Step-by-step:
- Measure your space and choose storage.
Decide how long and deep your bench can be (typical: 36–48" long, 14–16" deep, 18" high). First, pick bins or baskets you actually like; then design your bench around them so they slide under cleanly.
- Cut or buy panels.
Most big-box stores will cut plywood to size for you. You need a top, two sides, and a back panel. For a basic box design:
- Top: full length × depth
- Sides: height × depth
- Back: full length × height
- Assemble the bench frame.
Lay the top panel upside down. Position the side pieces at each end, flush with the corners. Pre-drill and use wood screws through the top into the sides. Stand it upright, then attach the back panel with screws or nails. Add 2–3 interior support blocks (2×2 pieces) under the top, spaced along the length, to keep it from sagging.
- Sand and finish.
Sand all visible edges smooth. Paint or stain the bench to match your trim or door. If you’re painting, use a primer first, especially on raw plywood. Let it fully cure before loading it up.
- Define the zones.
Slide your bins underneath: one for shoes, one for bags, one for “random stuff that needs a home.” Put a tray or small wall-mounted organizer above the bench for keys and mail. The real trick: everything still lands by the door—but now it looks deliberate and stays contained.
3. Build A Router + Tech Hub Box That Doesn’t Kill Your Wi‑Fi
That blinking router on the floor or the shelf full of tangled charging cables doesn’t have to be a permanent eyesore. You can hide it all in a simple ventilated box or repurposed drawer—without blocking your signal or overheating your gear.
You’ll need:
- 1 wooden or rattan box / IKEA-style cabinet / old drawer
- Drill with hole saw or large spade bit
- Sandpaper
- Optional: furniture feet, paint, cable grommets, adhesive hooks
Step-by-step:
- Pick the right container.
Look for something with slatted sides (like rattan) or thin wood you can drill. Avoid metal boxes—they can block Wi‑Fi. Make sure your router and power strip can sit inside with a few centimeters of space around them.
- Plan airflow and cable paths.
Place your router inside and mark where the back sits. On the rear panel, mark circles near the bottom and top for ventilation and cable exits. You want a few openings so heat can escape and cables can route cleanly.
- Drill ventilation and cable holes.
Using a hole saw or spade bit, drill 2–4 holes on the back panel (about 1"–2" diameter). Smooth the edges with sandpaper so the cables don’t snag. If you’re using it on a shelf, drill holes near the bottom; for a floor box, some on the back and some on the base.
- Add power and organization.
Place a small power strip inside the box. Feed its main cord out through one hole to the wall outlet. Run your modem/router cords and any ethernet cables through the other holes. Use adhesive hooks or Velcro inside to hold excess cable length against the walls of the box.
- Finish and position.
Paint or stain the box if you want it to match your furniture, or add small feet to raise it slightly for better airflow. Place it on a console, shelf, or side table in roughly the same spot your router lives now. As long as the box isn’t metal and has ventilation, your signal should stay strong—just a whole lot better looking.
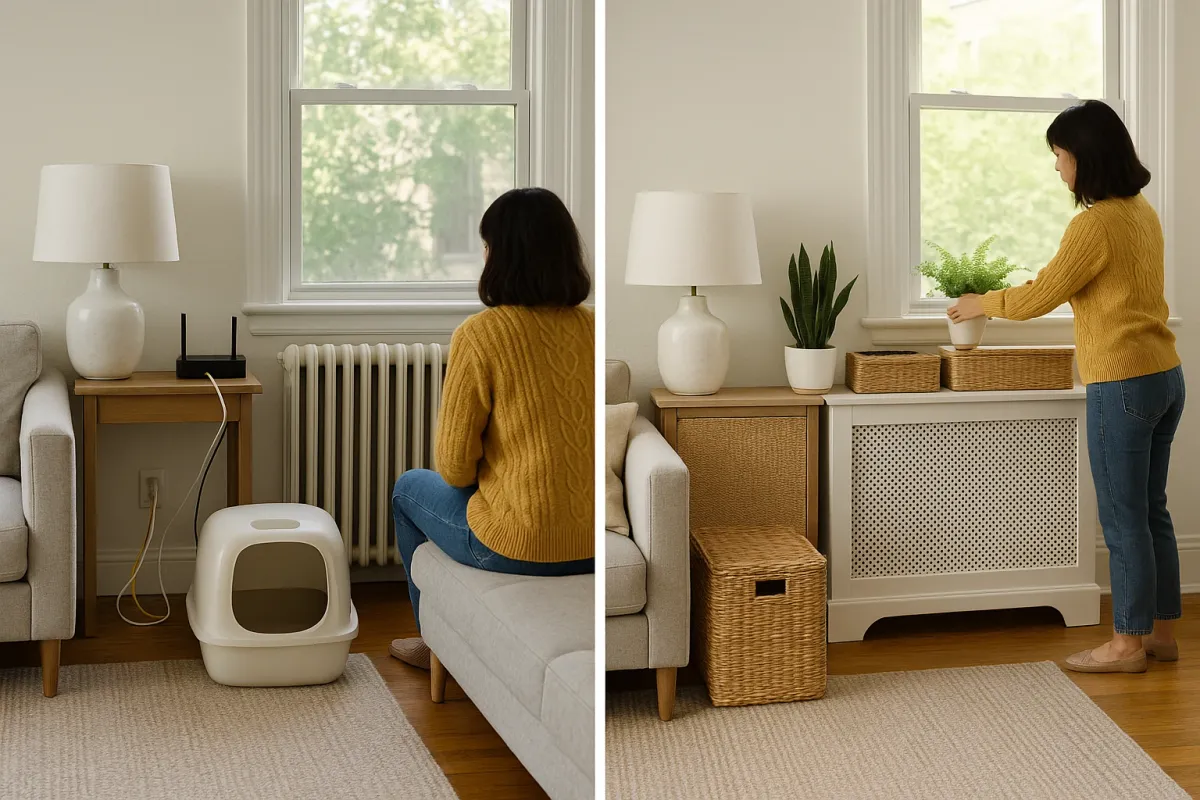
4. Hide Radiators Or Baseboard Heaters With A Removable Cover
Old radiators and baseboard heaters are classic “I’ll fix that later” items. Full replacement is expensive, but you can build a simple cover that makes them blend in with your interior while still letting heat out safely.
You’ll need:
- Measuring tape and pencil
- 1 sheet of plywood or MDF (for top and sides)
- Decorative front panel material (slatted wood, cane webbing, metal grille, or perforated hardboard)
- Wood screws, wood glue, drill/driver
- L-brackets or cleats (for wall attachment)
- Heat-resistant paint or standard wall paint (for non-metal covers)
Step-by-step:
- Measure for clearance and airflow.
Measure the full width and height of your radiator or baseboard heater, including valves. Add at least 2–3" above and 1–2" on each side. You need air to move freely—this is a cover, not a sealed box.
- Cut the top and sides.
From plywood or MDF, cut:
- 1 top panel: full width × 8–12" deep (depending on your heater style)
- 2 side panels: cover height × depth
- Build the “U” frame.
Assemble a simple U-shaped frame: sides attached to the top with screws and wood glue. This will slide over the heater. Dry-fit it to be sure it clears pipes and valves.
- Add the ventilated front panel.
Cut your decorative front to fit between the two side panels. Attach it with screws from the inside so you don’t see hardware on the face. Good options that let heat through:
- Wooden lattice
- Cane webbing stapled to a thin frame
- Perforated metal grilles
- Pegboard (perforated hardboard) painted to match walls
- Paint and secure in place.
Sand all edges and paint or finish to match your trim or wall. Use small L-brackets or cleats attached to the wall (not the heater) to keep the cover from tipping forward, but don’t permanently seal it—you still need access for maintenance. You’ve now turned a visual eyesore into a useful surface and design feature.
5. Create A “Fake Built‑In” Panel To Hide Wall Warts And Odd Bumps
We all have that one wall with a random access panel, uneven patch, or weird outlet cluster. Instead of staring at it—or endlessly promising yourself you’ll “learn drywall someday”—build a shallow, removable panel that looks like intentional trimwork.
You’ll need:
- Measuring tape and pencil
- 1 sheet of thin plywood or MDF (¼")
- Simple trim (1×2s, lattice trim, or picture frame moulding)
- Construction adhesive and finish nails (or brad nailer)
- Paintable caulk
- Paint to match your walls or trim
- Magnetic catches or French cleats (for removable access)
Step-by-step:
- Define the “frame” area.
Decide how big your fake panel will be. It should be large enough to cover the ugly area, but not so big it looks strange. Often, centering it on the wall or aligning it with existing trim or furniture helps it look intentional.
- Cut the backing panel.
Cut thin plywood or MDF to your chosen size. This is the backing that hides whatever’s on the wall. Hold it up to double-check coverage and mark any outlets—you can cut small access holes where needed.
- Add decorative trim on the panel.
On a work surface, attach trim pieces to the front of the panel to create a picture-frame or grid pattern. Use a bit of construction adhesive and brad nails or finish nails. Sand joints smooth. This trim creates the illusion of a built‑in feature or wainscoting, not a cover-up.
- Choose how it attaches.
If you need easy access (for example, over a junction box or plumbing access):
- Use French cleats (one piece on wall, one on panel) or
- Use magnetic catches and a couple of small alignment blocks screwed to the wall.
For purely cosmetic issues, you can screw or nail the panel directly to the wall and fill nail holes before painting.
- Paint and blend it in.
Caulk any small gaps where trim meets panel. Prime (especially MDF edges) and paint to match either your wall color (subtle) or trim color (bolder, more architectural). Once dry, mount it in place. Now, instead of a weird patch or box, you have a custom detail that looks like it was always part of the house.
Conclusion
As the “It’s Almost 2026…” trend reminds us, everyone has something at home they meant to fix months ago—but hiding the ugly stuff doesn’t have to mean major renovations or expensive built‑ins. With a few boards, some basic hardware, and an afternoon, you can:
- Tame the cable chaos behind your TV
- Turn a dumping ground entry into a clean landing zone
- Hide your router and tech without killing your Wi‑Fi
- Disguise old radiators with safe, removable covers
- Turn awkward wall bumps into intentional design features
Pick one project you can finish this weekend and get it done. The fastest way to stop noticing an eyesore is to give it a clean, simple disguise—and once you see how big a difference one small fix makes, the rest of that “I’ll do it later” list gets a lot easier to tackle.
Key Takeaway
The most important thing to remember from this article is that this information can change how you think about DIY Projects.


