A cramped, cluttered entryway drags your whole home down. The good news: you don’t need to knock down walls or hire a designer to fix it. With a few targeted upgrades and smart planning, you can turn that “drop zone disaster” into a clean, functional space that actually works for your routine.
This guide walks you through a practical, DIY-friendly entryway renovation you can tackle in a weekend, with five clear steps from planning to finishing touches.
Step 1: Map How You Actually Use the Space
Before you buy anything, figure out what the entryway needs to do every day.
Spend a few minutes watching how your household uses the area for a couple of days:
- Where do shoes pile up?
- Where do mail and keys land?
- Do you need a place to sit and put on shoes?
- How many coats, bags, and hats really live here?
Grab a tape measure and note:
- Wall width and height (especially the main wall you’ll organize)
- Depth from door swing to the opposite wall (so you don’t block it)
- Location of light switches, outlets, and vents
Then make a simple list of must-haves, for example:
- “Hooks for 6 coats/bags”
- “Hidden shoe storage for at least 6–8 pairs”
- “Small surface for keys/mail”
- “Mirror for last-minute checks”
Use this list to drive every decision. If something doesn’t support your real daily use, skip it—no matter how stylish it looks online.
Step 2: Create a Simple Layout and Choose Durable Materials
Now translate your needs into a basic layout that fits your measurements.
For narrow entryways (less than 4 ft wide):
- Stick to wall-mounted solutions (hooks, narrow shelves, shallow cabinets).
- Look for storage 10–12 inches deep so it doesn’t choke the walkway.
- Place deeper storage (like a bench) on the widest wall, away from the door swing.
For wider entryways:
- A storage bench under hooks works well on the main wall.
- Add a narrow console table or small cabinet if you still have room to walk comfortably (ideally a minimum 36 inches of clear path).
Material tips:
- Choose semi-gloss or satin paint for walls and trim—easier to wipe down from scuffs and fingerprints.
- Use water-resistant flooring or a sturdy rug near the door (indoor/outdoor rug, washable runner, or durable mat).
- Opt for metal hooks and solid wood or quality plywood for benches and shelves; cheap particleboard swells quickly from wet shoes and umbrellas.
Sketch your layout on paper with rough measurements. It doesn’t have to be fancy—just enough to visualize what fits without blocking the door or walkway.
Step 3: Prep and Refresh the Shell (Walls, Floor, and Lighting)
Before you add storage, get the basics right. A clean, bright “shell” makes even small entryways feel bigger and less chaotic.
1. Clear and clean
- Completely empty the space: rugs, furniture, wall decor, everything.
- Patch small nail holes and dings with lightweight spackle.
- Clean walls, baseboards, and door trim with a mild degreaser or soapy water, especially around light switches and door handles.
2. Paint strategically
- Use a light, neutral color for walls to reflect more light (soft white, light gray, or a pale beige).
- Consider painting trim and doors a crisp white or a slightly contrasting neutral.
- If the entry opens into a hallway, keep colors consistent to make the area feel larger and more cohesive.
3. Fix lighting
- If the current light fixture is dim or dated, replace it with something brighter and low-profile.
- Choose LED bulbs with:
- Warm to neutral color temperature (around 2700K–3000K).
- High CRI (color rendering index) when possible, so colors look natural.
- Add a motion sensor switch if your hands are often full—simple upgrade, huge convenience.
4. Protect the floor
- If you have hardwood or laminate near the door, use a boot tray or mat to catch water and dirt.
- Use non-slip rug pads under runners to avoid tripping.
This prep work isn’t flashy, but it makes everything you add on top look better and last longer.
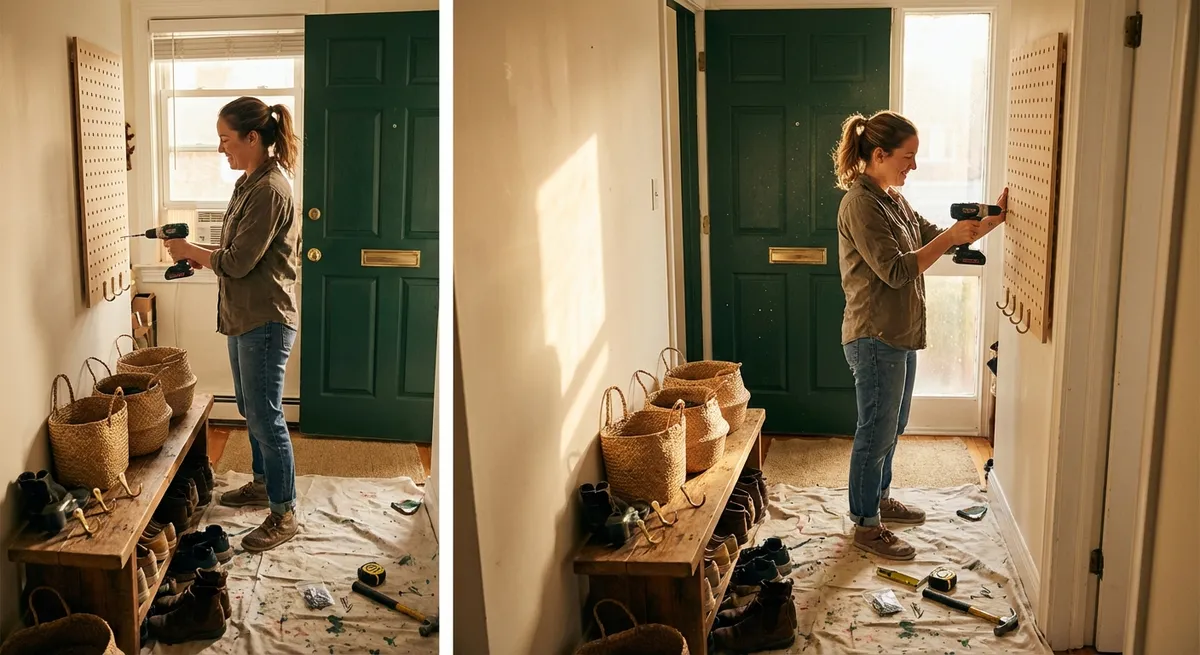
Step 4: Build a Simple, Sturdy Storage Wall
This is the functional heart of your entryway renovation. You’ll create a straightforward setup using three core elements: hooks, a bench (or shoe storage), and a small surface.
Hooks: Vertical storage that works
- Use a 1x4 or 1x6 board as a mounting rail across the main wall, painted to match your trim or wall.
- Locate wall studs with a stud finder and screw the board into them for strength.
- Install hooks spaced about 6–8 inches apart.
- Mount height:
- Adults: top of hooks around 66–70 inches from the floor.
- Kids: add a lower row around 42–48 inches so they can reach their own hooks.
Bench or shoe storage
You have two main DIY-friendly options:
Option A: Simple open bench
- Buy or build a sturdy bench 16–18 inches high (comfortable sitting height).
- Aim for 12–16 inches deep to allow sitting and shoe storage underneath without jutting too far into the walkway.
- Store baskets or low bins under the bench for everyday shoes.
Option B: Closed shoe cabinet
- Choose a shallow, closed-front shoe cabinet if you want to hide clutter.
- Secure it to the wall with brackets or the included anchoring hardware.
- Keep the depth at 10–12 inches for tight spaces.
Small surface for everyday items
- Install a narrow wall-mounted shelf (4–6 inches deep) or a slim console table.
- Place near the door but not blocking it, for keys, wallets, and mail.
- Add a small catch-all tray to prevent things from spreading out.
Anchor anything tall or heavy to the wall, especially in homes with kids or pets. Use appropriate wall anchors if you can’t hit studs.
Step 5: Add Practical Finishing Touches That Keep It Organized
The last details are what keep your entryway from sliding back into chaos.
1. Define zones
- Use a mat or runner to visually mark the “shoe drop” area near the door.
- Dedicate specific hooks:
- One per family member.
- A separate hook for guests.
- One hook for reusable grocery bags or backpacks.
2. Contain the small stuff
- Use labeled baskets or bins under the bench or on a shelf for:
- Hats and gloves
- Scarves
- Dog leashes and waste bags
- A small, vertical mail sorter on the wall helps separate:
- “Incoming”
- “To pay / to handle”
- “To file / recycle”
3. Add a mirror and final checks
- Hang a mirror at eye level near the door.
- A mirror helps bounce light around and makes tight entryways feel larger.
4. Set a simple maintenance rule
- Decide on one habit to keep it under control, such as:
- “No more than 2 pairs of shoes per person at the door.”
- “Mail gets sorted into the wall organizer as soon as we come in.”
- “Coats not worn this week go back to the main closet.”
Post a small reminder note inside a cabinet door or on the side of a shelf if that helps everyone stick to the plan.
Conclusion
A small, messy entryway can feel like a permanent problem, but with a few focused changes you can transform it into a reliable, hardworking space in a single weekend. By mapping how you actually use the area, refreshing the walls and lighting, building a simple storage wall, and finishing with smart organizers, you’ll create an entry that looks better—and makes daily life easier.
The goal isn’t perfection. It’s creating a setup that’s simple enough that your household can keep using it without thinking too much. Build for the way you really live, and your entryway will finally start working for you instead of against you.
Sources
- [U.S. Department of Energy – Lighting Choices to Save You Money](https://www.energy.gov/energysaver/lighting-choices-save-you-money) - Guidance on efficient, high-quality lighting options and bulb types
- [Consumer Reports – How to Choose the Right Paint Sheen](https://www.consumerreports.org/paints-stains/how-to-choose-the-right-paint-sheen-a5780608854/) - Explains which paint finishes work best for high-traffic areas like entryways
- [IKEA – Safety at Home: Securing Furniture](https://www.ikea.com/us/en/customer-service/product-support/safety-and-compliance/tip-over-prevention-pub6285a1e7) - Details why and how to anchor storage pieces to walls
- [This Old House – Entryway Storage Solutions](https://www.thisoldhouse.com/closets/21018094/entryway-storage) - Ideas and examples of practical entryway organization and storage
- [Mayo Clinic – Preventing Falls at Home](https://www.mayoclinic.org/healthy-lifestyle/healthy-aging/in-depth/fall-prevention/art-20047358) - General safety tips relevant to lighting, rugs, and clutter in entry areas
Key Takeaway
The most important thing to remember from this article is that this information can change how you think about Renovation.


