Power saws open the door to real DIY projects—shelves that fit your space, clean trim, straight cuts for flooring, and more. But for a lot of people, they’re also the tool that feels the most intimidating. This guide walks you through choosing, setting up, and safely using a basic circular saw so you can cut wood accurately without feeling like you’re guessing.
We’ll focus on simple, repeatable steps and practical tips you can use on real projects, not just theory.
Start With the Right Saw for Real‑World Projects
Before you cut anything, make sure you’re using a saw that matches what you actually plan to build.
A basic 7‑1/4" corded circular saw is enough for most home projects: building shelves, cutting 2x lumber, trimming plywood, or making straight cuts for small furniture. Corded saws deliver consistent power and don’t die mid‑cut, which is helpful when you’re learning. If you’re often working in spots without outlets, a quality 18V or 20V cordless saw from a major brand (DeWalt, Makita, Milwaukee, Ryobi, Bosch) is a good choice—but cheap cordless saws can bog down and burn wood.
Look for a saw with:
- A solid metal base plate (shoe) rather than flimsy plastic
- Clearly marked depth and bevel adjustments
- An electric brake (blade stops quickly when you release the trigger)
- A standard 5/8" arbor so you can use common blades
If you’re cutting mostly plywood and trim, a “thin‑kerf” fine‑finish blade (40+ teeth) will give cleaner cuts. For construction work (2x4s, deck boards), a 24‑tooth framing blade is durable and fast.
Borrow or rent before buying if you’re unsure. Using a decent saw even once will show you the difference between a tool you fight and a tool that quietly does its job.
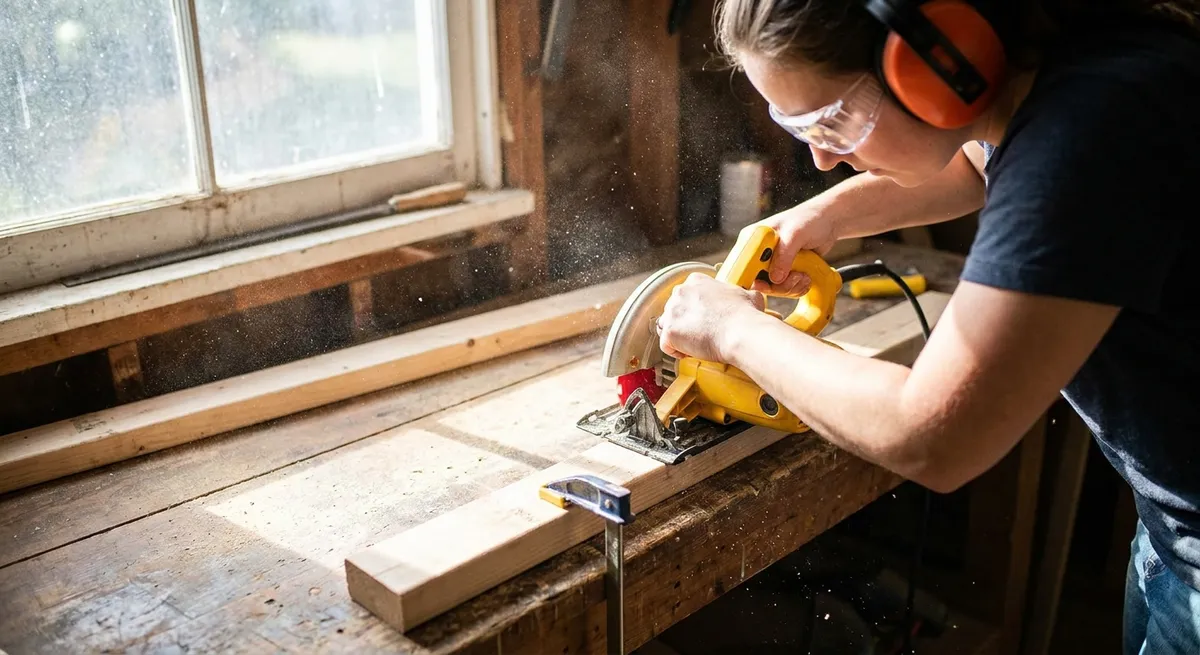
Essential Safety Gear You Should Actually Wear
Circular saws are safe when used correctly—and unforgiving when you get casual. Setting up your safety gear properly is part of using the tool, not an optional extra.
Always use:
- Eye protection: Safety glasses with side shields or, better, wrap‑around goggles. Regular glasses aren’t enough.
- Hearing protection: Foam earplugs or earmuff‑style protectors. Circular saws easily reach levels that can damage hearing over time.
- Dust protection: A disposable dust mask or reusable respirator when cutting a lot of wood, especially plywood or MDF, which can produce fine dust and chemicals.
- Proper clothing: No loose sleeves, scarves, or jewelry. Tie back long hair. Wear non‑slip closed‑toe shoes.
Inspect the saw before each session: check that the blade guard moves smoothly and snaps back over the blade on its own, the cord isn’t damaged, and the trigger doesn’t stick. If anything feels off, don’t “just make it work”—fix it or have it serviced.
Build a habit: gear on, inspection done, work area cleared, then plug in. Doing that in the same order every time makes safe operation automatic.
Step‑By‑Step: Set Up Your Saw for Accurate Cuts
The difference between “DIY‑looking” and pro‑looking projects often comes down to how carefully you set up the tool before you cut. This setup process should become your routine.
Step 1: Install and check the blade
- Unplug the saw or remove the battery. Never skip this.
- Press the arbor lock button (or use the included wrench) to stop the blade from spinning.
- Loosen and remove the arbor nut and outer washer.
- Install the blade with the teeth facing the correct direction (usually toward the front of the saw; check the arrow on the guard and blade).
- Replace the washer and nut, then snug it down firmly but don’t over‑tighten.
- Spin the blade by hand to be sure it moves freely and doesn’t rub the guard.
A dull or wrong blade is one of the main reasons cuts burn, bind, or drift. If the saw feels like it’s fighting you, check the blade first.
Step 2: Set the cut depth correctly
Most beginners run the saw fully extended. That’s unsafe and less accurate.
- Loosen the depth adjustment lever or knob.
- Slide the base plate up or down so the blade extends about 1/8"–1/4" below the material you’re cutting.
- Re‑tighten the depth adjustment securely.
Proper depth means:
- Less exposed blade = safer
- Less strain on the motor
- Cleaner edges, especially on plywood and trim
Make a habit of resetting depth every time you change material thickness.
Step 3: Check that your saw cuts square
Even a small angle error adds up over longer cuts or when pieces need to fit tightly.
- Unplug the saw or remove the battery.
- Set the bevel to 0° and lock it.
- Place a reliable speed square or carpenter’s square against the blade (avoid the teeth; use the side of the blade plate).
- Check if the base plate is perfectly square to the blade.
- If it’s off, adjust the saw’s bevel stop (usually a small screw or bolt near the bevel scale) until the blade and base are true.
Do this once when you first get the saw, and then again if you’ve bumped or dropped it. A square saw makes everything else easier.
Step‑By‑Step: Make Straight, Repeatable Cuts
Random freehand cuts are where people lose accuracy and confidence. Using simple guides makes your saw feel “on rails.”
Step 4: Use a basic cutting support and straightedge
- Set up a stable cutting surface. Two sawhorses with a sheet of sacrificial foam board or scrap plywood on top works well. The workpiece should be fully supported and not sag.
- Mark your cut line with a sharp pencil or fine marker. Extend the line across the full width of the board.
- Clamp a straight board or aluminum straightedge parallel to your cut line, positioned so the saw’s base plate rides against it and the blade falls exactly on your line. Check your saw’s base‑to‑blade distance once, then reuse that offset.
- Double‑check that your clamps are tight and will not be in the saw’s path.
Now your job is just to keep the saw’s base pressed against the guide, not to steer in mid‑cut. That immediately improves accuracy and confidence.
Step 5: Make the cut with control, not force
This is where most new users either go too fast (binding the blade) or too slow (burning the wood). Aim for smooth, steady movement.
- Put on your eye, ear, and dust protection.
- Stand comfortably with a balanced stance, slightly off to the side of the cut line—not directly behind the blade. This keeps you out of the potential kickback path.
- Hold the front handle with your non‑dominant hand and the main handle with your dominant hand.
- Start the saw before the blade touches the wood, letting it come up to full speed.
- Ease the blade into the cut, keeping the base plate flat on the material and pressed firmly against the straightedge.
- Push the saw forward with steady, moderate pressure. Let the blade do the work; if the motor sound drops or the saw strains, you’re pushing too hard.
- Once you finish the cut, keep the saw base on the material until the offcut drops away and the blade guard closes. Release the trigger and wait for the blade to fully stop before moving the saw.
If the wood starts pinching the blade near the end of the cut, pause, support the offcut better, or add a wedge in the kerf (the cut slot) behind the blade so the two sides don’t squeeze together.
Practical Tips to Avoid Common Circular Saw Problems
Little adjustments make a big difference in how easy and safe your cuts feel.
- Support both sides of the cut. If the offcut drops while you’re still cutting, it can bind the blade and cause kickback or splintering. Use scrap blocks, a helper, or your foam‑on‑sawhorses setup.
- Control splintering. For cleaner top edges on plywood or trim, put painter’s tape over the cut line and cut through the tape, or flip the sheet so the “good” side faces down (most circular saws cut cleanest on the underside).
- Mind the cord or battery. Keep the cord behind you and over your shoulder. Don’t let it snag on the workpiece mid‑cut. With cordless, ensure the battery is fully seated before starting.
- Stay out of the cut line. Your body should be offset so if the saw kicks straight back, it doesn’t aim at your torso.
- Never remove or tie back the blade guard. If the guard is sticking, clean or repair it—don’t bypass it.
- Avoid cutting unknown materials. Hidden nails, screws, or metal brackets can destroy blades and cause kickback. Inspect and, if needed, use a metal detector or remove fasteners first.
If something feels wrong—burning smell, heavy vibration, sudden binding—stop, unplug, and inspect. Developing the habit of stopping instead of forcing a bad cut will save wood, blades, and fingers.
Conclusion
A circular saw doesn’t have to be a “scary” tool. With the right setup, a decent blade, and a repeatable process, it becomes one of the most useful tools in your home workshop. Focus on:
- Correct blade installation
- Proper depth and square alignment
- Solid work support and straightedge guides
- Calm, steady cutting technique and consistent safety habits
Once you’re comfortable making straight, accurate cuts, a whole range of realistic DIY projects opens up: custom shelves, clean‑cut trim, workbenches, and small furniture builds. The goal isn’t to work faster—it’s to work safer and more confidently so you can actually finish the projects you care about.
Sources
- [OSHA – Hand and Power Tools](https://www.osha.gov/hand-and-power-tools) – Official U.S. guidance on safe power tool use, including saws and general safety practices
- [Consumer Product Safety Commission – Power Tool Safety Tips](https://www.cpsc.gov/safety-education/safety-guides/tools-and-power-equipment/power-tools) – Practical recommendations for avoiding common accidents with power tools
- [Lowe’s – How to Use a Circular Saw](https://www.lowes.com/n/how-to/use-a-circular-saw) – Step‑by‑step circular saw basics, setup tips, and cutting techniques
- [The Home Depot – Circular Saw 101](https://www.homedepot.com/c/ab/circular-saw-101/9ba683603be9fa5395fab90162c01f9) – Overview of circular saw types, blades, and setup options for DIY users
- [Fine Woodworking – How to Make Perfect Cuts with a Circular Saw](https://www.finewoodworking.com/2012/03/15/how-to-make-perfect-cuts-with-a-circular-saw) – Detailed techniques for improving cut quality and accuracy with simple jigs and guides
Key Takeaway
The most important thing to remember from this article is that this information can change how you think about Tools & Equipment.


