A full kitchen remodel can take months and drain your budget fast—but you don’t have to go “all in” to get a space that feels cleaner, brighter, and more functional. A focused weekend mini-makeover can make a big difference if you plan smart, choose the right upgrades, and stay realistic about what you can finish in two days. This guide walks you through a practical, DIY-friendly plan so you can upgrade your kitchen without tearing it down.
Step 1: Define Your Weekend Scope (So You Don’t Blow the Timeline)
Before you touch a tool, decide what “done” means by Sunday night.
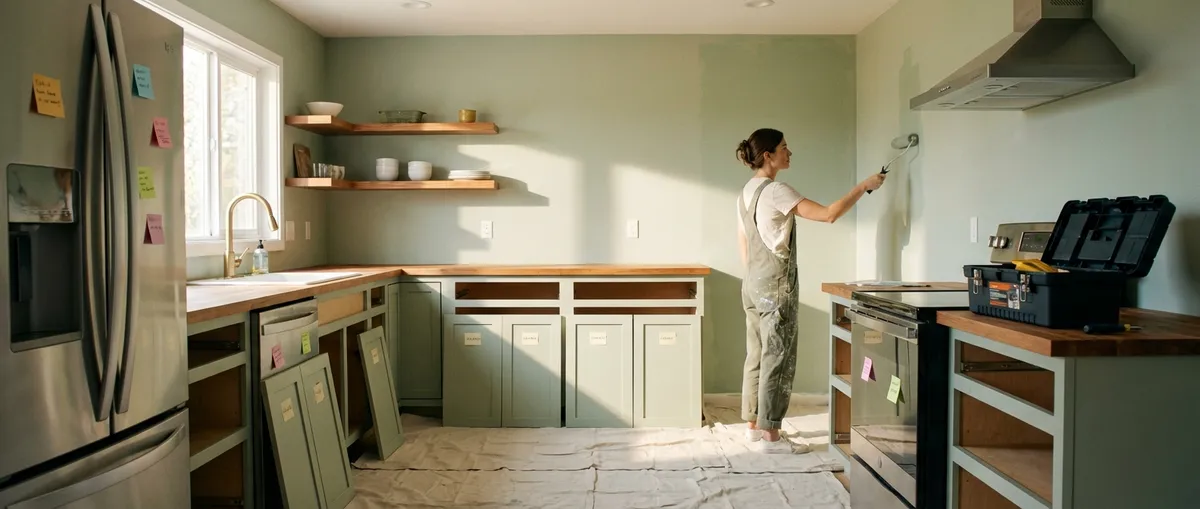
Start by standing in your kitchen and writing down everything that bothers you: dark corners, cluttered counters, dingy cabinets, scuffed walls, bad workflow. Then choose 2–3 targets that give you the most visual or functional impact for the least amount of demolition. Examples of realistic weekend projects include: painting the walls, swapping cabinet hardware, adding a peel-and-stick backsplash, updating light fixtures, or installing simple open storage.
Check your calendar and be honest about your energy level and skill set. If you’re new to DIY, avoid anything that changes plumbing, gas, or electrical wiring behind the walls. Instead, focus on “surface” improvements and simple swaps. Sketch a quick floor plan, note where you’ll be working, and plan to keep at least part of the kitchen usable so you’re not stuck without a sink or fridge. Finally, list each project on a timeline (Saturday morning, Saturday afternoon, Sunday morning, etc.) so you can see if you’re overloading the weekend.
Step 2: Audit, Measure, and Make a Precise Shopping List
Once you’ve defined your scope, move into planning the details.
Walk through each project and record measurements with a tape measure. Measure wall length and height for paint and backsplash, cabinet door and drawer dimensions for hardware, and distances between studs or existing anchors for shelves or pot racks. Take photos of everything—including close-ups of existing hardware, light fixtures, and outlets—so you can reference them at the store or online.
Turn those measurements into a materials list: paint type and quantity, primer if needed, painter’s tape, rollers and brushes, drop cloths, cabinet pulls or knobs (plus a few extras), screws, anchors, caulk, cleaner/degreaser, sandpaper, and any specialty items (like a stud finder or caulk smoothing tool). Check what you already own; many DIYers accidentally buy duplicates of basic tools.
For each item, choose products designed for kitchens: moisture-resistant paint with a washable finish (often satin or semi-gloss), kitchen-safe caulk, and backsplash materials rated for use near stoves and sinks. Build in a small margin for waste (typically 10–15% extra for tile or peel-and-stick materials). Buying everything before the weekend starts prevents mid-project runs that cost you an hour or more every time you leave the house.
Step 3: Prep the Space Like a Pro (This Makes Everything Look Better)
Good prep work is what makes DIY projects look “finished” instead of homemade.
Start by clearing as much as possible from counters, open shelves, and the tops of cabinets. Move small appliances to another room or table. Protect your floors with rosin paper or canvas drop cloths; plastic can be slippery and bunch under your feet. Remove outlet and switch covers, and label them or keep them grouped in small bags with the screws so you don’t lose anything.
Clean all surfaces you’ll be painting, refinishing, or sticking anything to. Kitchen grease and residue will prevent paint and adhesives from bonding properly. Use a degreaser or a mix of warm water and a small amount of dish soap, then rinse with clean water and let everything dry completely. Lightly sand glossy surfaces so paint or peel-and-stick finishes adhere better, then vacuum or wipe off dust.
If you’re painting walls or cabinets, patch holes and dents with spackle, let it dry, and sand smooth. Tape off edges where walls meet ceilings, trim, and backsplash, pressing the tape firmly to avoid bleed-through. Group tools and materials for each task into separate “stations” (paint area, hardware area, backsplash area) so you aren’t constantly hunting for a screwdriver or roll of tape in the middle of a job.
Step 4: Tackle the High-Impact Surfaces First (Walls, Cabinets, and Backsplash)
Use most of your energy on the projects that change how the kitchen feels the moment you walk in.
If you’re painting walls, start as early as possible to maximize drying time between coats. Cut in around edges and corners with a brush, then roll the larger sections. Work in manageable areas and maintain a “wet edge” to avoid lap marks. Typically, two coats give you even coverage; factor in drying time from the paint label before planning a second coat.
For cabinets, a full refinish is beyond a weekend for most people, but a targeted refresh can still work. Focus on cleaning, lightly sanding, and painting only visible faces or a small bank of upper cabinets to create a “two-tone” look (example: darker lowers, lighter uppers). Remove doors and label their locations with tape, then lay them flat for painting. Use a bonding primer if you’re going over stained or glossy wood, then follow with thin, even paint coats to reduce brush marks.
If you’re adding a simple backsplash, peel-and-stick tiles or panels are the most realistic weekend option. Double-check your layout and use a level to keep lines straight. Dry-fit a few pieces before peeling the backing so you understand how they interlock and where you’ll need cuts. Use a sharp utility knife or recommended cutting tool, and keep to clean, straight lines around outlets and corners. Press firmly to secure each piece and revisit any edges that lift as you go.
Step 5: Finish With Smart Upgrades and Careful Reassembly
Once your big surfaces are dry and secure, move on to the details that make daily use easier.
Install new cabinet hardware by using a template or jig to keep holes consistent. If you’re replacing knobs with pulls (or vice versa), you may need to fill old holes with wood filler, sand, and touch up with paint before drilling new ones. Always drill pilot holes to avoid splitting the wood or chipping your finish. Tighten screws snugly, but don’t overtighten—this can strip holes or warp drawers.
Swap out light fixtures only if you’re comfortable working with basic electrical, and always turn power off at the breaker, not just at the switch. If wiring or box conditions look questionable, stop and call a licensed electrician; it’s not worth guessing. For renters or low-commitment changes, consider plug-in pendant lights, upgraded LED bulbs with better color rendering, or under-cabinet plug-in strips to brighten work zones.
Reinstall outlet covers, switch plates, and cabinet doors only after paint is fully dry to the touch and not tacky. Adjust cabinet hinges so doors are level and close cleanly. Then reset your kitchen intentionally: only put back what you actually use on the counters, move rarely used items to higher shelves, and keep frequently used tools within arm’s reach of their work zones (knives near prep space, pans near the stove, etc.).
Take photos of your finished space from the same angles as your “before” shots. Not only is this satisfying to share, it also helps you objectively see what worked and what you might tackle next time. Finally, make a quick note of leftover paint colors, brands, and sheens—this makes future touch-ups or matching much easier.
Conclusion
A weekend kitchen mini-makeover isn’t about perfection—it’s about targeted improvements you can actually complete. By setting a clear scope, measuring and planning carefully, prepping like a pro, focusing on high-impact surfaces, and finishing with thoughtful upgrades, you can transform how your kitchen looks and functions without a full renovation. The key is staying realistic about your time and skills and choosing projects that give you visible results by Sunday night. With a bit of planning, your “just a weekend” update can make your kitchen feel like a whole new room.
Sources
- [U.S. Department of Energy – Kitchens: Improving Your Home’s Efficiency](https://www.energy.gov/energysaver/kitchens) - Overview of kitchen-related improvements that can boost efficiency and comfort
- [Benjamin Moore – How to Paint Kitchen Cabinets](https://www.benjaminmoore.com/en-us/interior-exterior-paints-stains/how-to-advice/interior-how-to-advice/how-to-paint-kitchen-cabinets) - Detailed steps and best practices for cabinet surface prep and painting
- [Family Handyman – How to Install a Kitchen Backsplash](https://www.familyhandyman.com/project/how-to-install-a-tile-backsplash/) - Practical backsplash installation tips, including layout and cutting techniques
- [Lowe’s – How to Replace a Light Fixture](https://www.lowes.com/n/how-to/replace-light-fixture) - Step-by-step guide to safely swapping light fixtures in a residential setting
- [This Old House – Kitchen Remodeling Ideas and Advice](https://www.thisoldhouse.com/kitchens) - Collection of kitchen upgrade ideas, including small-scale projects suitable for DIYers
Key Takeaway
The most important thing to remember from this article is that this information can change how you think about Renovation.


