A noisy home can make even the nicest renovation feel unfinished. Footsteps overhead, TV noise bleeding through walls, barking dogs outside—none of that shows up in listing photos, but you feel it every day. The good news: you don’t need a full gut renovation or pro-level gear to make your space noticeably quieter. With some planning and a few targeted upgrades, you can cut a surprising amount of noise using DIY‑friendly methods during your next renovation.
This guide walks you through five practical, step‑by‑step soundproofing projects you can tackle while you’re already in renovation mode.
Understand Where the Noise Is Really Coming From
Before you start adding panels or caulk, you need to diagnose the actual paths the noise is taking. Sound usually sneaks in through three main routes: air gaps, thin assemblies, and rigid connections that carry vibration.
- Do a simple “noise audit.”
Sit quietly in the room at different times of day. Note when and where you hear outside traffic, neighbors, plumbing, HVAC, or footsteps. Put your ear near windows, doors, outlets, and walls to see where it’s loudest.
- Identify the biggest weak spots.
Common culprits: hollow-core doors, old single-pane windows, unsealed gaps around trim, thin interior walls (especially shared walls), and ceilings under hard-surface floors.
- Check for air leaks.
Turn off HVAC and fans. On a windy day, hold a lit incense stick or a very light tissue around window frames, door frames, and baseboards. Movement indicates an air leak—and likely a sound leak.
- Look for “sound bridges.”
Sound travels well through continuous materials. Think: metal ducts touching framing, pipes tight to studs, or drywall screwed to both sides of the same stud. Wherever vibration can travel, sound will follow.
- Prioritize by impact, not perfection.
Aim to address the loudest, most-used spaces first (bedrooms, home office, living room). You’re reducing noise, not building a recording studio.
Step 1: Seal Gaps and Cracks to Block Airborne Noise
This is the easiest, most underrated soundproofing upgrade—and it’s cheap. A lot of noise slips through the same cracks that let in drafts.
- Gather the right materials.
- Acoustic sealant (non-hardening, labeled for sound or acoustical use)
- High-quality silicone or acrylic latex caulk
- Weatherstripping (adhesive foam or rubber)
- Door sweeps or automatic door bottoms
- Caulk gun, utility knife, and rags
- Seal gaps around window and door frames.
Inside the room, run a thin bead of caulk where the trim meets the wall and where the trim meets the window/door frame. Smooth it with a damp finger or caulk tool. This closes tiny paths for sound and drafts.
- Fill gaps at baseboards and wall penetrations.
Check where baseboards meet the floor and wall. Seal visible cracks. Around outlets, cable jacks, and plumbing penetrations, use acoustic sealant to close gaps between the box or pipe and surrounding drywall.
- Upgrade door seals.
- Add adhesive weatherstripping around the door stop to close side and top gaps.
- Install a door sweep or automatic door bottom to eliminate the gap at the threshold.
This makes a big difference for bedrooms and offices.
- Use acoustic sealant in open wall or ceiling assemblies.
If you’ve opened walls during renovation, run acoustic sealant along all seams where drywall meets framing, around boxes and pipes, and at any crack-prone joints before closing up. Unlike regular caulk, acoustic sealant stays flexible and keeps blocking sound as the house moves.
Step 2: Upgrade Doors from Hollow to Solid for Better Sound Blocking
Interior doors are often hollow-core, which act like drums for sound. Swapping them for solid-core models is a manageable DIY project that yields a big improvement.
- Assess which doors matter most.
Focus on doors to bedrooms, home offices, nurseries, and between noisy and quiet zones (e.g., living room to hallway). You don’t have to replace every door in the house.
- Choose the right replacement door.
Look for:
- Solid-core or solid wood interior doors
- Matching size (height, width, and thickness)
- Similar hinge placement if possible (for easier swapping)
Pre-hung units are easier if you’re comfortable replacing the entire frame.
- Remove the existing door.
Pop the hinge pins with a screwdriver and hammer, then lift the door off. If reusing hinges, label them “top,” “middle,” “bottom” to reinstall in the same positions.
- Fit and hang the new door.
- Dry-fit the new door to make sure it closes without binding.
- Plane edges if needed for smooth clearance (leave about 1/8" gap on sides/top).
- Install hinges, hang the door, and test the swing and closure.
- Finish with sound-sealing details.
- Add quality weatherstripping to the frame for a snug seal.
- Install a door sweep or threshold seal to close the bottom gap.
- Use solid, well-installed strike plates and latches so the door closes firmly without rattling.
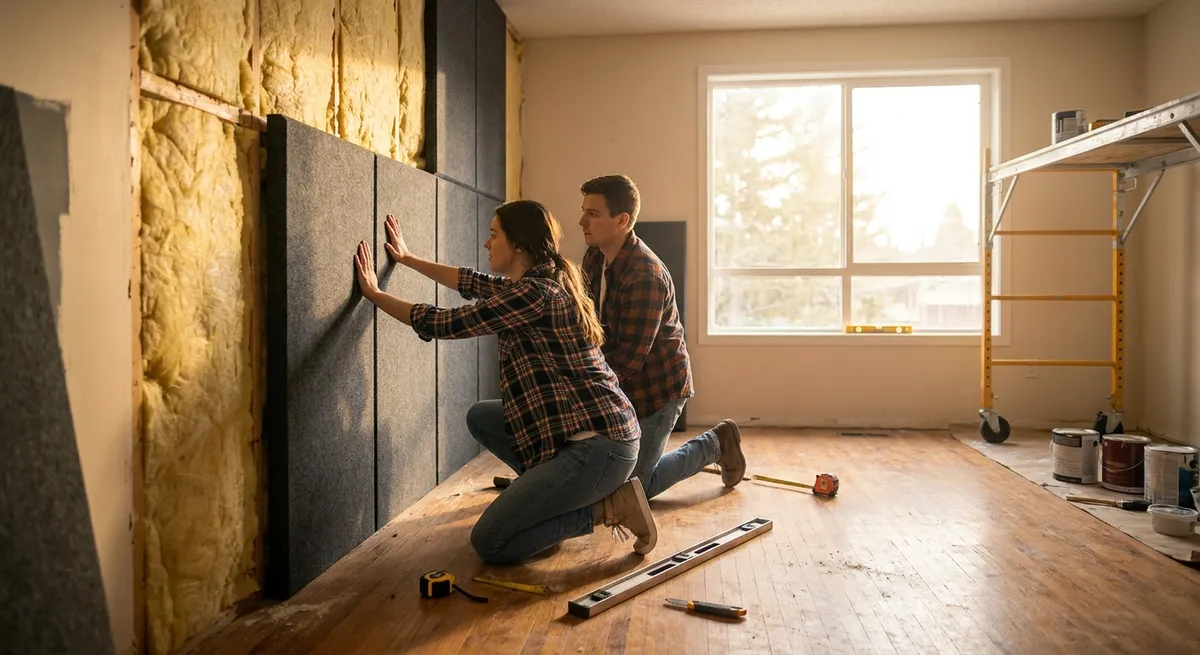
Step 3: Add Mass and Damping to Walls During Renovation
If you have a wall open during renovation, you have the perfect chance to upgrade it for sound without much extra cost. The key concepts: more mass and less vibration.
- Decide how far you want to go.
Options during open-wall work:
- Basic: Standard insulation + careful sealing
- Better: Insulation + damping compound + extra drywall layer
- Best (still DIY-friendly): Staggered studs or resilient channels + insulation + double drywall with damping
- Install sound-absorbing insulation.
Use mineral wool or high-density fiberglass batts rated for sound control (often labeled “soundproofing” or “acoustic”). Cut snugly to fit between studs and around electrical boxes without compressing too tightly.
- Add damping between drywall layers (if possible).
If you’re okay with increasing wall thickness:
- Install the first layer of drywall as normal.
- Apply a damping compound (like Green Glue) in a random pattern to the back of a second sheet of drywall.
- Screw the second layer over the first, staggering seams so they do not line up.
- Break vibration paths where you can.
- Consider staggered stud layouts or resilient channels to create separation between drywall layers.
- Make sure drywall on each side of a staggered wall doesn’t share the same studs.
- Finish with airtight detailing.
- Use acoustic sealant at all perimeter joints and around openings.
- Use putty pads or acoustic gaskets around electrical boxes on shared walls.
- Avoid back-to-back electrical boxes on the same stud bay whenever possible.
If building a new partition or heavily rebuilding:
Step 4: Quiet Floors and Ceilings to Reduce Footstep and Impact Noise
Impact noise (footsteps, dropped items, chairs moving) transfers easily through hard floors and framing. Renovation is the moment to address it from above, below, or both.
- Soften the walking surface where possible.
- Choose carpet or padded luxury vinyl tile/plank in upstairs bedrooms or hallways if noise is a big concern.
- If you prefer hard flooring, plan for area rugs with dense pads in key locations (bedsides, seating areas, kids’ play zones).
- Add an underlayment during flooring work.
When installing new floating floors (laminate, engineered wood, some vinyl):
- Upgrade the ceiling from below when accessible.
If you can work on the ceiling of the room below:
- Fix squeaks while the floor is open.
- Refasten subflooring to joists with construction screws to reduce movement that causes creaks.
- Add beads of construction adhesive between joists and subfloor where accessible.
- Control noise from plumbing and HVAC in floors/ceilings.
- Wrap noisy drain pipes with pipe insulation or sound wrap before closing ceilings.
- Use flexible connectors where appropriate to reduce vibration transfer from equipment.
Step 5: Tame Echo and Room Noise with Smart Interior Finishes
Even if you block outside noise, a room can still sound harsh and loud inside. This is about acoustics, not soundproofing—but it dramatically improves how “quiet” a room feels.
- Identify hard, reflective surfaces.
Rooms with bare walls, big windows, hard floors, and minimal furniture will echo. Clap your hands and listen for a sharp, lingering reflection. That’s reverb you can fix with soft finishes.
- Add soft, sound-absorbing materials.
- Use curtains with some thickness (thermal or blackout styles work well) over large windows.
- Choose upholstered furniture rather than all-wood or metal.
- Add rugs and thick rug pads over hard floors, especially in living rooms and bedrooms.
- Use acoustic panels where it matters most.
For home offices, media rooms, or echoey living spaces:
- Break up large flat surfaces.
- Bookshelves filled with books and decor help diffuse sound.
- Wall-mounted shelves, fabric art, and plants all contribute to breaking up reflections.
- Balance appearance and performance.
You don’t need studio-style foam everywhere. Aim for a mix of decor that you like visually and that also absorbs or scatters sound. If a room feels “dead,” you can back off; the goal is comfortable, not unnatural.
Conclusion
Soundproofing doesn’t have to mean tearing your house apart or spending like a commercial studio. By sealing gaps, upgrading key doors, adding targeted mass and damping in walls, quieting floors and ceilings, and choosing sound-friendly finishes, you can make your home noticeably calmer during an ordinary renovation.
The best time to think about noise is before you close walls or install new finishes—but even if you’re working with finished spaces, you still have plenty of DIY options. Start with the loudest room, pick one or two of the steps above, and build from there. A quieter home tends to feel more expensive, more comfortable, and a lot more livable—without changing a single paint color.
Sources
- [U.S. Environmental Protection Agency – Noise Pollution](https://www.epa.gov/clean-air-act-overview/noise-pollution-and-its-control) - Overview of how noise affects health and why controlling it indoors matters
- [U.S. Department of Energy – Air Sealing Your Home](https://www.energy.gov/energysaver/air-sealing-your-home) - Explains how sealing gaps reduces air (and sound) leakage in buildings
- [Green Glue Company – How Green Glue Noiseproofing Works](https://www.greengluecompany.com/how-green-glue-works) - Technical explanation of damping compounds used between drywall layers
- [Johns Hopkins University – Soundproofing and Acoustics Basics](https://ep.jhu.edu/programs-and-courses/courses/670.421-sound-and-vibration-control/) - Course overview describing core concepts of sound, vibration, and control methods
- [U.S. General Services Administration – Sound Control for Interior Spaces](https://www.gsa.gov/real-estate/design-construction/engineering/technical-procedures/sound-control-for-interior-spaces) - Government guidance on interior sound control strategies and assemblies
Key Takeaway
The most important thing to remember from this article is that this information can change how you think about Renovation.


