Not every renovation has to involve tearing down walls or a full-room makeover. If you’ve got loud neighbors, street noise, or echoey rooms that make every sound feel bigger, soundproofing is a smart, focused upgrade that can change how your home feels every day. This guide walks you through practical, DIY-friendly ways to reduce noise transfer and improve acoustic comfort—without needing professional training or a huge budget.
Understand Where the Noise Is Really Coming From
Before you start buying materials, you need a clear picture of how sound is moving through your space. Skipping this step can leave you frustrated and out money with very little improvement.
First, identify the type of noise you’re dealing with. Airborne noise (voices, TV, music, traffic) travels through the air and leaks through gaps and thin surfaces. Impact noise (footsteps, things dropping, chairs dragging) travels through the structure—floors, joists, and walls. Each type needs a slightly different approach.
Walk around the room during a noisy time and listen carefully. Put your ear near windows, doors, outlets, and vents. Notice if the noise gets louder near a shared wall or ceiling. Then, clap your hands in the center of the room. A sharp echo means the room is also acoustically “lively,” which makes everyday sounds feel louder inside.
Take quick notes: where the noise is strongest, what time of day it’s worst, and whether it’s more thumps or voices. This short diagnostic helps you decide where your DIY effort will pay off most—windows, doors, walls, or floors.
Step 1: Seal the Gaps That Leak the Most Sound
Sound moves through air, so if air can pass through, noise can too. Sealing gaps and cracks is one of the simplest, cheapest, and most effective first steps you can take.
Start with the door. From inside the room, turn off the lights during the day and check if you see daylight around the door frame or under the door. Any visible light is a sound leak. Add a door sweep along the bottom edge to close the gap to the floor. For the sides and top, stick-on weatherstripping foam or rubber can create a tighter seal when the door is closed.
Next, inspect windows. Run your hand around the edges on a windy day or use a lit incense stick; if smoke wavers, you have air leaks. Use caulk around the exterior trim if you own the home, or removable rope caulk on the inside if you want something less permanent. Apply adhesive-backed foam weatherstripping where the sashes meet to reduce rattling and vibration.
Don’t skip the small openings. Outlets and light switches on shared walls can leak surprising amounts of sound. With the power off at the breaker, remove cover plates and install foam gasket inserts. For larger gaps or cracks in baseboards, trim, or wall corners, use paintable acoustic caulk, which stays flexible and absorbs more vibration than standard caulk.
This step won’t make your room silent, but it tightens up the “weak points,” so your later improvements work better and you get an immediate, modest noise reduction.
Step 2: Add Soft Surfaces to Calm Echo and Everyday Noise
Even if outside noise is part of the problem, many rooms feel louder simply because sound bounces around inside. Hard floors, bare walls, and minimal furniture make echoes worse. Adding soft, absorbent materials is an easy DIY “renovation” that doesn’t require tools.
Start with the floor. If you have wood, tile, or laminate flooring, a thick area rug with a dense rug pad underneath can make a big difference. The pad matters more than the rug thickness—look for felt or rubber/felt blends rather than thin foam. The more floor you cover, the more echo and impact noise you soften.
Next, look at the walls. You don’t need expensive studio panels. Heavy fabric wall hangings, large canvas art with a layer of batting behind it, or fabric-covered corkboards can all absorb sound. Mount them on the wall opposite the main noise source or on the largest bare wall to break up reflections.
Don’t forget corners and ceilings. Tall bookcases filled with books, baskets, and decor act as “diffusers,” scattering sound instead of letting it bounce straight back. In especially echo-prone rooms, fabric-wrapped ceiling clouds or even simple, dense curtains hung a few inches off the wall can calm the space noticeably.
This step is particularly helpful in multipurpose rooms: home offices, living rooms, or gaming spaces where microphones pick up every little sound. Soft surfaces don’t stop noise from entering, but they do make rooms feel quieter and more comfortable to be in.
Step 3: Upgrade Doors and Windows for Better Sound Blocking
If you’ve sealed gaps and added soft surfaces but still hear TV dialogue or traffic clearly, the next upgrade is improving the actual “barriers”: doors and windows. This is more of a renovation-level step but still manageable for many DIYers.
Hollow-core interior doors are light and poor at blocking sound. If your problem wall has one, consider replacing it with a solid-core door. These are heavier and denser, which means less sound passes through. Measure your existing door carefully, match hinge locations if possible, and have a second person help with lifting. Once installed, pair it with the weatherstripping and door sweep from Step 1.
For renters or smaller budgets, you can add mass to an existing door. One option is to mount a decorative MDF panel or thin plywood sheet onto the door with construction adhesive and finish nails, then paint it to match. Another is a “door blanket”: a dense, quilted moving blanket or specialized sound-dampening curtain hung on a French cleat or hooks so you can remove it when needed.
Windows are often the biggest leak to the outside world. If replacement isn’t in the budget, install heavy, tightly woven “blackout” or “thermal” curtains. Hang them wider and higher than the window frame and let them pool slightly at the floor to cover gaps. For a bigger upgrade, build or buy insert-style window plugs: rigid foam board layered with mass-loaded vinyl, wrapped in fabric, cut to friction-fit inside the window frame. They can dramatically cut traffic noise when in place, especially at night.
If you own your home and are ready for a more permanent fix, consider upgrading to double- or triple-pane windows with laminated glass. They cost more upfront but improve energy efficiency and sound reduction long-term.
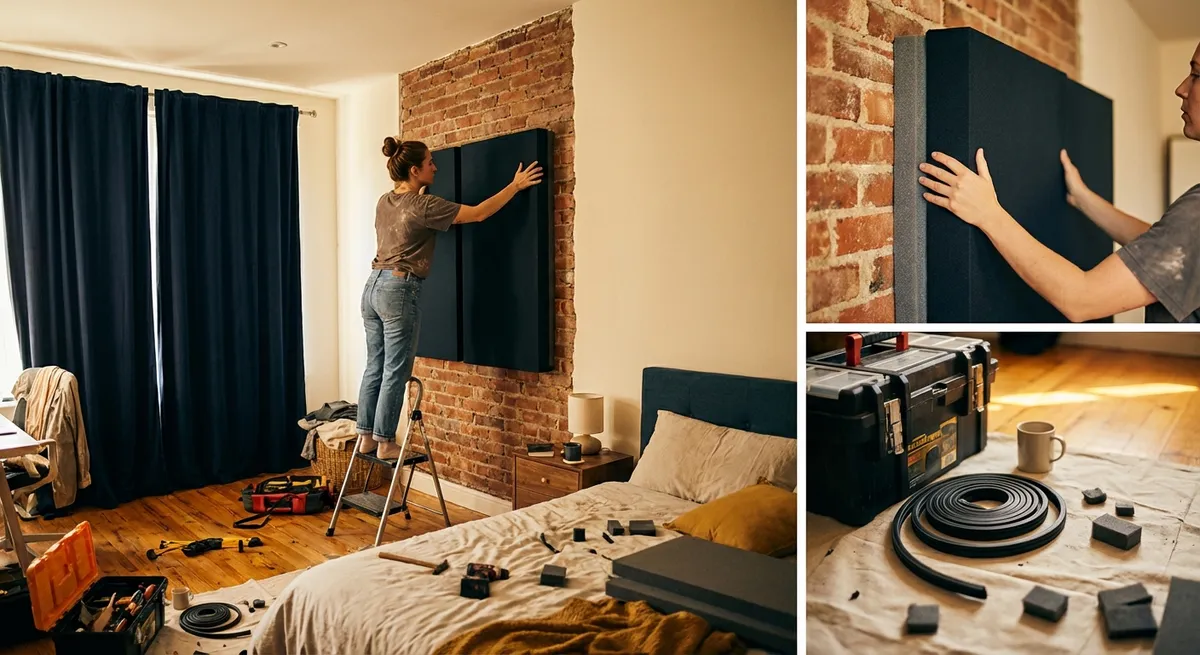
Step 4: Build a Quieter Wall Without a Full Gut Renovation
If most of the noise is coming through one shared wall—like between apartments, or between a bedroom and a noisy living room—you can reduce sound transfer without completely demolishing the wall. The goal here is to add mass and decouple surfaces so vibrations don’t travel as easily.
A practical DIY approach is to add a new layer of drywall over the existing wall. Use 5/8" Type X drywall instead of the thinner standard sheets—more mass equals better blocking. Run acoustic sealant around the perimeter of the wall first, then install the new drywall layer with screws, staggering seams so they don’t line up with the old ones.
For a more effective upgrade, install resilient channels or sound isolation clips on the existing studs or drywall before adding the new layer. These metal strips create a small air gap and “decouple” the new wall surface from the original structure, reducing how well vibrations pass through. Follow the manufacturer’s spacing and screw placement instructions carefully to avoid accidentally short-circuiting the system.
In between, you can add insulation if the wall is already open or if you’re willing to open limited sections. Dense fiberglass or mineral wool batts both help. Mineral wool is fire-resistant and a bit better for sound, but either is an improvement over an empty cavity.
Finish by sealing all perimeter seams and any gaps around outlets with acoustic caulk before taping, mudding, and painting. This is a more advanced DIY step but very achievable for someone comfortable with basic drywall work—and the noise reduction across a single problem wall can be substantial.
Step 5: Tackle Ceiling and Floor Noise Between Levels
Noise between floors—upstairs footsteps, downstairs music, or kids running—can be some of the most frustrating. Reducing it usually means addressing both the ceiling below and the floor above, but you can still make progress with work on one side.
From the ceiling side, the approach is similar to the shared wall method. If you’re open to a modest ceiling drop, you can install resilient channels or sound isolation clips to the existing joists, then hang a new layer of 5/8" drywall. Use acoustic caulk at all edges and seams, and consider two layers of drywall with a damping compound between them for stronger results.
If you’re not ready for structural work, start with what you can do from the floor above. Add thick area rugs and dense pads in high-traffic zones—especially hallways, kids’ rooms, and around couches or dining tables. This won’t stop deep thuds completely, but it can significantly reduce the sharpness and frequency of impact noise.
For homeowners planning a flooring upgrade, choose materials with better sound performance. Floating floors with underlayment rated for impact insulation (look for IIC/STC ratings) can reduce footfall noise. Avoid bare, thin laminate over wood joists if noise is a concern; pairing it with a high-quality acoustic underlayment is essential.
Around the edges of the floor, seal gaps where the subfloor meets the walls and around any penetrations for pipes or vents. Vibrations often sneak through these “invisible” paths. Again, flexible acoustic sealant is your friend here.
Managing expectations is important: floor and ceiling sound is one of the hardest issues to eliminate without major work. But with smart layering—rugs, pads, upgraded ceilings, and better floor assemblies—you can bring it down to a more livable level.
Conclusion
Soundproofing isn’t about making your home perfectly silent; it’s about reducing the noise that wears you down and making your rooms feel calmer and more private. Start with the basics: seal the gaps, soften the surfaces, and tackle the obvious weak points like thin doors and bare windows. Then, if you’re ready for a deeper renovation, add mass and isolation where noise is worst—shared walls and ceilings.
You don’t need to do every step at once. Pick one room, focus on its biggest noise source, and work through these upgrades in stages. Each layer adds up, and over time, you end up with a space that sounds as good as it looks—and finally feels like yours.
Sources
- [U.S. Department of Energy – Air Sealing Your Home](https://www.energy.gov/energysaver/air-sealing-your-home) - Explains how and why to seal gaps and cracks, which also helps block sound leaks.
- [Green Building Advisor – Soundproofing a Room](https://www.greenbuildingadvisor.com/article/soundproofing-a-room) - Technical overview of soundproofing concepts like decoupling, mass, and damping.
- [The Spruce – How to Soundproof a Room](https://www.thespruce.com/how-to-soundproof-a-room-1821464) - Practical homeowner-focused tips on improving room acoustics and blocking noise.
- [Johns Hopkins University – How Sound Travels](https://www.exploratorium.edu/snacks/how-sound-travels) - Basic explanation of how sound moves through air and materials, helpful for understanding what your fixes are doing.
- [National Renewable Energy Laboratory – Windows and Insulation](https://www.nrel.gov/buildings/windows-insulation.html) - Background on how windows and building assemblies affect energy and, indirectly, sound performance.
Key Takeaway
The most important thing to remember from this article is that this information can change how you think about Renovation.


