Noisy, squeaky floors make a home feel older, cheaper, and more stressful than it really is. The good news: in many cases, you can quiet them down without a full gut renovation. Whether you’re dealing with creaks in a second-floor bedroom or hollow thuds over a living room, you can tackle floor noise systematically and make a real difference in a weekend.
This guide walks you through a practical, step‑by‑step approach to diagnosing and fixing noisy floors—without ripping your house apart.
Understand What’s Making Your Floor So Loud
Before you reach for screws or construction adhesive, it helps to know what you’re actually trying to fix. Most floor noise comes from movement: wood rubbing against wood, metal, or fasteners as you walk across it. The more things flex, the more noise you get.
Common culprits include:
- Subfloor not firmly attached to joists (loose nails, gaps, or warped panels)
- Floorboards rubbing against each other or against nails/screws
- Gaps between finished flooring and subfloor
- Joists that are out of level or split, causing extra flex
- HVAC ducts, plumbing, or wires touching the subfloor or joists and vibrating
Spend a few minutes walking the space in quiet. Pay attention to:
- Where exactly the sounds come from (mark spots with painter’s tape)
- What type of sound you hear (sharp squeak, creak, dull thud, rattle)
- Whether the sound happens on every step or only at certain angles
The more precise you are at this stage, the fewer unnecessary holes and patches you’ll have later.
Step 1: Map Problem Areas from Above and Below
Start by locating squeaks from the living space, then confirm from below if you have basement or crawlspace access.
- Walk and mark from above.
Move slowly across the room in socks or soft shoes. When you hear a squeak or hollow sound, stop and press with one foot, then the other, to zero in on the loudest spot. Mark it with painter’s tape or a pencil X.
- Check patterns.
Look for lines of tape or marks that run across the room. Those often line up with joists or seams in the subfloor. Clusters of marks can indicate a loose subfloor panel or a problem joist.
- Go below, if possible.
In an unfinished basement or crawlspace, look up at the underside of the floor where you marked above. Use a stud finder or a small nail to confirm the subfloor/joist layout if it’s not obvious.
- Have a helper walk above.
While you watch from below, have someone walk and stand on the marked spots. You’re looking for visible movement: subfloor flexing, joists twisting, or pipes buzzing against wood.
- Note obstacles.
Identify anything that could get in the way of repairs from below: ductwork, plumbing, electrical, finished ceilings. This will tell you which squeaks are realistic to fix from underneath and which will need work from the top side only.
This mapping step keeps you from firing random screws into your floor, hoping one hits the right spot.
Step 2: Secure Loose Subfloor from Below
If you have access from underneath, this is often the most effective and least invasive way to quiet floors—especially over basements and garages.
- Confirm the problem.
While a helper walks above, watch for subfloor edges lifting from joists or panels that flex when stepped on. You may also hear the squeak directly from below.
- Pre‑drill if necessary.
For older, dry subfloor or hardwood joists, pre‑drill pilot holes slightly smaller than your screw diameter to reduce splitting. Aim for 2–3 screws per joist where the floor moves.
- Use proper screws.
Choose structural or subfloor screws (not drywall screws). Typical length is 2½–3 inches so they bite into the joist without poking through the flooring above.
- Add construction adhesive for chronic squeaks.
If you find a visible gap between subfloor and joist, run a bead of construction adhesive along the top of the joist and press the subfloor down with clamps or screw it tight while the adhesive is still wet.
- Re‑test after fastening.
Have your helper walk the same area again. If the noise is reduced but not gone, add a few more screws within 4–6 inches of the noisy spot, then test once more.
Working from below lets you reinforce the structure without touching your finished floors, which is ideal if you’re not planning a full cosmetic renovation.
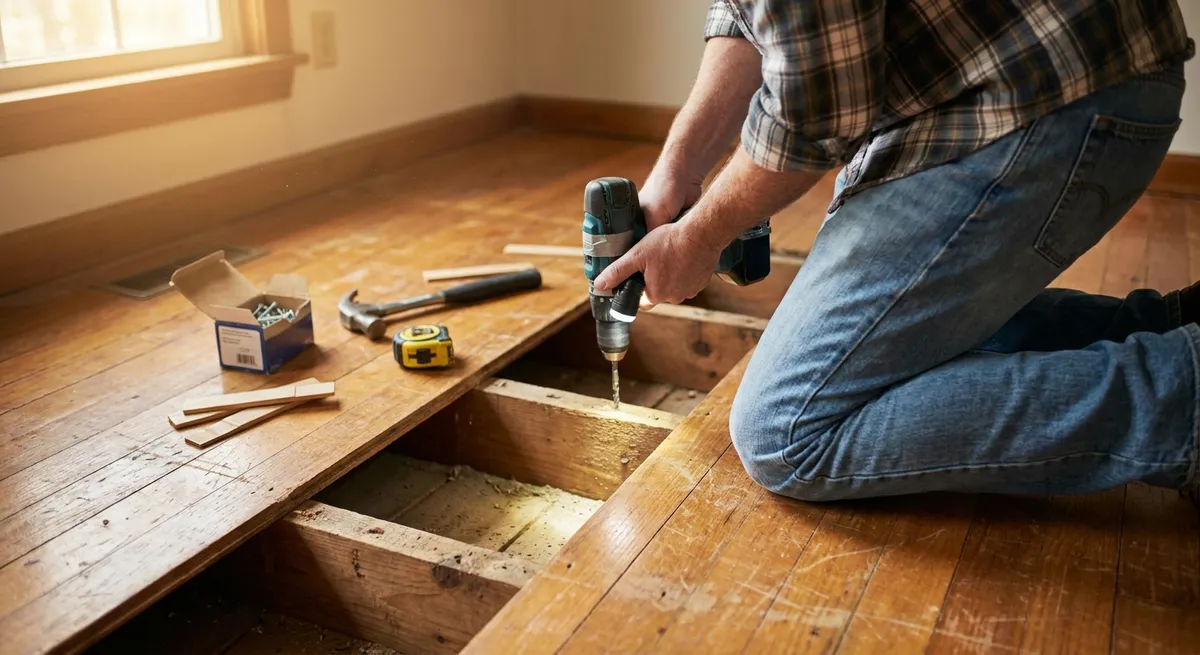
Step 3: Tackle Squeaks from Above Without Replacing the Floor
If you don’t have access from underneath—or you’re dealing with a top floor—there are still solid options that don’t involve ripping everything out.
- Identify joist direction.
Use a stud finder with deep scan mode or tap along the floor to find areas that sound more solid (over joists) versus hollow (between them). Joists usually run the same direction across a room.
- Use slim, flooring‑friendly fasteners.
For carpeted floors, specialty squeak‑repair kits let you drive breakaway screws through the carpet into the subfloor and joist, then snap the screw heads off below the pile. For hardwood, opt for trim-head or flooring screws you can sink below the surface and fill.
- Space your screws.
Start with one screw at the center of the squeak and test. If noise remains, add screws 3–4 inches to either side along the joist line. Don’t overdo it—you want just enough to stop movement.
- Fill and blend for hardwood.
After you’ve confirmed the squeak is gone, fill the small screw holes with a matching wood putty or wax stick. Wipe away excess and buff once dry to blend.
- Use shims with caution.
If you can slide a thin wood shim between subfloor and a supporting beam from above (typically only possible at room edges or under trim), add a dab of construction adhesive first, insert the shim gently until snug—not forced—and trim the excess flush.
This approach lets you target squeaks in finished spaces where you don’t want, or can’t justify, a full flooring replacement.
Step 4: Reduce Hollow Footfall and Vibration
Not all noisy floors are about squeaks. Sometimes the problem is that every step sounds like a drum. That’s usually from lack of mass, lack of damping, or poor separation between the floor and the structure.
- Add underlayment during any new flooring work.
If you’re planning to replace carpet, laminate, or engineered wood, choose an underlayment rated for sound control (look for IIC and STC ratings on the packaging). This goes between the subfloor and your finished flooring to absorb impact noise.
- Seal gaps at edges.
Gaps around the perimeter of rooms, especially where flooring meets walls or stair openings, can leak sound. Use acoustical caulk (not rigid grout) where appropriate to maintain flexibility while closing air gaps.
- Decouple where possible.
For major renovations with access to joists, consider resilient channels or sound isolation clips on ceilings below noisy rooms. This separates drywall from joists, reducing the amount of vibration transmitted.
- Densify strategically.
Heavier floors generally transmit less impact noise. If you’re doing a big reno, an extra layer of plywood or OSB glued and screwed to the existing subfloor can stiffen the floor system and reduce both flex and noise.
- Soft‑surface fixes for now.
If structural changes aren’t in the cards, simple solutions like thicker area rugs with dense pads, felt furniture pads, and door sweeps can substantially cut the everyday “thud” of footfalls, dropped items, and moving chairs.
Focusing on sound control during any planned flooring upgrade pays off long‑term—and is far cheaper than trying to retrofit later.
Step 5: Prevent Future Squeaks When You Renovate
When you’re already opening floors or planning a remodel, you have the perfect chance to build quiet into the structure from day one.
- Use the right subfloor materials and thickness.
Follow or exceed your local building code for subfloor thickness, especially for tile or stone finishes that need very stiff floors. Thicker panels with tongue‑and‑groove edges resist flexing and reduce squeaks.
- Glue and screw, don’t just nail.
Apply a continuous bead of construction adhesive to joists before laying subfloor panels. Fasten with coated screws or ring‑shank nails at the spacing your code or manufacturer recommends. Screws are more resistant to working loose over time.
- Stagger seams and support edges.
Make sure panel seams are staggered and edges land on joists or blocking, not “hanging” between supports. Unsupported seams flex more and are a common source of future noise.
- Install solid blocking in problem spans.
If joists span long distances or you notice twist/flex while walking on bare subfloor, install solid blocking or cross‑bracing between joists at mid‑span. This stiffens the floor system and cuts both bounce and squeak potential.
- Test before covering.
Before you install finished flooring, walk the entire space on bare subfloor. Jump lightly in different spots, listen for movement or squeaks, and add screws or blocking wherever you notice flex. Fixing it now is dramatically easier than after everything is finished.
Designing for a quiet floor upfront means less patchwork later—and a home that feels more solid and comfortable every time you walk through it.
Conclusion
Noisy floors can make even a nicely renovated space feel cheap and unfinished, but you don’t always need a full tear‑out to fix them. By mapping problem areas, securing loose subfloors from above or below, improving sound control where you can, and building better practices into any future renovation, you can dramatically cut down on squeaks and hollow echoes with fairly basic tools.
Start with the easiest access—usually from below—work methodically, and re‑test after each fix. Over a weekend or two, you can turn loud, creaky rooms into quiet, solid spaces that feel far more “finished” every time you take a step.
Sources
- [U.S. Department of Housing and Urban Development – Residential Rehabilitation Inspection Guide (Chapter on Floors)](https://www.hud.gov/program_offices/comm_planning/affordablehousing/training/web/rehab) - Covers structural floor issues, subfloor attachment, and common defects
- [APA – The Engineered Wood Association: Preventing & Repairing Floor Squeaks](https://www.apawood.org) - Technical guidance on subfloor materials, fastening, and squeak prevention (search “floor squeaks” on site)
- [Fine Homebuilding – Quiet Floors: Build and Retrofit for Less Noise](https://www.finehomebuilding.com/project-guides/framing/how-to-build-quiet-floors) - Practical details on stiffening floor systems and reducing squeaks and bounce
- [Johns Hopkins University – Architectural Acoustics Basics](https://pages.jh.edu/jhumag/0999web/sound.html) - Explains how sound and vibration travel through building structures
- [International Code Council – International Residential Code (IRC) Overview](https://codes.iccsafe.org/category/IRC) - Reference for structural and subfloor requirements that influence floor performance and noise
Key Takeaway
The most important thing to remember from this article is that this information can change how you think about Renovation.


