Most bathrooms feel “stuck” not because of the layout, but because of old finishes, dim lighting, and worn details. You don’t need to move walls, reroute pipes, or gut the room to make it feel new. With the right plan, you can update surfaces, storage, and lighting in a focused way that actually gets finished—without blowing your budget or your weekend.
This walkthrough gives you a practical, step‑by‑step sequence to refresh a dated bathroom using DIY‑friendly projects. You’ll work from planning and prep to five clear upgrade steps you can tackle in stages.
Start With a Simple Bathroom Checkup
Before you buy a single tile or light fixture, get clear on what you’re fixing and what you’re keeping. That prevents scope creep and half‑finished “forever” projects.
Walk your bathroom and take notes:
- Look at the “big three” surfaces: walls, floor, and vanity. Are they dirty, damaged, or just ugly?
- Check lighting at night and in the morning. Do you have enough light at the mirror, shower, and overall?
- Inspect visible damage: peeling caulk, cracked grout, water stains on the ceiling, swollen baseboards.
- Open and close cabinet doors and drawers. Do they stick, sag, or feel flimsy?
- Think about daily annoyances: no towel hook by the shower, nowhere to put a hair dryer, crowded countertop.
From this, decide:
- What absolutely must be repaired (safety and water damage first).
- What can stay as‑is (for now).
- What you’ll upgrade for a visual reset.
Take a few photos and measurements of your walls, vanity top, mirrors, and floor. These will help you compare products and quantities while shopping without guessing.
Step 1: Clean, Repair, and De‑Gloss the Basics
Renovations go smoother when you start with a clean, sound base. This step isn’t glamorous, but it’s where a “quick update” either succeeds or fails.
Deep clean all surfaces
- Use a bathroom cleaner or a homemade mix (water, a little dish soap, and white vinegar on tile and glass—avoid vinegar on natural stone). - Scrub tile, grout lines, around the toilet base, and under the vanity lip. - Clean fan grilles and light fixtures with a vacuum brush or damp cloth.
Handle minor repairs
- Re‑caulk around the tub, shower, and sink where old caulk is cracked, moldy, or pulling away. Cut out old caulk with a caulk remover tool, clean, dry thoroughly, then run a new bead of 100% silicone bathroom caulk. - Fill small wall dings or anchor holes with lightweight spackle; let dry, sand smooth, and wipe off dust.
De‑gloss where you’ll paint
- For glossy trim, doors, or previously painted cabinets, scuff sand with 120–180 grit sandpaper to help new paint adhere. - Wipe down sanded surfaces with a damp cloth or tack cloth to remove dust.
Protect what’s staying
- Cover countertops, toilets, and floors with rosin paper or plastic and painter’s tape. - Remove switch plates, vent covers, and door hardware you don’t want painted.
This step sets up every other improvement—especially paint and fixtures—to last and look intentional instead of “quickly covered.”
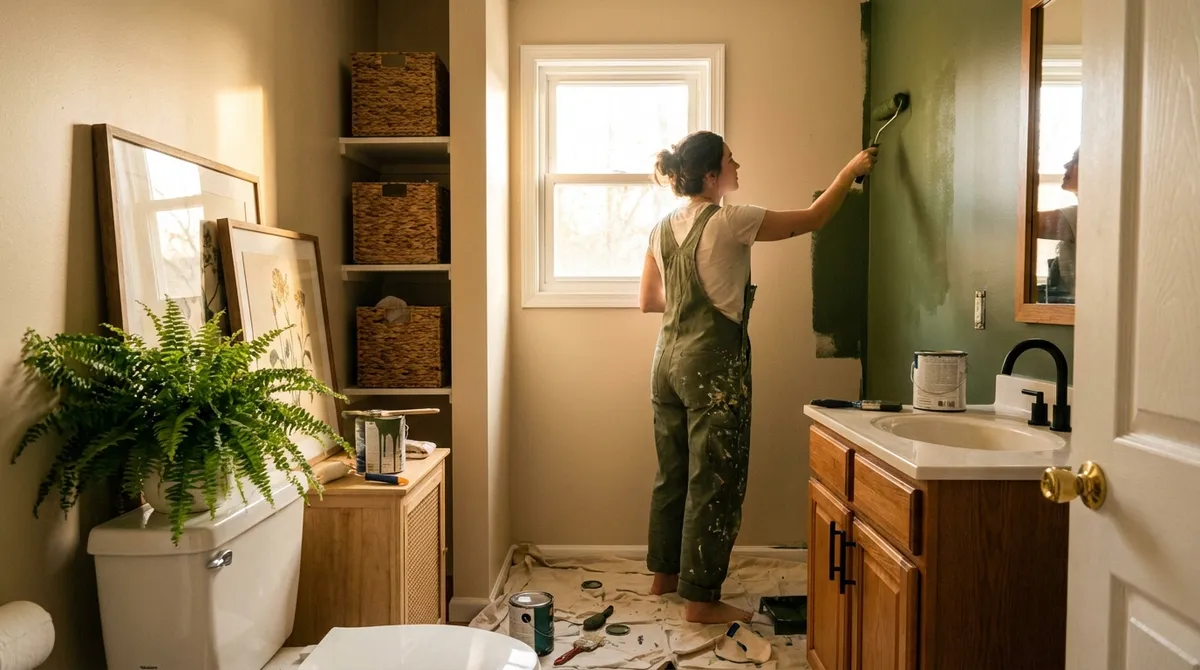
Step 2: Refresh Walls and Ceiling for an Instant Reset
Changing the wall color and brightening the ceiling is the fastest way to make a bathroom feel larger and newer, even if everything else stays the same.
Choose the right kind of paint
- Look for interior paint labeled for bath & kitchen or moisture‑resistant with a mildew‑resistant formula. - Use a satin or semi‑gloss finish on trim and doors; eggshell or satin is common for walls in bathrooms.
Pick a color that works with what you’re keeping
- If the tile or floor isn’t changing, choose a wall color that complements it rather than fights it. - Light neutrals (soft white, warm gray, very pale beige) usually make small baths feel bigger and cleaner. - If your tile is strongly colored (seafoam, burgundy, etc.), lean into softer, related tones instead of pure white, which can make older tile look dingier.
Cut in and roll properly
- Start by “cutting in” along ceilings, corners, and around fixtures with a quality angled brush. - Use a 3/8"–1/2" nap roller for walls; work in manageable sections, keeping a wet edge to avoid lap marks. - Apply two coats instead of one heavy coat for better coverage and durability.
Don’t forget the ceiling
- A fresh coat of flat ceiling paint, ideally a bright white or slightly warmer white, can help reflect light and make the room feel taller. - Address any prior water stain by priming those spots with a stain‑blocking primer before painting.
By the end of this step, your bathroom should already feel brighter and cleaner, even if nothing else has changed.
Step 3: Upgrade Lighting and Mirror for Better Function
Dim, yellow, or poorly placed lighting can make even a clean bathroom feel dingy. Swapping fixtures and optimizing mirror placement often delivers a big impact for moderate effort.
Evaluate current fixture placement
- Over‑mirror bar lights are common but often cast harsh shadows. Side sconces at eye level (on both sides of the mirror) give more flattering, even light—worth considering if wiring allows. - If you can’t move wiring, choose a wider or multi‑bulb fixture that spreads light evenly.
Choose brighter, better bulbs
- Look for LED bulbs rated for damp locations. - Aim for 3000–4000K color temperature for a neutral, natural light (not too yellow, not too blue). - Check lumens rather than just wattage–brighter is often better in bathrooms, especially for shaving or makeup.
Replace the light fixture (DIY‑level)
- Turn off power at the breaker and verify with a non‑contact voltage tester. - Remove the old fixture, noting wire connections (take a photo before disconnecting). - Mount the new fixture’s bracket to the existing electrical box, connect wires: black to black (hot), white to white (neutral), and green/bare copper to ground screw or ground wire; secure with wire nuts. - Attach the fixture base, install bulbs, then test power.
Upgrade or re‑frame the mirror
- Swap a small or builder‑grade mirror for a slightly larger framed mirror to visually widen the space. - For a glued‑on mirror you can’t easily remove, add a frame kit or build a simple wood frame painted or stained to match your trim. Attach with mirror‑safe adhesive and corner clamps while it cures.
Add task and accent options if possible
- Consider an LED strip under a medicine cabinet or a back‑lit mirror for soft night lighting. - A small, damp‑rated recessed light in the shower (if wiring exists) can make the whole space feel more high‑end.
Better lighting not only makes the bathroom look updated; it also highlights your other improvements and makes daily routines easier.
Step 4: Modernize the Vanity, Countertop, and Hardware
You don’t always need a brand‑new vanity. Often, you can repaint, reface, or just re‑hardware what you have and still get a modern look.
Decide: keep, refinish, or replace
- If the vanity box is solid (no major water damage, sagging, or mold), it’s usually worth keeping and updating. - If it’s swollen, crumbling, or particleboard that’s been saturated, replacement may be smarter and more durable.
If you’re keeping the vanity, repaint it
- Remove doors and drawers; label them so you know where each goes. Take off all hardware. - Sand lightly, then prime with a bonding primer suitable for glossy or laminate surfaces. - Paint with a durable cabinet or trim paint. Two thin coats are better than one thick coat. A small foam roller gives a smoother finish on flat areas.
Consider a simple countertop swap
- If your top is cracked, severely stained, or just dated, look for off‑the‑shelf vanity tops sized to your existing vanity width. - Turn off water, disconnect supply lines and P‑trap, remove the old top (it may be caulked at the wall). - Dry‑fit the new top, then secure it per instructions (usually adhesive or screws from inside the cabinet) and re‑caulk the backsplash edge.
Upgrade faucet and drain
- Choose a faucet that matches your preferred finish (brushed nickel, chrome, matte black, etc.) and lines up with sink holes (centerset, widespread, or single‑hole). - Turn off shutoff valves, disconnect water lines and old faucet, clean the surface, then install the new faucet using the included gasket or plumber’s putty as directed. - Align and install the new drain assembly; use plumber’s putty or sealant where specified, and reconnect the P‑trap.
Swap out hardware and accessories
- Replace dated knobs and pulls with a style that matches your faucet finish. Pre‑drilled holes make this a simple screw‑in job. - Coordinate towel bars, robe hooks, and toilet paper holder with the same or complementary finish for a cohesive look.
A refreshed vanity area often becomes the visual anchor of the room, making the whole bathroom feel more deliberately designed.
Step 5: Improve Storage and Floor Details for Everyday Use
Once the surfaces and fixtures are updated, focus on how your bathroom works day to day. Thoughtful storage and a few floor tweaks can make the space easier to live with and maintain.
Maximize vertical wall space
- Add open shelving above the toilet or beside the mirror for extra towels and daily items in baskets. - Install a shallow medicine cabinet (recessed if possible) to store small items you don’t want on the countertop.
Upgrade inside‑the‑cabinet organization
- Use stackable bins or drawer organizers for toiletries, cleaning products, and backup supplies. - Add pull‑out trays or baskets inside deep vanity cabinets to make the back space actually usable. - Apply labels so everyone in the household knows where things live.
Re‑think towel and robe placement
- Place towel hooks or bars within easy reach of the shower and sink, not across the room. - Multiple hooks often work better than a single bar in busy bathrooms—faster drying and less folding.
Evaluate and improve the floor
- If tile is intact but grout is stained, clean and then seal the grout to resist future staining. - For worn vinyl or laminate, consider a floating waterproof vinyl plank or peel‑and‑stick vinyl tile rated for bathrooms. Follow manufacturer instructions carefully, paying attention to subfloor prep and expansion gaps. - Use a sharp utility knife and straightedge for cutting; dry‑fit pieces before committing to adhesive.
Finish with practical soft goods
- Add a non‑slip bath mat that fits the space without crowding the doorway. - Use matching or coordinating towels to pull your color scheme together. - If privacy allows, choose a lighter shower curtain or glass cleaner on shower doors to maximize light.
These finishing steps turn a “nice‑looking” bathroom into one that’s also easy to keep organized and clean, which is what makes the renovation feel worth it long‑term.
Conclusion
You don’t need to demo walls or move plumbing to make a bathroom feel new. By cleaning and repairing first, then updating paint, lighting, the vanity area, and storage in a clear sequence, you can transform a tired space into a brighter, more functional room you actually like using.
Work through these five steps at your own pace. Tackle one area per weekend if needed, and focus on durable, moisture‑appropriate materials. The end result is a bathroom that looks renovated, functions better, and doesn’t require a full‑scale remodel to get there.
Sources
- [U.S. Department of Energy – LED Lighting](https://www.energy.gov/energysaver/led-lighting) - Explains benefits of LED bulbs, color temperature, and efficiency for home use
- [Environmental Protection Agency – Mold & Moisture](https://www.epa.gov/mold/mold-and-moisture) - Guidance on dealing with moisture in bathrooms and preventing mold growth
- [Sherwin-Williams – Painting Bathrooms](https://www.sherwin-williams.com/en-us/homeowners/how-to/painting-bathrooms) - Details on choosing the right paint and finish for high‑humidity spaces
- [Family Handyman – How to Replace a Bathroom Vanity](https://www.familyhandyman.com/project/how-to-install-a-bathroom-vanity/) - Step‑by‑step reference for swapping vanities and tops
- [Mayo Clinic – Bathroom Safety Tips](https://www.mayoclinic.org/healthy-lifestyle/healthy-aging/in-depth/home-safety/art-20046821) - Covers practical safety considerations, including non‑slip surfaces and grab bars
Key Takeaway
The most important thing to remember from this article is that this information can change how you think about Renovation.


