A small, well-planned workshop can turn random DIY ideas into real, finished projects. You don’t need a huge garage or expensive tools to get started—you need a clear plan, the right basic gear, and a layout that makes work safer and faster. This guide walks you through building a compact, efficient home workshop from scratch, with step‑by‑step instructions you can follow in a weekend or two.
Step 1: Choose the Right Space and Plan Your Layout
Before buying tools, decide where your workshop will live and how you’ll use it.
Start by walking your home and looking for spaces that meet three minimum requirements: a flat floor, at least one grounded outlet, and decent ventilation. Common options include a corner of the garage, part of a basement, a shed, or even a section of a spare room if you’re mostly doing light repairs and assembly. Avoid areas prone to flooding or constant moisture—water is hard on both tools and wood.
Stand in the space and imagine three zones: a cutting/assembly area (where a workbench will go), a storage wall (for tools and materials), and a safety/clean-up area (for exits, fire extinguisher, and trash). Keep walkways at least 3 feet wide so you can move large pieces without tripping. If you’ll use power saws or sanders, plan for dust—a nearby window, door, or the ability to run a shop vac hose outside is helpful.
Sketch a simple floor plan on paper or using a free online tool. Mark where outlets, windows, and doors are, plus where you’ll put your workbench, main tools, and storage. Try to keep your primary tools separated from each other by at least an arm’s length so cords and materials don’t overlap and create clutter. A bit of planning now prevents you from constantly shifting things later.
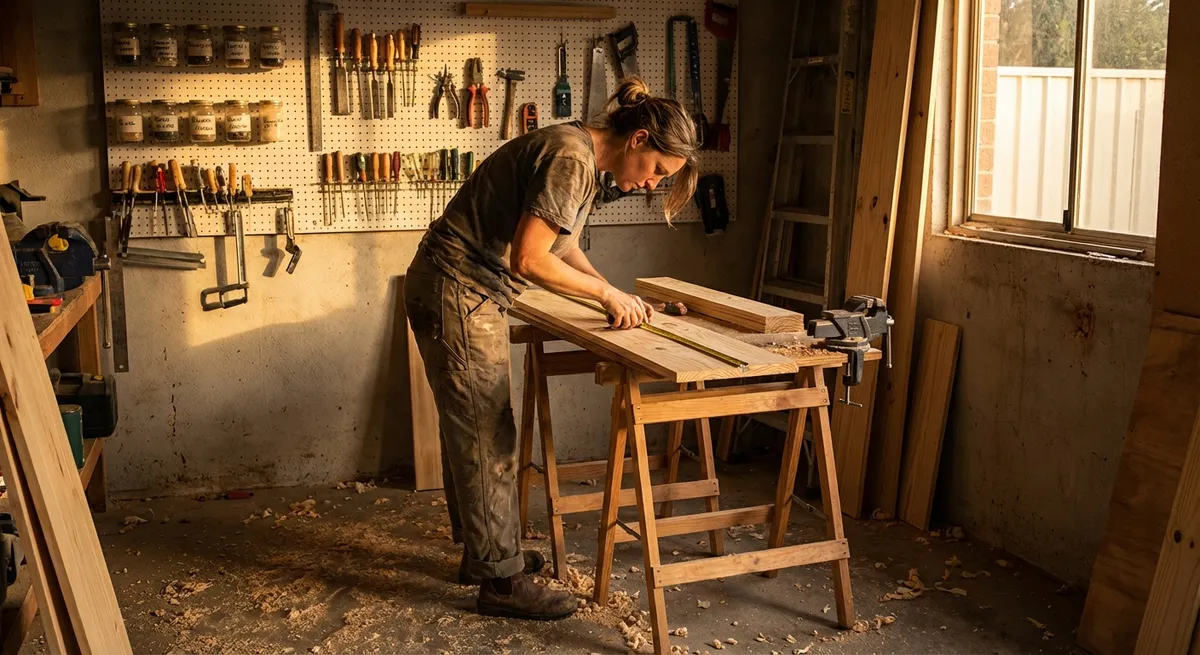
Step 2: Build or Set Up a Solid Workbench
Your workbench is the heart of your workshop. Make it sturdy, flat, and the right height for you.
Aim for a bench height around wrist level when you’re standing with your arms relaxed at your sides (typically 34–38 inches for most adults). Too low and your back will hurt; too high and you’ll lose leverage for clamping and planing. If you’re buying one, choose a model with a solid top (thicker plywood, hardwood, or laminated top) and strong legs, ideally with cross-bracing.
To build a simple bench, use construction lumber (like 2x4s or 2x6s) for the frame and legs and a 3/4-inch plywood or MDF sheet for the top. Screw the frame together with structural or deck screws rather than nails for better strength and easier disassembly. Add a lower shelf for storage; it stiffens the bench and gives you a spot for heavier tools like a compressor or shop vac.
Secure the bench to a wall if possible, especially if you’ll be pounding, chiseling, or working with heavy materials. Lag screws into wall studs work well. Add a sacrificial top layer (like a thin sheet of hardboard) that you can replace when it gets chewed up. Finally, mount a bench vise on one corner for clamping, cutting, and holding workpieces—this one tool dramatically expands what your bench can do.
Step 3: Build a Smart, Basic Tool Kit (Hand + Power)
Instead of buying every tool you see, build a focused starter kit that covers most DIY tasks.
For hand tools, start with: a 16–20 oz claw hammer, a good tape measure (25 ft, with clear markings), a combination square, a utility knife with replaceable blades, a set of screwdrivers (or a quality multi-bit driver), an adjustable wrench, a set of pliers (slip-joint, needle-nose, and locking), and a small handsaw. Add a basic set of wood chisels and a level (24 inches or longer) for carpentry and installation work.
For power tools, begin with a cordless drill/driver (with at least two batteries), a circular saw, and a random orbital sander. These three tools handle most basic cutting, drilling, and smoothing jobs around the house. When choosing cordless tools, stick with one battery platform (same brand and voltage) so your batteries and chargers are interchangeable—that saves money and space over time.
Organize your tools so the most-used items are easiest to reach. Hang hand tools on a pegboard or magnetic strip near your workbench. Store drill bits, driver bits, and fasteners in small labeled bins or drawers. Keep power tools in their cases if you move them often; if they stay in the workshop, a simple shelf or cubby system labeled by tool type works well. The goal: you can find any tool in under 30 seconds without digging.
Step 4: Set Up Safe Power, Lighting, and Dust Control
A functional workshop is only useful if it’s safe and comfortable enough to spend time in.
Start with power. Avoid overloading a single outlet with multiple high-draw tools (like a shop vac and saw on the same power strip). Use heavy-duty extension cords rated for your tools, and keep cords off the floor where possible by routing them along walls or overhead. If you’re unsure about your circuit capacity or see frequent breaker trips, talk to a licensed electrician before adding more gear.
Lighting is critical. Aim for bright, even overhead lighting plus a task light at your bench. LED shop lights are energy-efficient, run cool, and are easy to mount. Position them so your body doesn’t cast a shadow over your work area. Add a clamp light or desk lamp for close work like marking, measuring, or wiring.
For dust and air quality, use at least a shop vac with a good filter attached to your sander and saws whenever possible. Open doors and windows while cutting or sanding, and use a fan to push dust out instead of deeper into your home. Wear safety glasses and a dust mask or respirator rated for fine dust when you’re creating visible dust clouds. Keep a small fire extinguisher (ABC-rated) within easy reach and ensure exits are never blocked by materials or tools.
Step 5: Create a Simple Maintenance and Storage Routine
A small workshop stays useful only if it stays organized and your tools stay ready to work.
After each project—or at least once a week—do a quick reset. Put every tool back in its place, empty the trash, and vacuum or sweep the floor. Wipe down your bench and power tools with a dry or slightly damp cloth to remove dust. This not only keeps the space usable but also helps you spot damage, loose screws, or frayed cords before they become a problem.
Check your cutting tools regularly. Dull blades and bits make work harder and less safe. Inspect saw blades and drill bits for burning, chipping, or slow cutting; replace or sharpen as needed. A simple file or sharpening stone can refresh chisels and some hand tools. Keep a small bottle of light machine oil on hand for hinges, pliers, and other moving parts to prevent rust.
For long-term storage, protect tools from moisture. If your workshop is in a garage or basement, consider a small dehumidifier or at least desiccant packs in closed toolboxes. Store chemicals, adhesives, and finishes in clearly labeled, sealed containers on a dedicated shelf away from heat sources and out of the reach of children and pets. Finally, keep a short checklist taped to the wall (power off, tools stored, trash emptied, doors/windows closed) as a quick end-of-day routine.
Conclusion
A small, efficient home workshop doesn’t require a big budget—just deliberate choices about space, tools, and habits. By planning your layout, building a solid workbench, investing in a focused tool kit, setting up safe power and lighting, and sticking to a simple maintenance routine, you create a place where projects start and finish instead of stalling halfway. Once your workshop is in place, every repair, build, and upgrade around your home becomes faster, safer, and far more enjoyable.
Sources
- [OSHA – Hand and Power Tools](https://www.osha.gov/hand-power-tools) - Safety guidelines and best practices for using hand and power tools in a workshop setting
- [UL Solutions – Home Electrical Safety Tips](https://www.ul.com/resources/home-electrical-safety-tips) - Guidance on safe use of outlets, extension cords, and circuits in the home
- [Family Handyman – How to Build a Workbench](https://www.familyhandyman.com/project/how-to-build-a-workbench-super-simple-50-bench/) - Practical example of a simple, sturdy DIY workbench build
- [Fine Woodworking – Shop Layout and Workflow](https://www.finewoodworking.com/2007/01/02/shop-layout-designing-your-perfect-workshop) - Ideas for arranging tools and work areas for efficient movement and workflow
- [Mayo Clinic – DIY Project Safety](https://newsnetwork.mayoclinic.org/discussion/mayo-clinic-minute-diy-projects-and-safety-tips/) - General safety tips for doing projects and using tools at home
Key Takeaway
The most important thing to remember from this article is that this information can change how you think about Tools & Equipment.


