A messy closet wastes space and makes everyday life harder than it needs to be. Instead of dreaming about a full custom system, you can turn almost any standard closet into a high‑functioning storage zone with basic tools and simple materials. This project works for bedroom closets, hall closets, or utility closets—and you can customize it for clothes, linens, cleaning supplies, or mixed storage.
This guide walks you through a practical, step‑by‑step upgrade you can tackle over a weekend, even if you’re not an experienced DIYer.
Step 1: Empty, Measure, and Diagnose the Closet
Before you buy anything, you need to know exactly what you’re working with and what problems you’re solving.
Start by completely emptying the closet. Remove every hanger, box, shoe, and random item you tossed in “for now.” Wipe down shelves, vacuum or sweep the floor, and check for any signs of moisture, cracks, or damage. If you spot water stains or mold, pause and fix that issue before adding storage.
Next, measure the interior: width, depth, and height. Note any oddities like sloped ceilings, bulkheads, light switches, or outlets. Sketch a quick top‑down view and a front view on paper and write your measurements clearly. This doesn’t have to be perfect, but it will prevent wasted trips to the store.
Now diagnose what’s not working. Are clothes jammed together? Do shoes pile up on the floor? Are cleaning supplies stuck behind everything else? Make a simple list of “must fix” issues—for example: “need more hanging space,” “off‑season storage,” or “accessible spot for the vacuum.” These pain points will drive your design so you don’t just recreate the same clutter in a slightly nicer layout.
Step 2: Plan a Simple, Realistic Layout
With measurements and problems in hand, you can design a layout that actually fits your life instead of a generic “nice looking” closet.
Start by deciding the main job of this closet: clothes, linens, cleaning, mixed storage, or something else. For a typical bedroom closet, a good starting setup is: one section of double‑hang rods for shirts/pants and one section of long‑hang for dresses or coats, plus shelves above and below. For a hall or utility closet, you might need one tall open section for brooms and vacuums, with shelves up top and maybe a low shoe or bin area.
Use your sketch to roughly place:
- Hanging rod locations (double‑hang or single‑hang)
- Shelf positions (above rods, mid‑height, and/or low)
- Floor zone (for heavier items, baskets, or shoes)
- Door storage (hooks, over‑the‑door racks if needed)
Keep it realistic. If you don’t fold clothes neatly, don’t plan lots of open shelves for stacks. If you’re the “toss it in and close the door” type, build in bins and baskets that can hide imperfect organization.
Before you finalize, quickly inventory what needs to go back into the closet and how much space it takes. If you own mostly long dresses, don’t sacrifice that to squeeze in double‑hang rods. Plan the layout around your actual belongings, not a template.
Step 3: Gather Materials, Hardware, and Tools
Now that you have a rough design, choose materials that match your skill level, budget, and how permanent you want this to be.
Common material options include:
- Wire shelving systems: Affordable, widely available, easy to cut and install, and flexible. Great for utility or hall closets.
- Pre‑made laminate or melamine closet kits: Cleaner look, more like furniture. Ideal for bedroom closets if you want a more finished appearance.
- Custom wood shelves (from plywood or solid boards): Highly customizable, strong, and good for odd‑sized closets if you’re comfortable with more cutting and finishing.
You’ll typically need:
- Shelves or a closet kit
- Hanging rods and rod brackets
- Shelf supports (brackets, standards, or cleats)
- Wall anchors appropriate for your wall type (drywall, plaster, masonry)
- Screws (wood or sheet metal screws per manufacturer’s instructions)
- Optional: baskets or bins, hooks for doors or side walls, shoe rack
Basic tools you’ll likely use:
- Stud finder
- Tape measure
- Pencil
- Level (a 24" or longer level is ideal)
- Drill/driver with suitable bits
- Hand saw or hacksaw for wire shelving, or circular saw for wood (hardware stores can often cut boards to size)
- Safety gear: safety glasses, dust mask if cutting, and hearing protection if using power tools
Before you start mounting hardware, read the installation instructions for any system you buy. Most failures happen from using the wrong anchors or overloading shelves. When in doubt, aim to hit wall studs whenever you can for maximum strength, especially for hanging heavy clothes or boxes.
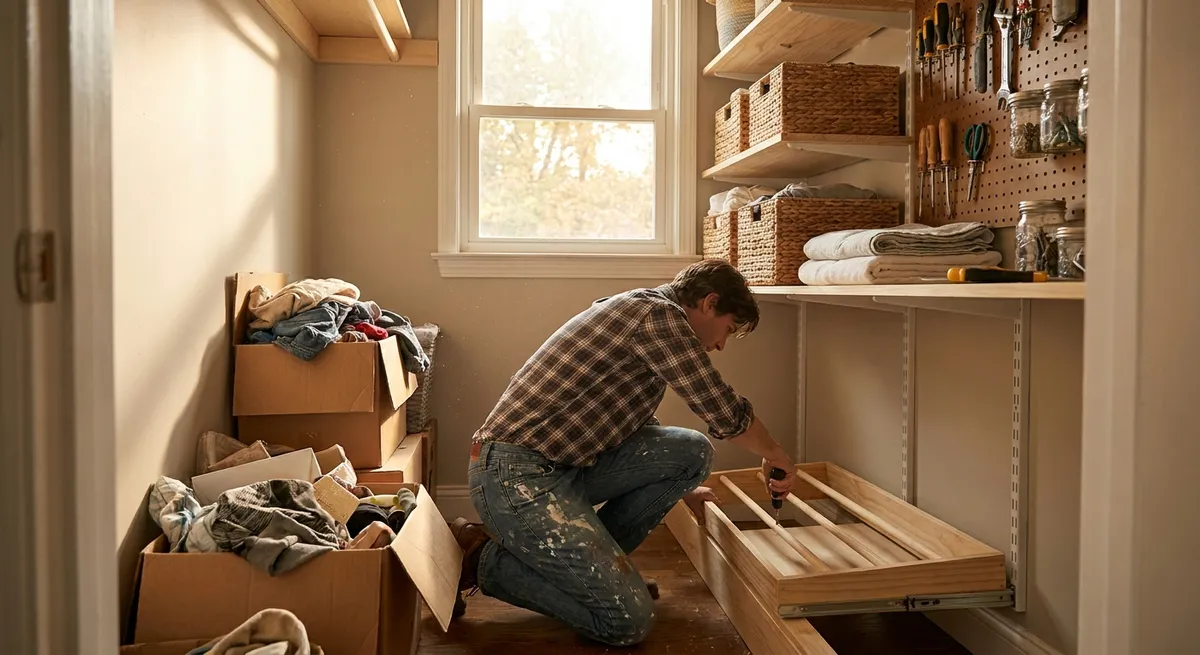
Step 4: Install Shelves and Hanging Rods Securely
This is where your empty shell becomes a practical storage system. Take your time getting things level and solid—it pays off every time you open the closet.
Mark the height of your key elements first:
- For bedroom clothes, typical double‑hang heights:
- Lower rod: about 40–42 inches from the floor
- Upper rod: about 80–82 inches from the floor
- For single‑hang long clothes:
- Rod: around 66–72 inches from the floor, depending on clothing length
- Top shelf above a rod:
- Often 12–16 inches above the rod, leaving enough room to use both
Use a stud finder to locate studs and lightly mark them. Where possible, place supports or standards directly into studs. If you must attach into drywall alone, select heavy‑duty wall anchors rated for more weight than you think you’ll use.
Install in this practical sequence:
- Top shelf supports: Mount standards or brackets first, starting with one secured into a stud if possible. Use your level to ensure everything is straight before driving all screws.
- Top shelf: Set the shelf in place, ensure it’s level, then secure it per instructions (shelf clips, screws from below, etc.).
- Hanging rod supports: Attach rod brackets at the planned heights, again checking level across the span. If the rod is long, add a center support to prevent sagging.
- Additional shelves: Install any lower or side shelves, keeping at least one open vertical section if you need room for tall items (vacuum, broom, coats).
- Door and side‑wall storage: Add hooks, rails, or small racks for belts, bags, or cleaning tools. These make great use of typically wasted areas.
After installation, gently load a few items on each shelf or rod and test for wobble. If something feels loose, fix it now rather than waiting for it to fail under full weight.
Step 5: Load Smart, Label, and Maintain the System
A well‑built closet can still become chaos if you throw everything back in at random. The final step is setting up a system that’s easy to use and easy to maintain.
Start by sorting items into broad categories: daily wear, seasonal clothes, linens, cleaning products, hobby gear, etc. Group similar things together before they go into the closet. This makes it obvious how much space each category actually needs.
When loading the closet:
- Put daily‑use items at eye level and arm’s reach: shirts, frequently worn pants, everyday towels, commonly used cleaning supplies.
- Place rarely used or seasonal items up high: extra bedding, off‑season clothes in clear bins, holiday decorations.
- Use the floor zone for heavier items: bulk supplies, toolboxes, or a shoe rack.
- Use bins and baskets to contain small or loose items. Clear bins make it easy to see what’s inside; opaque bins are better if you want a cleaner look.
Labels help more than most people expect. A simple piece of masking tape and marker on a bin (“Winter hats & gloves,” “Guest linens,” “Lightbulbs & batteries”) keeps everything from drifting into a junk heap.
Finally, set a simple maintenance habit: every few months, do a 5–10 minute reset. Pull out anything you haven’t used in a long time, donate what you don’t need, and return strays to their labeled homes. A little regular attention will keep your DIY closet upgrade functional for years instead of letting it slide back into clutter.
Conclusion
Transforming a cluttered closet into a storage workhorse doesn’t require a custom installer or a huge budget—just a clear plan, a few tools, and a weekend of focused work. By measuring carefully, designing around your real habits, using the right hardware, and loading the space with intention, you end up with a closet that actually makes daily life easier.
Start with one closet, learn what works for you, and then use the same five‑step approach to tackle other storage pain points around your home.
Sources
- [U.S. Department of Energy – Home Storage and Organization Tips](https://www.energy.gov/energysaver/design/home-storage-and-organization) - General guidance on designing efficient storage spaces in the home
- [Lowe’s – How to Install Wire Shelving](https://www.lowes.com/n/how-to/install-wire-shelving) - Step‑by‑step instructions and hardware recommendations for wire closet systems
- [The Home Depot – Closet Organization Ideas & DIY Closet Systems](https://www.homedepot.com/c/ab/closet-organization-ideas/9ba683603be9fa5395fab9014f0c0e0) - Examples of layouts, measurements, and product options for different closet types
- [Family Handyman – How to Build a Closet Organizer](https://www.familyhandyman.com/project/how-to-build-a-closet-organizer/) - Detailed DIY guidance for building and installing custom organizers
- [This Old House – Closet Design Basics](https://www.thisoldhouse.com/closets/21015102/closet-design-basics) - Practical advice on closet layout, hanging heights, and storage planning
Key Takeaway
The most important thing to remember from this article is that this information can change how you think about DIY Projects.


