If you’ve seen the trending piece about artists using everyday objects and paper cutouts to recreate movie scenes (inspired by the “I Use Everyday Objects And Paper Cutouts To Create Funny Scenes From Movies” feature that’s circulating right now), you’ve already seen how far a bit of cardboard and imagination can go. The good news: you don’t need an art degree—or a pro studio—to do something similar at home.
This guide will walk you through building your own mini “movie sets” using simple DIY techniques. These projects are perfect for rainy weekends, social media content, or just making your home feel more creative without tearing down any walls or buying expensive gear.
Below is a practical, step‑by‑step plan to go from “I have random junk in a drawer” to “I just staged a scene that looks ready for Instagram or TikTok.”
Step 1: Choose a Movie Moment (And Plan Your Mini Set)
Start by picking one specific scene or visual moment from a movie or show—not the whole film. The trending artist who recreates movie scenes with household items keeps it simple: one clear idea per shot. Think of iconic visuals like a lightsaber duel, a character standing by a window in the rain, or a chase across a bridge. Screenshot the scene on your phone so you have a visual reference nearby.
Next, figure out what you actually need to represent, not copy, that scene. Ask: “What are the three things that make this scene instantly recognizable?” It might be colors (all blue and neon), shapes (a big circle moon, a tiny bike silhouette), or props (a hat and a whip). Sketch your version on scrap paper: where the background goes, where the characters or objects are, and what you can fake with paper. This quick plan will save time and prevent you from overbuilding details that won’t even show in the final photo.
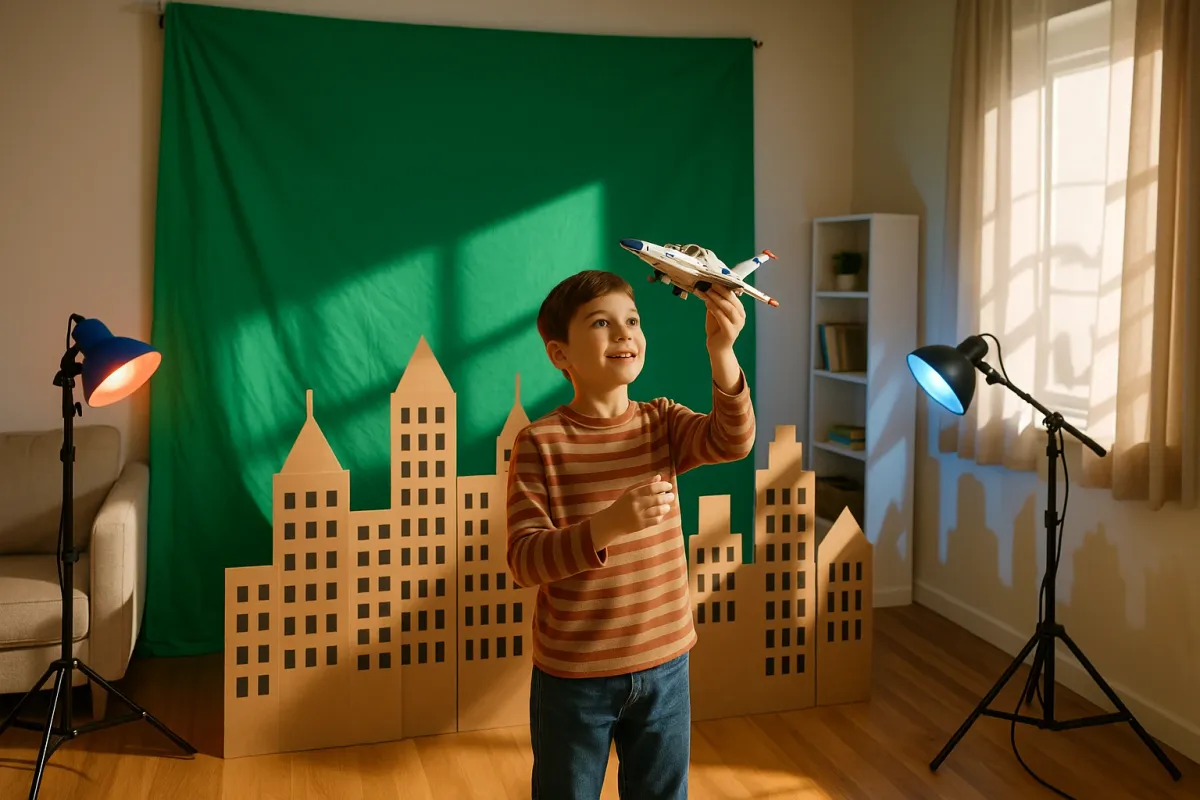
Step 2: Gather Everyday Objects and Basic Craft Supplies
The viral “everyday object” movie scenes work because they lean on what’s already lying around. Before you buy anything, shop your home. Look for:
- Neutral items: mugs, bowls, boxes, books, cutting boards (great as walls and platforms)
- Shape-makers: forks, spoons, keys, clothespins, bottle caps (they become fences, wheels, railings)
- Textures: dish towels, scarves, placemats, baking parchment, cardboard boxes
- Light modifiers: baking paper, thin curtains, lamps, phone flashlights
For craft basics, gather:
- Cardboard (cereal boxes or shipping boxes)
- Plain paper or colored paper
- Scissors or a craft knife (with a cutting mat or thick cardboard underneath)
- Tape (clear tape + masking tape) and glue stick
- A black marker or pen for outlines and details
Lay everything out on a table so you can “audition” objects for different roles. That strainer might suddenly become a sci‑fi dome. A cheese grater might read as a skyscraper at the right angle. The goal here is not realism; it’s recognizability and fun.
Step 3: Build a Simple Background and Foreground Layer
Most of the impact in those trending DIY film scenes comes from layering: a paper cutout in front, an object in the middle, and a simple background behind everything. Start with the background. Use a large piece of cardboard, poster board, or the inside of a flattened box. Paint it or tape colored paper over it to match the overall feel of your chosen scene (dark blue for night, orange for sunset, gray for a “city”).
Then add the foreground: cut out simple silhouettes from paper—characters, buildings, trees, spacecraft—based on your movie screenshot. Don’t worry about tiny details; get the outline right and fill big shapes in with a marker. Tape these cutouts to thin strips of cardboard so they can stand upright like mini signs. Place them a few inches in front of the background so there’s visible depth.
Now work the middle layer with your everyday objects: books can stack into “buildings,” a bowl upside‑down can be a hill or dome, a colander can read as a futuristic ceiling. Keep moving pieces around while you look through your phone’s camera so you can see exactly what will be in the frame. You want the scene to look rich and layered from one angle, not from every angle.
Step 4: Light the Scene With Lamps and DIY Filters
If you look closely at the popular everyday‑object movie scenes, they rely heavily on lighting to sell the mood. You can do the same using what you already have. Turn off bright overhead lights and use one or two lamps or phone flashlights as your main light sources. Aim for side lighting or backlighting to create depth and drama rather than flat, front‑facing light.
To create soft, cinematic light, tape baking paper, thin white fabric, or a white plastic bag (not touching hot bulbs) in front of the lamp as a DIY diffuser. For color, place transparent plastic folders, tissue paper, or colored cellophane over the light to mimic the blue, red, or green tones you see in your reference scene. Move the lights around and take test shots—small shifts can dramatically change the mood.
Add simple shadows and “glows” with practical tricks: set a phone with a bright white screen behind a paper window to fake interior light, or place a small LED tealight behind a cardboard cutout door. Let your cables show outside the frame; they don’t exist as long as they’re not in the photo. The goal is to make the world inside your camera look believable, not your entire table.
Step 5: Capture, Tweak, and Share Your DIY Movie Shot
Now it’s time to turn your construction into a shareable image. Use your phone’s main camera (not a beauty filter app) and clean the lens first. Get the camera as close as you can to eye level with your mini scene so it feels like a real world, not a diorama on a table. Try both landscape and portrait orientation, depending on where you plan to share: TikTok and Reels favor vertical, while X and Facebook often work better with horizontal.
Lock focus on the main subject (tap and hold on most phones), lower the exposure slightly to avoid blown‑out highlights, and take multiple shots with small framing and angle changes. If your phone has a “portrait” or “macro” mode, experiment to blur the background a bit and make your paper cutouts look more like real silhouettes.
Do a quick edit: crop out any stray edges, adjust brightness and contrast so shadows are clear but not muddy, and nudge saturation to match the movie’s vibe. When you post, add a simple before/after or behind‑the‑scenes shot of your setup—those “how it’s made” photos are exactly what’s going viral right now and make your DIY work more shareable. Tag the movie or franchise where appropriate, and mention that your scene is created with everyday objects and paper inspired by the current trend, so people immediately understand what they’re looking at.
Conclusion
You don’t need a workshop full of tools to do a satisfying DIY project. By borrowing ideas from the artists currently trending for their everyday‑object movie scenes, you can turn your kitchen table into a small, creative studio. Start with one simple moment, keep your materials basic, and focus on smart layering and lighting.
Once you’ve built your first mini set, it becomes easier to see potential scenes everywhere in your home. The next time you walk past a stack of dishes or a messy drawer, you might see a sci‑fi cityscape or a fantasy castle instead—and that’s when DIY stops being just “fixing things” and becomes a way to play with your space every day.
Key Takeaway
The most important thing to remember from this article is that this information can change how you think about DIY Projects.


