Scrolling through this month’s “wholesome rescue pet” photos flooding social media? You’re not alone. The December edition of viral rescue pet roundups is everywhere again, featuring newly adopted dogs and cats settling into their first real homes. Behind every feel‑good photo from those ASPCA‑style adoption features is a practical reality: real people are making their spaces safer, cleaner, and more pet‑friendly—often on a budget and with DIY fixes.
If you’ve just adopted from a shelter (or are about to), your home doesn’t need a full renovation. A few focused projects can turn a regular space into a place where a scared, confused rescue animal can actually relax. Below are five straightforward DIY projects—no designer budget needed—that line up with what new adopters are doing right now, as rescue numbers stay high and “adopt, don’t shop” continues to trend.
1. DIY “Landing Zone” For Your New Pet (So Your Whole House Isn’t Chaos)
Those viral before‑and‑after shots of rescue pets usually skip the in‑between: the first 72 hours where the animal is stressed and exploring everything. A simple landing zone keeps the chaos contained and helps your pet decompress.
What you’ll need
- One small room or clearly defined corner (laundry room, spare room, or a corner of your living room)
- Baby gate or tension‑mounted pet gate
- Old rug or carpet remnant
- One or two storage crates or bins
- Command hooks or a simple wall rail
- Optional: tension rod and curtain panel to create visual separation
Steps
- Choose the calmest spot available. Avoid high‑traffic areas and loud appliances. A quiet corner with at least one solid wall is best so your pet can rest with their back “protected.”
- Protect the floor. Lay down an old rug or carpet remnant. It makes accidents easier to deal with, gives traction for nervous paws, and helps define “this is your spot.”
- Create a soft barrier. Install a tension‑mounted gate across a doorway or to block off part of the room. If you’re using a corner, mount a short section of gate between two walls to create a “mini room.”
- Add storage you’ll actually use. Place one or two bins in the zone for leashes, toys, meds, and grooming basics. Label them simply: “Walks,” “Treats,” “Vet Stuff.” Put them where you can reach them in 2 seconds, not at the back of a closet.
- Hang grab‑and‑go gear. Install Command hooks or a basic wall rail at shoulder height. Hang the primary leash, harness, and a small poop‑bag dispenser so you’re not hunting every time you open the door.
Pro tip: If your home is open‑plan, use a tension rod with a curtain to create a visual barrier around a crate or bed. It gives shy rescue pets a “den” feeling without permanent construction.
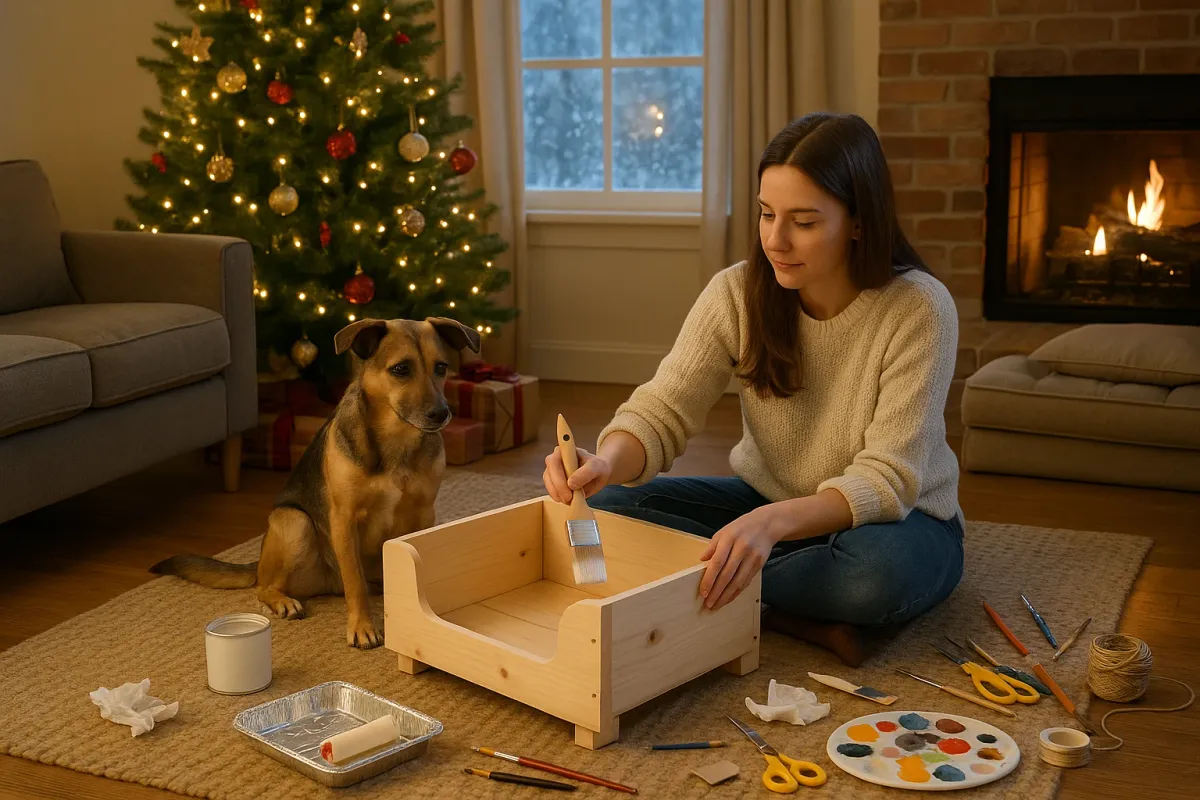
2. Build A Simple, Washable Pet Bed Frame From 2x2s
Many of the dogs and cats in those December adoption posts are finally getting a real bed for the first time. Elevated beds are cleaner, more comfortable, and easier to keep flea‑free—especially for rescues coming from shelters.
What you’ll need
- 2x2 lumber (pine is fine)
- For a small dog/cat: 4 pieces 24" (sides) + 4 pieces 18" (legs)
- Pocket‑hole jig or simple wood screws (2½")
- Drill/driver
- Sandpaper (120–220 grit)
- Outdoor fabric or a strong washable canvas
- Staple gun and staples
- Measuring tape and pencil
Steps
- Measure your pet (or the cushion you’ll use). Add 2–3" on each side for comfort. This gives you the inner bed dimensions.
- Cut the frame pieces. For a basic rectangle, cut two long side pieces and two shorter end pieces from 2x2s. Cut four legs to the same height (6–8" is good for small/medium pets).
- Assemble the frame. Pre‑drill your holes, then screw the sides and ends together into a rectangle. Attach each leg inside a corner of the frame with two screws driven at an angle, or use a pocket‑hole jig for a cleaner look.
- Sand all edges. Focus on any cut ends and corners. Rescue pets can be nervous chewers; you don’t want splinters in their gums or your hands.
- Add the fabric sling. Cut fabric enough to wrap under the frame on all four sides with at least 3–4" of overlap. Pull it tight and staple it underneath every 1–2". The goal is a firm “trampoline” surface that doesn’t sag to the floor.
Pro tip: Skip foam glued to the frame. A removable cushion on top of the sling is easier to wash—key when your new pet is still house‑training or adjusting.
3. Convert A Cabinet Into A Hidden Litter Box Or Crate Nook
A lot of the rescue cat photos that go viral show clever ways owners hide litter boxes. You don’t need expensive “pet furniture” to do this—you can convert an old cabinet or IKEA unit into a hidden station over a weekend.
What you’ll need
- Old cabinet, sideboard, or IKEA cupboard with doors
- Jigsaw or hole saw
- Sandpaper
- Peel‑and‑stick vinyl tiles or scrap laminate
- Weatherstripping tape (optional, for odor control)
- Magnetic catch (if doors don’t stay closed)
- Litter box (for cats) or small crate/bed (for dogs)
Steps (for a cat litter cabinet)
- Pick the right cabinet. Make sure the interior is large enough for your litter box with at least 3–4" clearance around it and overhead.
- Mark the entry hole. On one side panel, draw a circle or arch at least 8–10" wide and 8" high from the floor of the cabinet. This becomes the access door.
- Cut the opening. Drill a starter hole, then use a jigsaw to cut along your line. Sand all edges smooth to avoid scratches.
- Protect the interior floor. Install peel‑and‑stick vinyl tiles or lay a scrap of laminate inside. This shields the wood from spills and makes cleanup easier.
- Control odors and mess. Add a small mat inside or just outside the entry to catch litter. If the doors rattle, add weatherstripping or a magnetic catch so they stay snug, which helps contain dust.
Steps (for a dog crate nook)
- Remove one cabinet door. The opening will act as the “front” of the nook. Optional: add a low trim piece across the bottom to make it look built‑in.
- Measure and line. Measure your crate or bed and ensure it fits. Line the base with a removable mat or thin foam covered in washable fabric.
- Add hooks or bins inside. Mount one or two small hooks for a short house leash or harness, and a bin for toys. Keep it minimal—this is your dog’s rest zone, not storage.
Pro tip: For anxious rescues, add a small battery‑powered puck light with a dim setting so the space is cozy, not cave‑dark.
4. Install DIY Pet‑Safe Window Perches And Barriers
The December rescue photo compilations are full of cats and smaller dogs finally discovering windows. You can give them safe viewing spots without destroying your drywall or risking falls.
What you’ll need (for a cat/small dog window perch)
- 1” thick pine board cut to window width minus 1–2"
- Two heavy‑duty L‑brackets (rated at least 50–75 lb)
- Wood screws and wall anchors suitable for your wall type
- Thin foam or old yoga mat
- Fabric/removable cover
- Level, measuring tape, drill
Steps
- Pick the window. Choose a spot with a stable sill and solid wall (ideally over a stud) beneath it. Avoid tilt‑and‑turn windows that open inward at perch level.
- Mark the height. Measure 10–14" below the sill for bracket placement, depending on your pet’s size. Use a level to mark two points where brackets will go.
- Install brackets. Drill pilot holes into studs if possible. If not, use appropriate wall anchors. Secure the brackets so they’re perfectly level.
- Attach the shelf. Center the board on the brackets, clamp if needed, then screw up through the brackets into the board. Test by gently leaning your body weight on it.
- Pad and cover. Cut foam or an old yoga mat to size and place on top. Wrap in fabric or use a washable cover you can remove weekly.
For higher floors or balcony doors
- Add a clear barrier. Install clear acrylic panels or pet‑screen across balcony railings using zip ties or small brackets to prevent falls, especially for curious new rescues.
- Reinforce screens. Replace flimsy window screens in “cat TV” windows with pet‑resistant screen material, which is thicker and less likely to tear.
Pro tip: If you’re renting, use only screw holes below the window line that you can easily patch later, and keep everything within your lease’s rules.
5. Build A Quick “Decompression” Tunnel Or Hideaway For Shy Rescues
Many of the December rescue pet photos show “before” animals that looked terrified—and “after” animals that finally relaxed. That transformation usually involves giving them safe hiding options instead of dragging them into every room. You can build one with basic supplies.
What you’ll need
- Collapsible wire shelving cubes OR cardboard boxes
- Zip ties or packing tape
- Old blankets or towels
- Non‑slip rug or yoga mat
- Optional: battery‑powered fairy lights outside the tunnel (for you, not the pet)
Steps (wire cube tunnel)
- Plan the path. Choose a route along a wall from your pet’s landing zone to a favored area (like your sofa or your bedroom doorway).
- Assemble base cubes. Lay 2–3 wire grid panels on the floor in a row and connect with zip ties to make a path length of 3–6 feet.
- Add sides and top. Attach panels on both sides and across the top, securing with zip ties every 3–4 squares. You’re building a basic rectangular tunnel.
- Soften and secure. Place a non‑slip rug or yoga mat under the tunnel. Drape with blankets or towels to darken it slightly and muffle noise.
- Leave both ends fully open. Never create a dead‑end space; anxious animals need a clear way out.
Steps (cardboard version)
- Line up boxes. Use 2–4 medium boxes. Cut both ends off each and tape them together to form a long hollow tube.
- Cut a side “escape hatch.” For safety, cut a small exit hole in one side of the middle box so your pet doesn’t feel trapped.
- Stabilize. Place the tunnel along a wall on top of a rug, and weight the sides gently with books if your pet is larger.
Pro tip: Don’t push your rescue into the tunnel. Let them discover it. Often you’ll catch them using it at night or when the house is busy, which is the entire goal.
Conclusion
Those monthly “most wholesome rescue pet” roundups aren’t just feel‑good content—they’re a snapshot of how many animals are landing in real homes right now. Whether your new family member came from a big shelter highlighted by ASPCA stats or a small local rescue featured in a viral post, the basics are the same: they need safety, structure, and quiet places to rest.
You don’t have to be a pro builder to give them that. A landing zone, a sturdy washable bed, hidden functional storage, safe window views, and a decompression tunnel are all within reach with basic tools and a free weekend. Start with one project that fits your pet’s personality and your space, then build from there. The next “before and after” story people share might be yours—only this time, you’ll know exactly how the “after” was built.
Key Takeaway
The most important thing to remember from this article is that this information can change how you think about DIY Projects.


