Adding wall shelves is one of the fastest, most affordable ways to get more storage and make a room look more finished. You don’t need a workshop full of tools or advanced carpentry skills—just some planning, a few smart measurements, and the right hardware for your walls.
This guide walks you through the entire process, from choosing the right shelf style to getting them level and secure. Follow these five clear steps and you’ll end the weekend with sturdy, straight shelves you’ll actually use.
Step 1: Plan Your Shelves (So You Don’t Regret Them Later)
Start by deciding what the shelves are for. Books? Decorative items? Pantry storage? Knowing the purpose will guide your size, material, and hardware choices.
Measure the wall where you want your shelves and note:
- Total width available
- Ceiling height
- Any obstacles (switches, outlets, vents, trim, doors)
Then think through:
- Depth:
- 6–8" for decor and small items
- 10–12" for books
- 12–16" for pantry or heavier storage
- Spacing between shelves:
- 10–12" for books or decor
- 14–18" for taller items (storage bins, kitchen appliances)
Sketch a simple layout on paper with rough dimensions. It doesn’t have to be fancy—just enough to avoid surprises.
Practical tips:
- Leave at least 10–12" above a desk or countertop if you’re installing shelves over it.
- Avoid placing shelves where doors might swing into them.
- If you’re renting, plan for holes that are easy to patch—fewer brackets, no oversized anchors unless necessary.
Step 2: Choose the Right Materials and Hardware
The best DIY project is the one that doesn’t sag or fall off the wall after a few months. To get there, you need the right combination of shelf material and wall hardware.
Shelf materials (common options):
- Pre-made wood or MDF boards (from home centers):
- Easiest option—already cut, often pre-primed or finished
- Solid wood is stronger than MDF for heavier loads
- Plywood (3/4" cabinet-grade):
- Strong, stable, and paintable
- Edges may need edge banding or sanding/filling for a clean look
- Solid wood planks:
- Strong and durable
- More variation in color and grain; can warp if not stored flat
Bracket and support options:
- Standard metal L-brackets:
- Visible but affordable and strong
- Good for garages, laundry rooms, or casual spaces
- Heavy-duty shelf brackets:
- Larger, often more decorative
- Ideal for heavier loads like books or pantry items
- Floating shelf hardware (hidden brackets):
- Cleaner, modern look
- Requires more precise drilling and a sturdy wall (studs preferred)
Match hardware to your wall type:
- Drywall with wood studs behind:
- Best case—use wood screws into studs for strength
- Use heavy-duty wall anchors if you can’t hit a stud at all bracket locations
- Plaster walls:
- Pre-drill carefully; consider self-drilling anchors designed for plaster
- Masonry or brick:
- Use masonry drill bit and masonry anchors or concrete screws
Check weight ratings on both brackets and anchors. Always assume you’ll load more on the shelves than you plan—books and canned goods are heavier than you think.
Step 3: Find Studs and Mark a Straight, Level Layout
A level layout and solid mounting points are what separate pro‑looking shelves from wobbly ones.
Locate studs (for drywall walls):
- Use a stud finder and run it horizontally across the wall.
- Confirm stud locations by measuring—studs are typically 16" apart on center in many homes (sometimes 24").
- Mark stud centers lightly with a pencil at the approximate height of your shelf.
If you don’t have a stud finder, you can:
- Tap along the wall and listen for a solid vs hollow sound (less precise).
- Measure from a corner—studs are often near wall edges, outlets, and switches.
Mark your shelf height:
Decide the height of your first (lowest) shelf—usually:
- 48–54" from the floor for a typical eye-level shelf - 18–24" above a desk or counter surface 2. Use a tape measure to mark this height at several points along the wall. 3. Place a long level (or a shorter level with a straight board) along these marks and draw a light pencil line. This is the bottom line for your brackets or the top line for your shelf, depending on bracket design.
If you’re installing multiple shelves:
- Mark and level each shelf height one at a time.
- Use a piece of scrap wood cut to your desired vertical spacing as a quick “story stick” to mark repeatable spacing between shelves.
Double-check everything before drilling: step back and visually confirm the layout looks right in the room.
Step 4: Install Brackets Securely (Without Destroying the Wall)
Now you’re ready to commit holes to the wall. Take it slow and precise here—this step controls how strong and straight your shelves will be.
Mounting brackets:
- Hold the first bracket with its top aligned to your pencil line for the shelf height.
- Use your level on the vertical leg of the bracket to make sure it’s plumb (straight up and down).
- Mark the screw holes with a pencil.
Remove the bracket and drill pilot holes:
- Use a smaller bit than your screw diameter for studs. - Use the size recommended on your anchor packaging if not hitting a stud.
Insert wall anchors if needed (for drywall only):
- Tap them in gently with a hammer until flush. 6. Hold the bracket over the holes and drive the screws in firmly—but don’t overtighten to the point the bracket bends or the anchor spins.
Repeat this for each bracket:
- Use your level across multiple brackets to make sure their tops line up on the same horizontal plane.
- Measure from a fixed point (like the floor or a nearby window trim) if you need a double-check.
Spacing brackets:
- For solid wood or plywood shelves: brackets every 16–24" is usually safe for moderate loads.
- For MDF or long spans: stay closer to 16" spacing or follow product guidelines.
- Heavy loads (like books) benefit from more brackets, not fewer.
If you’re installing floating shelf hardware, follow the manufacturer’s template closely and make sure the rods or supports extend into studs whenever possible.
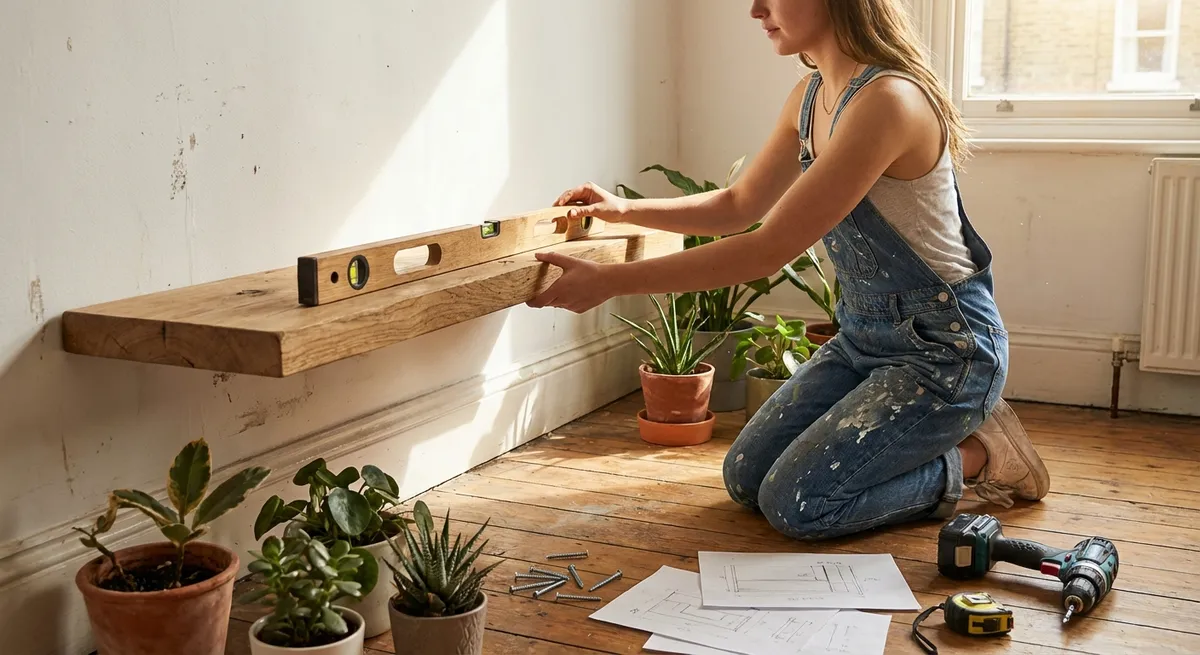
Step 5: Attach, Level, and Finish the Shelves
Once the hardware is in, it’s time to place the shelves and lock everything in.
Set and secure the shelves:
- Place each shelf on the brackets. Check that:
- The front edge is aligned with or slightly overhanging the bracket arms.
- The shelf sits flat on all supports—no rocking.
Use a level across the length of each shelf and adjust as needed:
- Small shims (thin wood or cardboard) can fix slight irregularities.
Once you’re satisfied, attach the shelf to the brackets (if holes are provided):
- Pre-drill shallow pilot holes into the underside of the shelf to avoid splitting. - Use short screws that won’t poke through the top surface.
Finishing touches:
- If you’re painting or staining:
- Sand the shelves lightly with fine-grit sandpaper.
- Wipe off dust before applying primer/paint or stain/sealer.
- Let everything dry fully before loading up the shelf.
- For a cleaner look:
- Fill screw heads on wood shelves with wood filler, then sand and paint.
- Use paintable caulk where shelves meet the wall if you want a built‑in appearance.
Loading and using your shelves:
- Place heavier items near the bracket locations and lighter decor toward the ends.
- Don’t exceed the combined weight rating of your brackets and anchors.
- If anything feels loose or flexes noticeably, unload the shelf and upgrade the hardware or add more supports.
A quick yearly check to tighten screws and inspect anchors will keep your shelves safe and solid for the long run.
Conclusion
Wall shelves are a high-impact, low-cost project that can transform a room in a single weekend. With a simple plan, the right hardware for your wall type, and careful measuring and leveling, you can build storage that looks intentional and holds up to everyday use.
Use this step-by-step process as a template: measure, plan your loads, hit studs when you can, and don’t rush the layout. The more precise you are before drilling, the more your finished shelves will look like they came from a custom install—without the custom price.
Sources
- [The Family Handyman – How to Install Shelves](https://www.familyhandyman.com/project/how-to-install-shelves/) – Practical, step-by-step guidance on installing different kinds of wall shelves
- [This Old House – How to Hang Shelves](https://www.thisoldhouse.com/storage-organization/21016772/how-to-hang-shelves) – Covers shelf mounting methods, anchors, and layout tips for various wall types
- [Lowe’s – How to Find a Wall Stud](https://www.lowes.com/n/how-to/find-a-wall-stud) – Explains different techniques and tools for locating studs safely and accurately
- [U.S. Consumer Product Safety Commission – Anchor It!](https://www.cpsc.gov/AnchorIt) – Safety information on anchoring furniture and shelving to prevent tip-overs and injuries
Key Takeaway
The most important thing to remember from this article is that this information can change how you think about DIY Projects.


