If you’ve ever scrolled past those “oddly satisfying” photos where everything lines up perfectly (like in today’s viral “Very Satisfying” matching-things thread) and thought, “I want my workspace to look like that,” you’re not alone. Social feeds are full of hyper-organized garages, color‑matched tool walls, and drawers where every bit and driver snaps into place like a puzzle. It looks staged—but for many pros and serious DIYers, that kind of order is real, and it makes projects faster, safer, and a lot less frustrating.
Instead of just liking those posts and moving on, you can use that same “perfect match” mindset to upgrade your own tools and workspace. Below is a practical, step‑by‑step way to build an actually-usable, visually satisfying tool setup using gear you can buy right now and materials you likely already have.
Step 1: Map Your Real Projects Before You Buy More Gear
Viral “satisfying” shots usually skip the boring part: planning. But this is where a good tool setup actually starts.
List your last 5–10 real projects (or the ones you know are coming):
- Examples: hanging shelves, minor plumbing fixes, furniture assembly, painting, simple electrical swaps, basic car maintenance. 2. Beside each project, write which tools you actually used. Don’t guess—check your toolbox, garage, or junk drawers. 3. Circle the tools that keep showing up across different tasks (drill/driver, tape measure, utility knife, level, adjustable wrench, etc.). These are your “core tools” that deserve prime, easy‑reach spots. 4. Put a star next to the tools you wished you had or had to borrow. That’s your priority shopping list, not whatever is trending in today’s ads. 5. Finally, mark any tools you haven’t touched in a year. Those can be stored deeper, donated, or sold.
This quick audit keeps your setup focused on what you actually do, not what looks cool online. It’s how pros build those clean, efficient kits that still look satisfying without being fake or staged.
Step 2: Build One “Satisfyingly Perfect” Drawer (Or Box) For Hand Tools
Instead of trying to overhaul your entire shop at once, start with a single drawer or toolbox and make it your “hero” space—the one that would hold up in a close‑up photo.
Choose your most-used hand‑tool zone:
- A top drawer, the lid tray of a metal toolbox, or the front of a tool bag.
Empty it completely and group tools by function:
- Measuring/marking (tape, pencils, square) - Gripping/turning (pliers, wrenches) - Cutting (utility knife, snips) - Striking/prying (hammers, pry bar, nail set)
Add a simple liner or organizer:
- Drawer liner, thin foam, or even cut‑down yoga mat to stop tools sliding around. - For extra precision, use Kaizen foam or pick‑and‑pluck foam to create tool outlines.
Assign each tool a dedicated “parking spot”:
- Heavier tools to the back, frequently used to the front. - Keep measuring + marking together so you can grab them in one sweep.
Do a 10‑second “close the loop” test:
- Open the drawer, remove three tools, put them back, and close it with one hand. - If any tool doesn’t feel easy to grab and return, adjust its spot.
The goal isn’t Instagram perfection—it’s repeatable order. When every tool has a visible, logical place, your brain gets the same little hit of satisfaction you see in those “perfect fit” photos, and you lose less time hunting mid‑project.
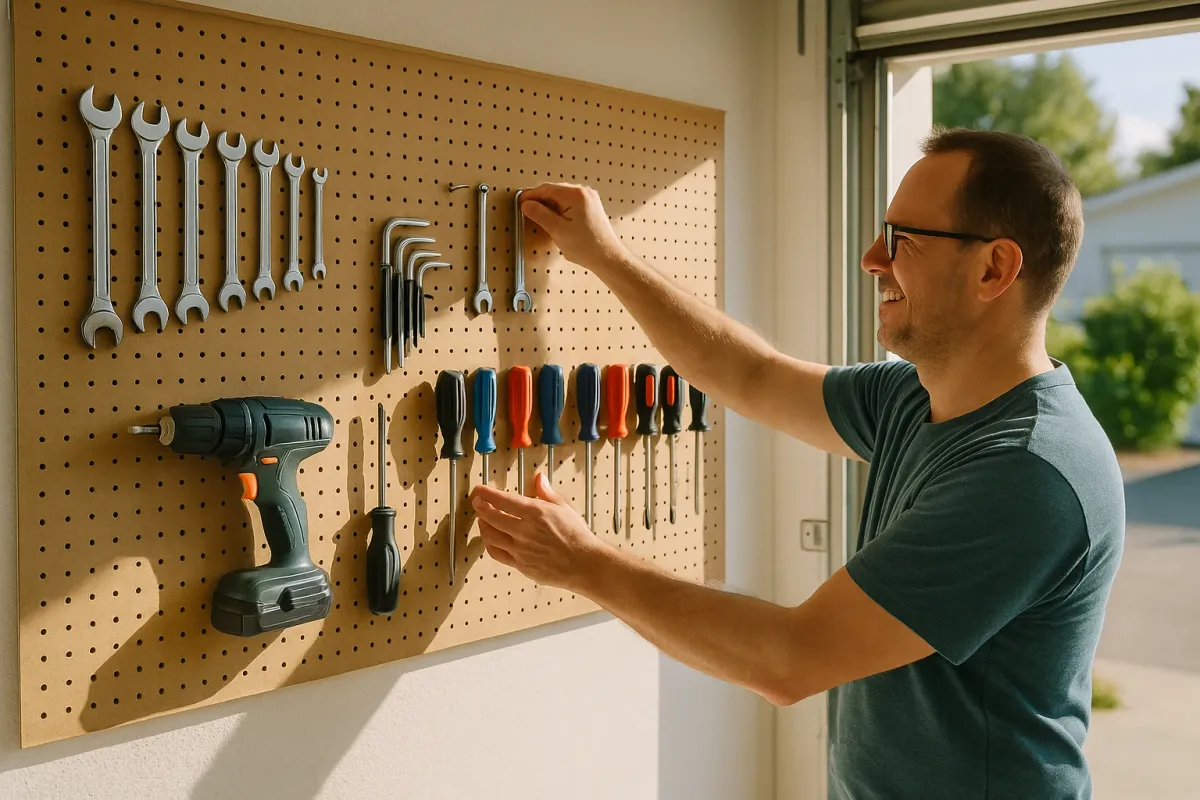
Step 3: Turn Your Wall Into A “Real Life Grid” For Power Tools
All those photos of drills and drivers lined up like museum pieces? That’s not just for show—it’s a fast way to see what’s charged, what’s missing, and what should be upgraded.
Pick a wall section near an outlet:
- Ideal: near your workbench or main project area, not across the room.
Install a simple backbone system:
- Pegboard with hooks, French cleats from scrap plywood, or a steel rail system from big‑box stores.
Group tools by platform and type:
- Keep all 18V/20V cordless tools together (drill, impact driver, oscillating multi‑tool, etc.). - Hang chargers directly under or beside their matching tool family.
Give each tool a “shadow” or label:
- Use tape or marker to outline where each tool lives, or use printed labels with names (e.g., “Impact Driver,” “Hammer Drill”). - This is the workshop version of those “perfectly matched” images—every empty outline tells you what’s missing.
Build a charging shelf that looks (and works) clean:
- Mount chargers on a small plywood shelf with a built‑in power strip. - Use cable clips or Velcro to route cords in straight lines rather than a tangle. - Set a simple rule: when a battery comes off a tool, it either goes on a charger or back to its marked spot—never loose on the bench.
You’re effectively creating a live “status board” for your power tools. It satisfies that visual itch and keeps you from realizing, halfway through a project, that every battery in the house is dead.
Step 4: Create Modular, Color‑Coded Kits For Repeat Jobs
One trend behind those “everything matches so well” viral photos is smart grouping: things that are used together live together. Bring that logic to your tools with purpose-built kits.
Identify 3–4 types of jobs you repeat often:
- Example kits: - Wall‑hanging kit (shelves, art, TVs) - Plumbing emergency kit (leaks, clogs, loose traps) - Paint and patch kit (small repairs, touch‑ups) - Electrical basics kit (switch/outlet swaps, fixture changes—if you’re comfortable and local code allows DIY)
Choose a container for each kit:
- Small stackable bins, plastic organizers with dividers, or labeled zip‑top pouches.
Assign each kit a color or visual marker:
- Colored tape on handles, different color bins, or bold printed labels. - Example: blue for plumbing, yellow for electrical, green for painting.
Stock each kit with both tools and consumables:
- Wall‑hanging: drill bits, level, stud finder, wall anchors, screws, pencil. - Plumbing: adjustable wrench, channel‑lock pliers, Teflon tape, spare washers, bucket, nitrile gloves. - Paint/patch: putty knife, sandpaper, patch compound, touch‑up brush, painter’s tape, small roller.
Test each kit on a small, real task this week:
- As you use it, note missing items and obvious extras. - Adjust until you can grab one container and handle 90% of that category’s tasks without extra trips.
Color‑coded kits bring the same “everything fits perfectly” feeling you see online, but in a way that genuinely speeds up home maintenance. You pick the kit, not the entire toolbox.
Step 5: Set Up A “Reset Routine” So The System Actually Sticks
The difference between a one‑time clean‑up and a pro‑level setup is the reset habit. The most satisfying workshops you see online aren’t cleaned once—they’re reset regularly.
Choose a realistic reset schedule:
- For casual DIYers: once a week, same day, 10–15 minutes. - For active renovators: brief 5‑minute reset after every work session.
Define a simple 3‑part reset checklist:
- Return: Every tool goes back to its labeled/kitted spot or wall outline. - Recharge: All batteries that dropped a bar or more go on chargers. - Refill: Top up consumables (screws, anchors, tape, blades, sandpaper) in your most-used kits.
Keep a small “fix‑later” bin:
- This is for broken bits, dull blades, and tools that need oil, sharpening, or replacement. - Once a month, go through this bin and actually repair or replace what’s inside.
Take a quick photo after each reset:
- Sounds silly, but it works. When your setup looks clean, you’ll notice more quickly when it drifts out of control. - It’s also content you can share if you want to join the “oddly satisfying” crowd for real.
Make one improvement each month:
- New holder for your drill bits, better lighting over the bench, an upgraded tape measure—small changes that make daily use smoother. - Over a year, that’s 12 real upgrades instead of one giant (and expensive) burst of effort you can’t maintain.
A reset routine is how you protect the time and money you’ve put into good tools and smart organization. Without it, even the cleanest setup will slide back into chaos.
Conclusion
The internet’s obsession with “perfectly matched” and “oddly satisfying” setups isn’t just about looks—it’s tapping into something DIYers already know: when tools are easy to see, reach, and return, projects go faster, frustrations drop, and your gear lasts longer.
You don’t need a showroom or a viral post to get those benefits. Start with one drawer, one wall section, and one color‑coded kit. Build in a simple reset routine. Within a few weeks, you’ll have a tool setup that feels as satisfying in real life as those photos look on your feed—and it’ll actually help you get more done around the house.
Key Takeaway
The most important thing to remember from this article is that following these steps can lead to great results.


