Hairline cracks along drywall seams make a room look tired fast. The good news: you don’t need to re-drywall a whole wall to fix them. With a few basic tools and a little patience, you can repair cracked seams so they blend in and stay put.
This guide walks you through a practical, DIY-friendly method using common materials from any home center. If you can spread peanut butter on toast, you can learn to spread joint compound on a wall.
Understand Why Drywall Seams Crack
Before fixing anything, it helps to know what went wrong.
Most cracked seams happen where two drywall panels meet and were taped and mudded when the house was built. Over time, a few things can cause the seam to fail:
- Normal house movement as framing shrinks, swells, and settles
- Temperature and humidity swings that make materials expand and contract
- Heavy doors slamming or foot traffic causing vibration in certain walls
- Poor original taping: too little compound, bubbling tape, or no mesh/paper support
- Fasteners (screws/nails) that weren’t set properly or have loosened slightly
If you only patch the crack with paint or caulk, it almost always comes back. The real fix is to re-tape the seam properly so the joint is reinforced and feathered out smoothly.
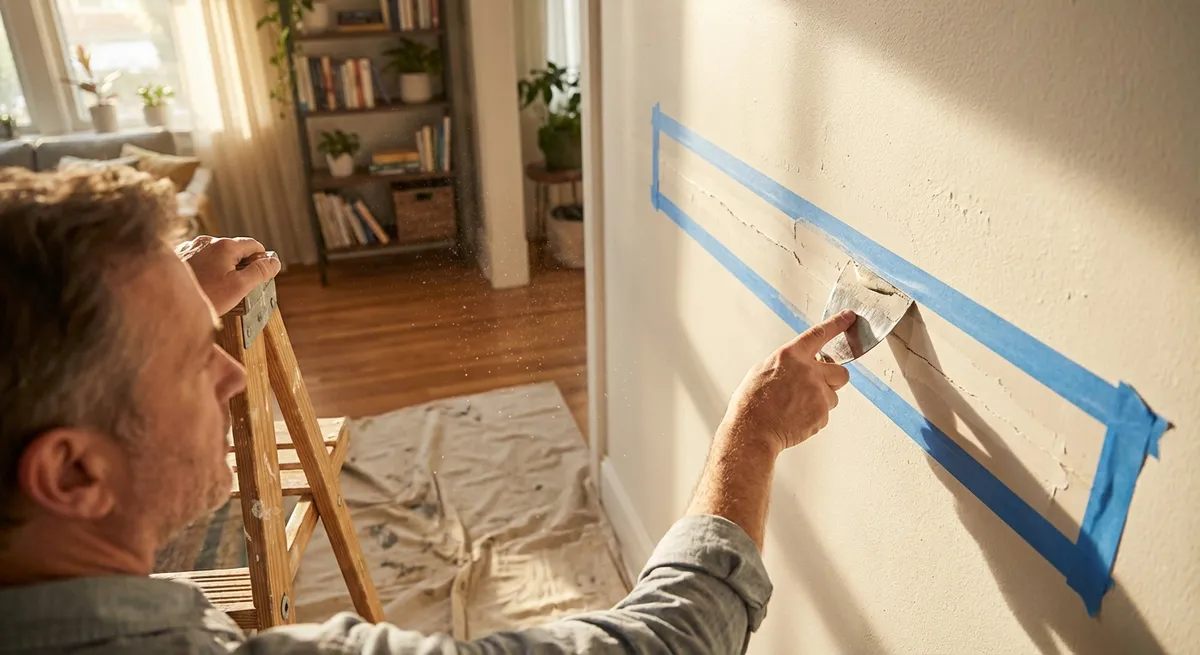
Step 1: Prep the Area and Remove Loose Material
A clean, stable surface is the foundation of a repair that lasts.
Protect nearby surfaces
Lay down a drop cloth or old sheet under the work area. Move furniture a few feet away and cover it if needed. Drywall dust gets everywhere if you’re not prepared.
Score along the crack
Use a sharp utility knife to lightly score along both sides of the crack. This helps you control how much of the old joint compound you remove and prevents peeling paint outside the repair area.
Scrape out loose material
With a 3–4" putty knife, gently scrape along the seam. Remove any loose, flaking, or hollow-sounding compound. If the old tape is bubbling, loose, or separating from the wall, peel it back and remove the bad section.
Check drywall fasteners
Look for nail pops or screws near the crack. If you see raised spots, drive drywall screws about 1" away from the old fastener into the stud behind (just below the surface, not tearing the paper). Remove or dimple any popped nails and plan to cover them with compound.
Dust the area thoroughly
Brush off dust with a dry paintbrush or vacuum with a brush attachment. A clean, dust-free surface helps new compound and tape bond properly. If the wall is very glossy, a light scuff with 120–150 grit sandpaper improves adhesion.
Step 2: Embed New Tape in Fresh Joint Compound
Taping the seam correctly is what prevents the crack from returning.
Choose your tape
- Paper tape: Strong, commonly used, best for flat seams and corners. - Fiberglass mesh tape: Easier for beginners, self-adhesive, but can crack if used without enough compound.
Paper tape is more forgiving long-term if you’re willing to learn the technique. Mesh is fine for small repairs on flat areas.
Apply a base coat of compound
Use premixed all‑purpose joint compound for most repairs. With a 4–6" knife, spread a smooth layer (about 1/16–1/8" thick) centered over the seam, extending 2–3" on each side of the crack.
Place the tape
- For paper tape: Cut a piece slightly longer than the damaged area. Press it into the wet compound with your fingers, then run the knife lightly over it to seat it fully and squeeze out air. - For mesh tape: Stick the tape directly over the crack first, then apply compound over the top, forcing it through the mesh.
Embed and smooth
Hold the knife at a low angle (about 25–30°) and draw it along the tape with moderate pressure. Your goal is a thin, even coat over the tape, with no bubbles or heavy ridges. You should see the tape outline, but not bare tape.
Feather the edges
Placing slightly more pressure on the outer edges of your knife helps “feather” the compound so it tapers into the existing wall surface. This is what makes the repair disappear after sanding and painting.
Let this base coat dry fully—usually 12–24 hours, depending on compound type, temperature, and humidity. Avoid fast-drying “hot mud” unless you’re comfortable working quickly.
Step 3: Build Up and Feather Out the Joint
The second and third coats are about blending, not strength.
Lightly sand the first coat
Once fully dry, use 120–150 grit sandpaper or a sanding sponge to knock down any ridges or knife marks. Don’t sand aggressively; you don’t want to expose the tape.
Apply a wider second coat
Switch to a wider knife (6–10"). Apply another thin layer of compound, this time spreading it a few inches wider on each side of the seam than your first coat—aim for 6–8" total width. Focus on filling low areas and blending high spots.
Feather the edges again
Press slightly harder on the knife edges than the center so the middle of the seam is built up just a bit higher, then gently slopes back to the original wall. This subtle “crown” is how professionals hide seams.
Check with a light
After it starts to firm up (but before it’s rock hard), shine a flashlight or work light along the wall at a shallow angle. This raking light reveals ridges and dips. Make small adjustments with your knife while the compound is still workable.
Add a third skim coat if needed
After the second coat fully dries and gets a quick sanding, apply a very thin, final skim coat, again slightly wider. This coat should be as smooth and uniform as possible—think “polishing” rather than “building.”
Allow the final coat to dry completely before moving on. Rushing this stage is one of the most common reasons you can see the repair through paint.
Step 4: Sand, Prime, and Blend the Finish
The surface prep before painting is what makes your repair disappear.
Sand smoothly but carefully
Use 180–220 grit paper or a fine sanding sponge. Work with light pressure, blending the edges of the repair into the surrounding wall. Use your hand and your eyes: the repair should feel flat and look uniform with the wall.
Control the dust
If possible, use a sanding sponge made for dust collection or a sanding pole with a vacuum attachment. At minimum, wear a dust mask and goggles, and vacuum the area afterward. Drywall dust is fine and easily airborne.
Check for imperfections
Shine a light across the wall again. Circle any small pinholes, scratches, or low spots with a pencil. Spot-fill these with a thin swipe of compound, let dry, and sand lightly. Taking this extra 20–30 minutes can transform the final result.
Prime the repaired area
Always use a primer over fresh joint compound before painting. Bare compound absorbs paint differently than the rest of the wall and can flash (look dull or patchy). A stain-blocking or PVA drywall primer works well for most interiors.
Feather the primer and paint
If you’re touching up rather than repainting the whole wall, slightly extend the primer and paint beyond the repair edge to blend. Using a small roller with similar nap to the original wall texture helps your patch match the existing finish.
Step 5: Prevent Future Cracks Around the Seam
A little prevention helps your repair last longer.
Control humidity and temperature swings
Use exhaust fans in kitchens and bathrooms. In very dry or very humid climates, a humidifier or dehumidifier can stabilize conditions and reduce movement in framing and drywall.
Reduce vibration near problem walls
If the cracked seam is near a frequently slammed door or a high-traffic hallway, add soft-close hardware or adjust door latches to reduce impact. Small changes in how doors close can make a big difference over time.
Deal with underlying structure issues
If you notice multiple cracks radiating from corners, doors, or windows, or if cracks widen over time, you may have a framing or foundation issue. That’s a good time to pause DIY repairs and consult a qualified contractor or structural professional.
Use flexible caulk only where appropriate
At trim joints (like where baseboard meets wall) or at gaps between dissimilar materials, paintable caulk is often better than compound. But at true drywall seams in flat wall areas, proper tape-and-mud repairs are stronger and more stable.
Document what you did
Take a quick photo and note the date and materials used. If a crack reappears in the same spot later, this history can help you or a pro diagnose whether there’s a deeper structural cause.
Conclusion
Fixing a cracked drywall seam isn’t about fancy tools; it’s about preparation, thin layers, and patience. By removing loose material, embedding new tape correctly, building up smooth coats of compound, and finishing with careful sanding and priming, you can restore your wall so the crack truly disappears.
For most DIYers, the biggest adjustments are taking your time between coats and resisting the urge to put on too much material at once. Focus on thin, even layers and clean edges, and you’ll end up with a repair that looks professional and holds up over time.
Sources
- [USG: How to Repair Drywall](https://www.usg.com/content/usgcom/en/how-to/repair-holes-dents-drywall.html) - Manufacturer guide on drywall repair techniques and product use
- [Home Depot Project Guide: How to Patch and Repair Drywall](https://www.homedepot.com/c/ah/how-to-patch-and-repair-drywall/9ba683603be9fa5395fab9016c9b16a) - Step-by-step retail guide with photos and tool recommendations
- [Benjamin Moore: How to Repair Wall Cracks & Paint Over Them](https://www.benjaminmoore.com/en-us/interior-exterior-paints-stains/how-to-advice/interior-how-to/painting-tips-and-techniques/how-to-repair-wall-cracks-and-paint-over-them) - Practical advice on prepping, priming, and painting over drywall repairs
- [Lowe’s: How to Repair Drywall and Fix a Hole in the Wall](https://www.lowes.com/n/how-to/repair-drywall) - General drywall repair instructions, including seam and hole repair
- [U.S. Department of Energy: Air Sealing Your Home](https://www.energy.gov/energysaver/air-sealing-your-home) - Background on building movement and sealing, useful for understanding why cracks can form over time
Key Takeaway
The most important thing to remember from this article is that this information can change how you think about Home Repair.


