A slow, noisy sink drain is more than an annoyance—it’s an early warning that a full blockage is coming. The good news: in most cases, you can clear it yourself with basic tools and a little patience. This guide walks you through a practical, step‑by‑step process to get water flowing freely again, without jumping straight to harsh chemicals or an expensive emergency call.
Understand What’s Really Slowing Your Drain
Before you start taking things apart, it helps to know what you’re likely dealing with and where.
In bathroom sinks, the usual culprits are hair, soap scum, toothpaste buildup, and skin oils. These collect around the pop‑up stopper and just past the drain opening. In kitchen sinks, think grease, food particles, coffee grounds, and starches (like rice or pasta) that swell with water and stick to pipe walls. A “gurgling” sound often means air is trapped behind partial blockages or there’s poor venting, causing the drain to pull air through the water and make that hollow bubbling sound.
Look at how your sink behaves: if it drains slowly but consistently, the blockage is likely close to the sink. If water stands still for a while, then suddenly drops in a rush, you may have a more solid clog further down the line. Knowing this helps you decide how deep you need to go—surface cleaning, trap removal, or farther into the branch line.
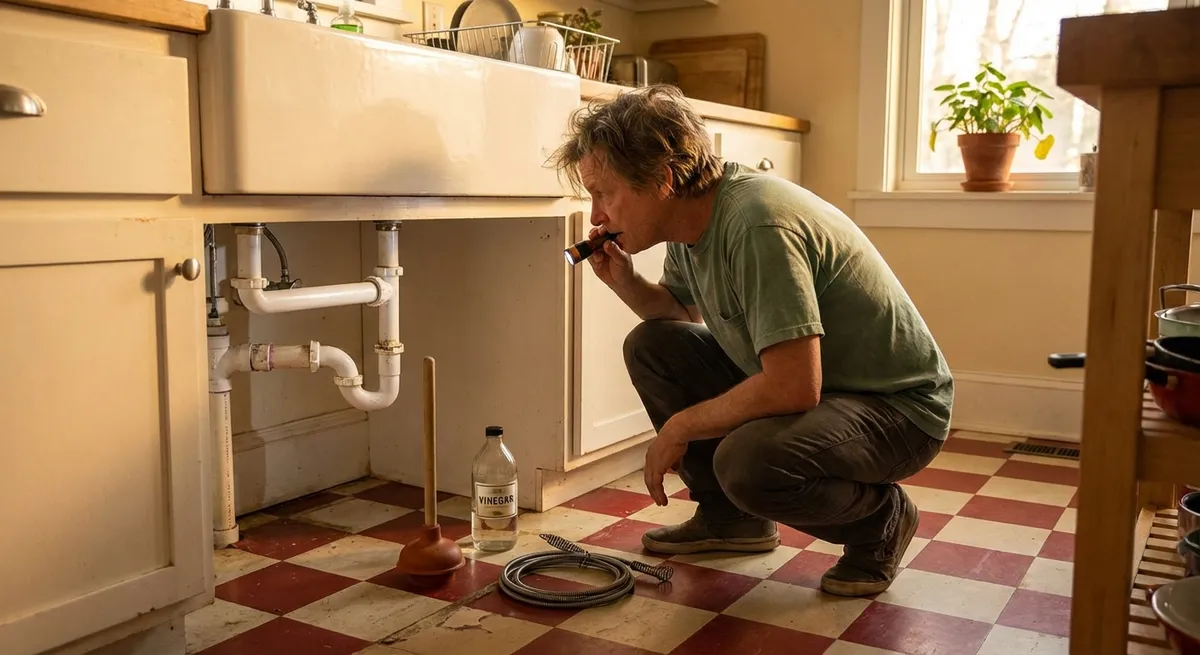
Step 1: Start with Simple, Non‑Chemical Clearing
Begin with low‑risk methods that can fix minor clogs without tools or disassembly.
First, run hot (not boiling) tap water for 1–2 minutes. In kitchen sinks, especially, this can soften grease and move small buildups along. Next, try a baking soda and vinegar treatment: pour about ½ cup of baking soda into the drain (as much as you can get past the opening), then slowly pour in 1 cup of white vinegar. Let it fizz for 10–15 minutes, then flush with hot water for another 1–2 minutes.
This method is best for mild buildup and maintenance; it won’t drill through solid masses of hair or compacted food, but it can break up soft sludge. Avoid dumping boiling water into porcelain sinks (risk of cracking) and onto PVC traps (thermal stress). Also, skip “just in case” use of caustic chemical drain cleaners at this stage—they can damage older pipes, harm septic systems, and make later DIY work hazardous if you end up opening the pipes.
Step 2: Clear the Stopper and Drain Opening
Many “mystery” slow drains are almost entirely blocked at the top by gunk you can reach easily.
In bathroom sinks, close the drain stopper, then remove it. Most pop‑up stoppers either pull straight up with a twist or are held by a small horizontal rod under the sink. If you see a nut and rod assembly on the back of the drainpipe under the sink, loosen the nut by hand or with pliers, slide out the rod, then lift the stopper from above.
Once the stopper is out, you’ll usually see a ring of hair and grime clinging to it and just inside the drain opening. Use a bent wire, plastic drain cleaning tool, or needle‑nose pliers to pull out as much material as you can reach. Wipe the stopper clean with paper towels and a bit of dish soap. Rinse thoroughly and reinstall it by reversing the steps.
For kitchen sinks with removable strainers, lift the basket and clean both the basket and the visible portion of the drain. If you have a garbage disposal, make sure it’s OFF (and unplugged if possible), then use a flashlight to inspect the rubber splash guard and the area just inside—food often packs up right there. Never put your hand inside the disposal; use tongs or pliers to remove any visible debris.
Step 3: Use a Plunger the Right Way
If surface cleaning doesn’t speed things up, a plunger can often push or pull the clog loose—if you use it correctly.
First, block any overflow opening (common in bathroom sinks) with a damp cloth or tape. This forces pressure down the drain instead of letting air escape through the overflow. For double kitchen sinks, plug the side you’re not plunging with a stopper or a wet rag. Fill the sink with just enough water to cover the plunger cup—this helps create a better seal.
Position a cup‑style plunger (flat bottom, not a toilet flange plunger) directly over the drain and press down firmly to seal. Use quick, strong up‑and‑down motions for 15–20 seconds, keeping the seal intact. Then quickly pull the plunger off to break the seal and let the pressure release. Check if water drains more freely; you may need to repeat this cycle a few times.
If you get black or dirty water coming up at first and then it starts to clear, you’re likely breaking up the clog. Once it seems improved, run hot water for a minute or two to flush remaining debris. If there’s no change after several attempts, the clog is probably deeper and tougher than a plunger can handle.
Step 4: Remove and Clean the P‑Trap Safely
When plunging doesn’t work, the next step is to open the plumbing under the sink—usually the P‑trap—where a lot of clogs collect.
Clear the area under the sink and place a bucket or bowl directly under the curved section of pipe (the P‑trap). Wear gloves if you have them. Many modern P‑traps have large plastic slip nuts you can turn by hand; older metal traps may require adjustable pliers or a wrench. Loosen the nuts on both sides of the trap slowly—water will start to drain into your bucket.
Once the trap is free, tilt it and pour the contents into the bucket. You’ll often find a mix of sludge, hair, grease, or dropped items (earrings, screws, etc.). Use a bottle brush, old toothbrush, or a rag to scrub the inside of the trap until it’s smooth and clear. Also check the short horizontal section of pipe going into the wall (or into the main drain line) by gently probing with a small, flexible brush or a short drain snake if you have one.
Reassemble the trap, making sure the washers are seated correctly and the slip nuts are snug but not over‑tightened (especially on plastic pipes). Once reconnected, run water and check carefully for leaks at the joints. If you see drips, tighten the nuts slightly more by hand or with pliers, but don’t crank down hard enough to crack fittings.
Step 5: Snake the Line and Plan for Prevention
If the P‑trap is clear and the problem persists, the clog is likely further along the branch line—and a drain snake is your next move.
A basic hand‑crank drain auger is usually enough for sink drains. Remove the P‑trap again if necessary and feed the snake into the wall pipe (not down from the sink opening) until you feel resistance. Tighten the set screw on the snake, then turn the handle clockwise to drill into or hook the clog. After a few turns, loosen the screw and push forward a bit more; repeat this pattern until you feel the resistance break or suddenly lessen.
Slowly pull the snake back out, cleaning off debris into your bucket as you go. Reassemble the trap, run water, and check if draining has improved. If you consistently hit a hard obstruction or the snake won’t advance, you may be dealing with a more serious issue (broken pipe, heavy scale, or tree root intrusion in older homes), which is a good time to call a professional.
Once everything is flowing well, put prevention habits in place: use drain strainers in bathroom sinks and tubs to catch hair, scrape plates into the trash before using the kitchen sink, never pour fats or oils down the drain, and occasionally flush kitchen drains with hot water and a bit of dish soap. These simple habits cut way down on the thick, sticky buildup that causes slow drains and gurgling in the first place.
Conclusion
A slow, gurgling sink isn’t just something to ignore until it’s “worth” calling a plumber. By working through these steps—from basic flushing, to stopper cleaning, plunging, trap cleaning, and finally snaking—you can usually restore full flow with basic tools and a bit of time. Just move methodically, protect yourself with gloves and a bucket, and stop if you encounter anything that looks damaged, corroded, or beyond your comfort level. Fixing small drain problems early keeps your plumbing functional and saves you from messy, expensive backups later.
Sources
- [U.S. Environmental Protection Agency – Septic Systems: Homeowner’s Guide](https://www.epa.gov/septic/septic-systems-what-you-need-know) - Explains how household drain habits affect plumbing and septic systems, including why to avoid certain chemicals and greases.
- [International Association of Certified Home Inspectors – Plumbing Drain and Vent Systems](https://www.nachi.org/drainage-systems.htm) - Provides a clear overview of how residential drain lines and traps work, useful for understanding where clogs form.
- [The Family Handyman – How to Clear Any Clogged Drain](https://www.familyhandyman.com/project/how-to-clear-any-clogged-drain/) - Step‑by‑step guidance on using plungers, traps, and drain snakes safely for DIY drain cleaning.
- [This Old House – How to Fix a Slow Draining Sink](https://www.thisoldhouse.com/plumbing/21015328/how-to-fix-a-slow-draining-sink) - Practical tips and visuals for diagnosing and clearing sink blockages at different points in the system.
- [Consumer Product Safety Commission – Home Maintenance Safety Tips](https://www.cpsc.gov/Safety-Education/Safety-Guides/home) - General safety advice for working on home systems, including using tools and chemicals safely.
Key Takeaway
The most important thing to remember from this article is that this information can change how you think about Home Repair.


