A door that scrapes, won’t latch, or gets stuck is annoying—and you don’t need a contractor to fix it. With a few basic tools and a focused approach, you can usually solve the problem in under an hour. This guide walks you through diagnosing the issue, then gives you clear, step‑by‑step fixes DIYers can handle confidently.
Understand Why Your Door Is Sticking
Before you grab tools, figure out what’s actually going wrong. A sticking door usually comes from one of a few causes: the house has settled and shifted the frame, the hinges have loosened over time, the wood has swollen from humidity, or paint has built up where it shouldn’t. Sometimes the latch isn’t lining up with the strike plate, so it feels like the door is “stuck” when it’s really just not closing cleanly.
Open and close the door slowly and watch where it makes contact with the frame. Note whether it drags on the floor, rubs the top, or binds near the latch. Check for visible gaps—large at the top on one side and tight on the other usually means the frame or hinges have shifted. Inspect the hinges for loose screws, rust, or bent parts. This quick inspection will tell you which of the repair steps below you actually need to follow.
Step 1: Tighten and Adjust the Hinges
Most sticking doors start with loose hardware, so always begin here. Use a screwdriver (ideally a hand screwdriver, not a drill, to avoid stripping) to snug up all hinge screws on both the door and the frame. Focus on the top hinge; if it’s loose, the door will sag and rub along the latch side or bottom.
If screws spin without grabbing, they’ve likely stripped the wood. In that case, remove the loose screw, insert wooden toothpicks or a short piece of wood golf tee coated with wood glue into the hole, then break them off flush and reinsert the screw once the glue gets tacky. This gives the screw something solid to bite into again. If the door still sags, you can slightly adjust its position by loosening the screws on one hinge, gently lifting or shifting the door, and retightening. Take your time and test the door after each small adjustment.
Step 2: Fix a Misaligned Latch and Strike Plate
If the door closes but the latch won’t catch—or you have to yank the handle to open it—the latch and strike plate probably don’t align. Look at the strike plate (the metal plate on the frame) and check where the latch is hitting. You can rub a little lipstick or chalk on the latch bolt, close the door, then open it to see the exact contact mark on the strike plate.
If the latch is only slightly high or low, first try loosening the screws on the strike plate and shifting it up or down as needed, then retighten and test. If it needs more movement than the screw holes allow, remove the plate and use a metal file to slightly enlarge the opening in the needed direction, then reinstall. For bigger misalignments, you may need to chisel a new shallow mortise for the strike plate and fill the old screw holes with glued wood pieces so the screws hold securely in the new position.
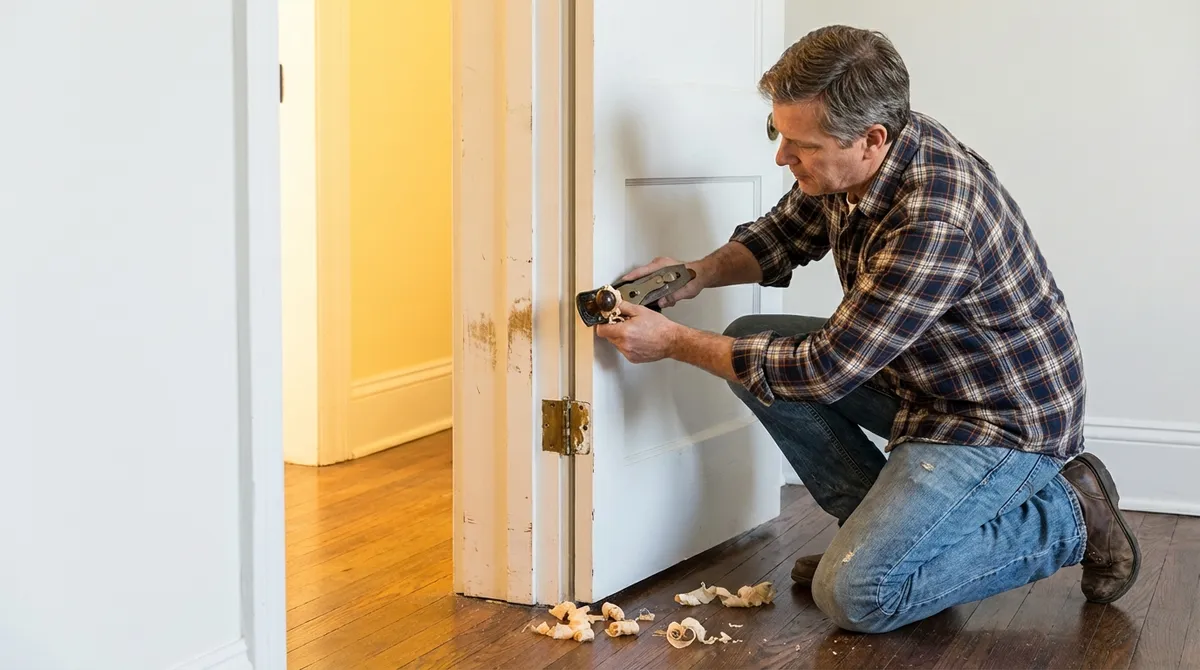
Step 3: Plane or Sand Swollen Wood
When humidity rises, wooden doors can swell and bind against the frame or floor. After you’ve checked and tightened hinges, if the door still rubs at a specific spot, you may need to remove a small amount of material. Close the door until it just touches the frame, and lightly run a pencil along the edge where it’s sticking to mark the high spots.
Take the door off the hinges (tap out the hinge pins with a nail set or small screwdriver and hammer, starting from the bottom hinge). Lay the door flat on a pair of sawhorses or a sturdy table. Use a hand plane or coarse sandpaper on a sanding block to carefully remove wood along the marked edge, working in smooth, even passes. Remove a small amount, then rehang the door and test. It’s easy to take off more; it’s impossible to put it back, so work slowly. Once it fits, smooth the area with finer sandpaper and seal or paint the raw edge to protect it from future moisture.
Step 4: Deal With Paint Buildup and Binding Edges
Layers of paint along the edges and in the jamb can create enough thickness to make the door stick. Look for paint ridges where the door meets the stop (the thin strip the door closes against) or where the latch slides past the strike plate. You may even see spots where paint from the door and frame are sticking together.
Use a sharp utility knife to score along any visible paint lines where the door and frame meet, breaking the paint bond. For thick paint ridges, carefully scrape the buildup with a paint scraper or putty knife, keeping the blade flat to avoid gouging the wood. If the door sticks at the top corner, you can often solve it by sanding or lightly planing just the paint and a thin layer of wood at that corner rather than reshaping the whole door. Wipe away dust, then touch up with primer and paint once you’re satisfied with how the door swings.
Step 5: Improve Long-Term Stability and Prevent Future Sticking
Once the door moves freely, take a few extra minutes to reduce the chance of the problem coming back. If your home is especially humid, consider using a dehumidifier or improving ventilation in nearby rooms, which can help keep wood from swelling. Check weatherstripping around the door; worn or oversized weatherstripping can create extra friction and make the door feel tight. Replace it with a similar profile if it’s torn or compressed flat.
Periodically recheck hinge screws, especially on heavy solid-core doors, and retighten as needed. If you had to remove wood from the door’s edge, make sure the newly exposed surface is fully sealed with paint or clear finish to slow moisture changes. Finally, open and close the door several times over the next few days and listen for new rubbing sounds; catching small issues early means you won’t be back where you started with a stubborn, sticking door.
Conclusion
A sticking interior door usually looks worse than it is. With a screwdriver, some sandpaper or a plane, and a bit of patience, most DIYers can diagnose the cause, adjust hinges and hardware, remove small high spots, and keep the door working smoothly for years. Start with the simplest checks, make one change at a time, and test often—you’ll learn a lot about how your home is put together, and you’ll gain a repair skill you can use on every door in the house.
Sources
- [U.S. Department of Energy – Air Sealing Your Home](https://www.energy.gov/energysaver/weatherize/air-sealing-your-home) - Explains how gaps around doors affect comfort and efficiency, useful context when adjusting doors and weatherstripping
- [Family Handyman – Fix Sagging or Sticking Doors](https://www.familyhandyman.com/project/how-to-fix-a-sticking-door/) - Practical overview of common causes of sticking doors and repair techniques
- [This Old House – How to Plane a Door](https://www.thisoldhouse.com/doors/21015029/how-to-plane-a-door) - Step-by-step guidance and visuals for safely removing material from a door edge
- [Home Depot – Interior Door Hardware Buying Guide](https://www.homedepot.com/c/ab/interior-door-hardware-buying-guide/9ba683603be9fa5395fab9039b3b7bc) - Helpful for understanding latch, strike plate, and hinge components you may adjust or replace
- [University of Minnesota Extension – Managing Indoor Humidity](https://extension.umn.edu/mold/managing-indoor-humidity) - Explains how humidity impacts wood and building materials, relevant for preventing doors from swelling
Key Takeaway
The most important thing to remember from this article is that this information can change how you think about Home Repair.


