A sticky interior door is annoying, but it’s also one of the easiest home repairs you can tackle without calling a pro. Whether the door rubs the frame, drags on the floor, or won’t latch unless you slam it, you can usually fix it with basic tools and a little patience. This guide walks you through a clear, step-by-step process to diagnose the problem and get that door opening smoothly again.
Start by Finding Exactly Where the Door Is Sticking
Before you grab tools, you need to know what you’re actually fixing. A door can stick for several reasons: the hinges may be loose, the frame may have shifted, the door may have swollen from humidity, or the latch may be out of alignment.
Close the door slowly and watch where it binds. Check along the top, latch side, and bottom edge:
- Look for areas where the paint is rubbed or wood is shiny from friction.
- Slide a sheet of paper between the door and frame; note where it catches.
- Check if the door rubs on the floor or carpet when swinging.
- Try the latch: does the door close easily, or do you have to lift, push, or slam it?
Once you see exactly where the problem is, you’ll know whether you’re dealing with a hinge issue, a swollen door, or a misaligned latch.
Step 1: Tighten and Adjust the Hinges
Many sticky doors are just sagging a bit because of loose hinges. This is the first thing to inspect and often fixes the problem without any cutting or sanding.
- Inspect each hinge. Open the door and look at the gaps around it. If the top of the latch side is closer to the frame than the hinge side, the door is sagging.
- Tighten all hinge screws. Use a screwdriver (manual is safer than power for old screws) to snug each screw on both the door side and frame side of the hinges. Don’t overtighten to the point of stripping.
- Replace stripped screws. If a screw just spins, it’s likely stripped out:
- Remove the screw.
- Fill the hole with wooden toothpicks or a short length of wood dowel coated in wood glue.
- Let it set for 30–60 minutes, then re-drive a screw into the repaired hole.
- Add longer screws if the door still sags. Especially at the top hinge on the frame side, replace one or two existing screws with 2.5–3 in. wood screws to bite into the wall stud and pull the door up slightly.
- Recheck the gap. Close the door and see if the gap along the top and latch side is more even. Often, this alone stops the sticking.
If the door still binds after the hinges are solid, the door or frame may be out of alignment, swollen, or too big for the opening.
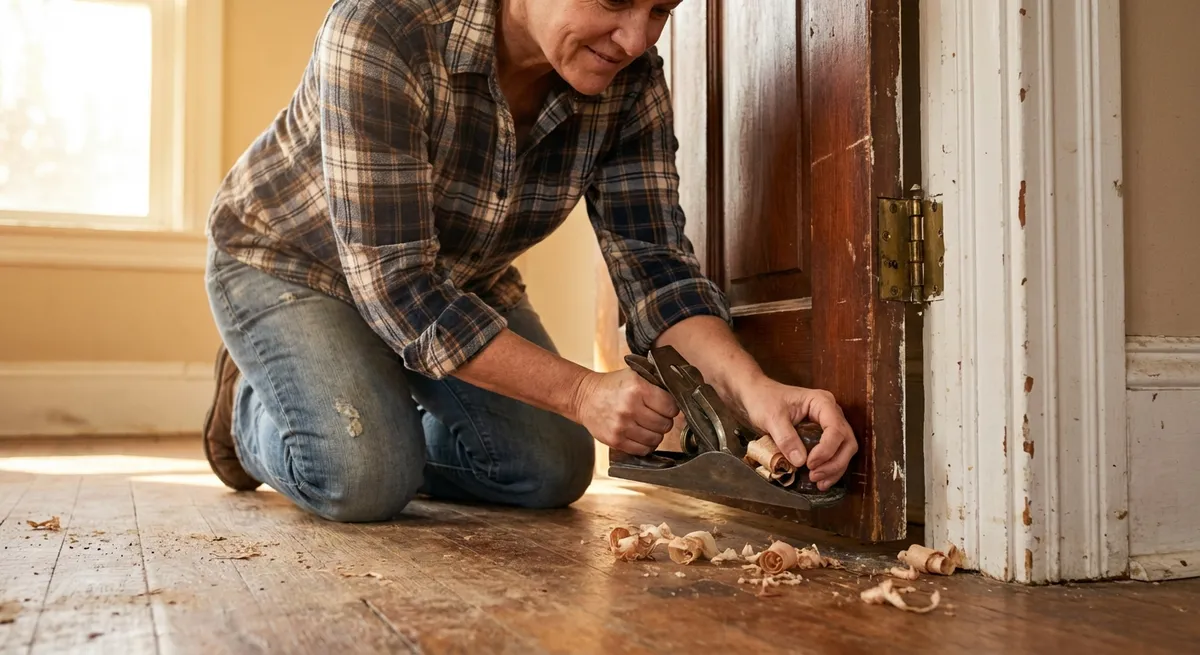
Step 2: Sand or Plane Problem Areas Safely
If tightening hinges didn’t solve it and you can see clearly where the door is rubbing, carefully removing a small amount of material is the next step.
- Mark the contact spots. Close the door until it sticks, then run a pencil along the edge where it meets the frame. Open the door; you should see a clear line where it’s tight.
- Decide if you can sand in place. If the sticking area is small and accessible (like the latch edge), you can often sand with the door still hinged:
- Use 80–120 grit sandpaper wrapped around a sanding block.
- Sand with steady strokes, focusing only on the high spots.
- Remove the door if you need more access. If the top is hitting the frame or there’s a lot of material to remove:
- Place a wedge or book under the door to support it.
- Tap out the hinge pins with a nail and hammer, starting at the bottom hinge.
- Lift the door off and lay it flat on sawhorses or a sturdy surface.
- Use a hand plane for bigger adjustments. For more than light sanding:
- Set a sharp block plane for a shallow cut.
- Work in the direction of the wood grain to avoid tear-out.
- Take off a little at a time, checking your progress often.
- Test fit frequently. Rehang the door (or close it if you left it in place) after removing a small amount. The goal is a consistent gap of about 1/8 inch—not to overcut and create a big uneven space.
- Finish the exposed wood. Once the door fits:
- Seal any freshly cut edges with primer and paint, or clear finish on stained doors.
- This helps prevent future swelling from humidity.
By working slowly and checking often, you avoid taking off too much and keep the door looking clean and professional.
Step 3: Fix a Misaligned Latch or Strike Plate
Sometimes the door swings fine but won’t latch unless you push or lift it. That usually means the latch and strike plate (the metal plate on the frame) aren’t lining up.
- Find how far off the latch is. Close the door gently and watch where the latch hits the strike plate:
- If it hits above or below the hole, note how far.
- If it hits to the side or doesn’t reach deep enough, you may need to move or adjust the plate.
- Try the simple fix first: bend the strike plate tab.
- Open the door.
- Look at the small bent metal tab inside the strike plate opening.
- Using pliers, carefully bend it slightly toward the interior to help pull the door tighter when closed.
- Test the latch.
- Adjust the plate position if necessary. If the latch is clearly too high/low or far to one side:
- Remove the strike plate screws.
- Hold the plate in the new position where the latch meets correctly and mark new screw holes with a pencil.
- Chisel or file away a small amount of wood if the mortise (recess) needs to move.
- Pre-drill new screw holes and reattach the plate.
- Widen the strike opening as a last resort. If the misalignment is minor:
- Use a metal file to slightly enlarge the opening in the strike plate in the direction needed.
- File a little, test, and repeat until the latch catches cleanly.
Correcting the latch alignment can make a door that felt “warped” suddenly feel brand new.
Step 4: Deal With Humidity and Seasonal Swelling
If your door only sticks when it’s humid or during certain seasons, the issue might be less about hardware and more about moisture in the wood.
- Confirm the pattern. Note whether the door sticks after rain or during summer but works fine in winter. That’s a strong sign of swelling.
- Improve airflow and reduce moisture. Especially for bathrooms or basements:
- Use an exhaust fan during and after showers.
- Run a dehumidifier in damp areas.
- Keep interior doors slightly open to let air circulate.
- Seal raw edges. The top and bottom edges of many doors are left unpainted or only lightly sealed:
- Remove the door if necessary.
- Lightly sand the top and bottom edges.
- Prime and paint or apply a clear sealer to reduce moisture absorption.
- Remove minimal material, then reseal. If you must plane or sand a swelling area (often at the latch edge):
- Take off the smallest amount that lets the door move freely.
- Immediately seal the newly exposed wood with primer/paint or clear finish.
Addressing moisture doesn’t just fix today’s sticking—it helps prevent the door from warping more over time.
Step 5: Finish With Smooth Operation and Quiet Hinges
Once the door hangs properly, closes easily, and latches correctly, a few final touches make it feel solid and smooth in daily use.
- Lubricate the hinges. If the door squeaks or feels rough:
- Pull each hinge pin partway out.
- Apply a small amount of lubricant (silicone spray, dry Teflon, or even petroleum jelly).
- Work the pin back in while moving the door to distribute the lubricant.
- Check for rubbing on flooring. If the bottom edge grazes carpet or a rug:
- Roll the rug back and test again to confirm.
- If it only barely touches, trimming the door bottom slightly may help—just like in Step 2, remove very little at a time and reseal the cut edge.
- Clean up rough paint lines. Where you sanded near painted areas:
- Lightly sand the surrounding paint to feather edges.
- Touch up with matching paint for a clean look.
- Test from both sides. Stand inside and outside the room and open/close the door several times:
- Ensure it doesn’t bounce back open.
- Confirm it latches without extra force.
- Check that the handle turns smoothly both ways.
Now you have a door that opens and closes smoothly, latches correctly, and doesn’t squeak—without a call to a contractor.
Conclusion
A sticky interior door looks like a small problem, but it’s usually a sign that hinges have loosened, wood has shifted, or the latch is slightly off. By working through these five steps—tightening hinges, carefully removing material where needed, realigning the latch, managing humidity, and fine-tuning movement—you can bring a stubborn door back into easy, everyday use.
Most fixes require only basic tools: a screwdriver, sandpaper or a hand plane, possibly a chisel, and some paint or finish. Take your time, check your progress often, and you’ll end up with a repair that feels as solid as a professional job—and the confidence to tackle the next small issue before it becomes a big one.
Sources
- [Family Handyman – How to Fix a Sticking Door](https://www.familyhandyman.com/project/how-to-fix-a-sticking-door/) - Practical walkthrough with photos showing hinge adjustments, planing, and strike plate fixes.
- [This Old House – How to Fix a Sticking Door](https://www.thisoldhouse.com/doors/21015210/how-to-fix-a-sticking-door) - Explains common causes of sticking doors and demonstrates planing and hardware adjustments.
- [Lowe’s – How to Install or Replace Interior Doors](https://www.lowes.com/n/how-to/install-or-replace-interior-doors) - Offers guidance on proper door fit, clearances, and hardware positioning that help diagnose misalignment issues.
- [U.S. Department of Energy – Moisture Control for Buildings](https://www.energy.gov/energysaver/moisture-control) - Covers how humidity and moisture affect building materials, including doors and frames.
Key Takeaway
The most important thing to remember from this article is that this information can change how you think about Home Repair.


