Squeaky floors are annoying, embarrassing, and surprisingly common—especially in older homes. The good news: you usually don’t need a full flooring replacement or major construction to quiet them down. With a few tools, a bit of detective work, and the right approach, most DIYers can dramatically reduce or eliminate squeaks in a weekend.
This guide walks you through why floors squeak, how to find the real problem spots, and five clear, step‑by‑step repair methods you can actually do yourself.
Understand What’s Making Your Floor Squeak
Before you start driving screws everywhere, it helps to know what’s causing the noise.
Most squeaks come from movement between two surfaces:
- Subfloor rubbing against floor joists
- Subfloor panels rubbing against each other
- Nails sliding in and out of loose wood
- Finished flooring (hardwood, laminate, or engineered wood) moving against fasteners
In many homes, the structure looks like this (from bottom to top):
joists → subfloor (plywood or OSB) → underlayment (sometimes) → finished flooring.
When someone steps on a loose area, parts of that sandwich move slightly. That friction creates the squeak you hear.
Key points to understand:
- Squeaks often get worse in dry seasons as wood shrinks.
- Carpeted floors can squeak just as much as hardwood; the carpet just hides the hardware.
- You can often fix squeaks from below (in a basement or crawl space) without touching the finished floor.
Knowing this helps you choose the least invasive fix that actually works.
Step 1: Track Down the Exact Squeak Location
You’ll get a better repair if you invest a little time into pinpointing where the movement is happening.
What you’ll need:
- Painter’s tape or masking tape
- A helper (very useful)
- Flashlight
- Pencil or marker
How to do it:
- Walk the area slowly.
Take slow, normal steps over the squeaky zone and listen carefully. Try different angles and directions—sometimes the squeak is louder from one side.
- Mark the general area.
Use painter’s tape on the floor to box in the squeaky region (no need to be precise yet). This helps you keep track as you test.
- Check from below if possible.
If you have a basement or crawl space, have a helper walk above while you stand underneath with a flashlight. Listen and watch for:
- Subfloor flexing up and down
- Gaps between joists and subfloor
- Rubbing or movement around existing nails or screws
- Mark joist locations.
From below, mark the joist positions on the underside of the subfloor with a pencil. If you can’t access from below, use a stud finder set to “deep scan” along the floor surface to locate joists and mark those lines with tape on top.
- Narrow it down.
As your helper steps, place your hand on suspect areas from below. When you feel movement and hear the squeak at the same time, you’ve found your problem spot.
Taking 10–15 minutes to do this will save you from random “shot in the dark” repairs.
Step 2: Fix Squeaks from Below Using Shims and Construction Adhesive
If you can access the underside of your floor, this is often the cleanest and most invisible fix—no changes to the finished surface.
What you’ll need:
- Wood shims (softwood, not hardwood)
- Construction adhesive (e.g., subfloor adhesive in a caulking tube)
- Caulking gun
- Utility knife or handsaw
- Safety glasses
How to do it:
- Locate the gap.
Look for small gaps between the top of a joist and the bottom of the subfloor where you previously heard/seen movement.
- Apply adhesive.
Run a thin bead of construction adhesive along the top of the joist where it meets the subfloor, especially in any gap you see.
- Insert the shim gently.
Slide a wood shim into the gap by hand, narrow end first. Push it only until you feel slight resistance. You want to support the subfloor, not jack it up. Over-forcing the shim can create a hump in the floor above.
- Stabilize multiple spots.
If the gap runs along a longer section of joist, use several small shims instead of one big one. Keep them a few inches apart so the load is distributed evenly.
- Trim the excess.
After the adhesive cures (check label for time), trim off any protruding shim with a utility knife or small saw.
- Test the floor.
Have someone walk above the repaired area again. If you still hear a faint squeak, you may need an additional shim or a screw-through repair (see next step).
This method is excellent when the main issue is a slight sag or gap between subfloor and joist.
Step 3: Secure Loose Subfloor with Screws from Below
When the squeak is caused by nails working loose or the subfloor flexing on the joists, adding screws from below can lock everything together without disturbing finished flooring.
What you’ll need:
- Drill/driver
- Wood screws (typically 2½"–3", depending on subfloor thickness)
- Stud finder or your existing joist marks
- Safety glasses
How to do it:
- Confirm subfloor thickness.
Most subfloors are 5/8" to 3/4" thick. Your screws must be long enough to bite securely but not so long that they go through the finished flooring. When in doubt, start shorter.
- Pre-mark screw locations.
Along each noisy joist, mark screw points every 6–8 inches for the worst sections, and every 10–12 inches for surrounding support.
- Drive screws up into the subfloor.
Working from below, drive screws up through the joist into the subfloor. Stop tightening as soon as the screw head is snug against the joist; don’t overdrive and strip the wood.
- Watch for movement.
As someone walks above, add screws specifically where you still see or feel movement.
- Check your results.
Once the main area is screwed off, test again. Often, just a few strategically placed screws dramatically quiet a floor.
This approach is durable and effective, especially in homes where the original builder relied heavily on nails instead of screws.
Step 4: Quiet Squeaks in Carpeted Floors from Above
Carpeted floors can be repaired from above using specially designed screw kits that hide the fasteners under the carpet fibers.
What you’ll need:
- Squeak repair kit for carpet (e.g., Squeeeeek-No-More or similar)
- Drill
- Tape measure
- Vacuum (optional, for cleanup)
How to do it:
- Find the joist under the carpet.
Use a stud finder along the floor or measure from nearby walls (joists are often 16" on center). You can also tap with your knuckles to hear a more solid sound over joists.
- Confirm with a test screw (optional).
In a hidden area like a closet, test the depth by driving one screw with the kit to ensure it doesn’t go too deep. Follow the kit’s instructions.
- Install screws through the carpet.
Place the kit’s special guide or fixture over the joist and drive the provided scored screws through the carpet, pad, and into the subfloor. The screw head is designed to snap off at the correct depth using the guide.
- Break off the screw heads.
Use the kit’s tool to snap off the screw heads just below the subfloor surface. The carpet fibers will close around the tiny hole, leaving the repair effectively invisible.
- Repeat around the squeak.
Add screws in a small pattern around the noisiest spots until the squeak is gone or greatly reduced.
- Vacuum if needed.
Clean up any metal shavings or fibers left from the process.
This method is popular because it avoids removing carpet and leaves almost no visible sign of the repair.
Step 5: Tackle Squeaky Hardwood or Laminate from Above
Hardwood and laminate are trickier because you can see every fastener. The goal is to stabilize the floor with minimal cosmetic impact.
What you’ll need (options depending on method):
- Drill with small bit (1/16"–1/8")
- Flooring screws or trim-head screws
- Wood filler that matches your floor color
- Colored wax sticks or stain marker (for blending repairs)
- Graphite or talc powder (for minor friction squeaks)
- Soft cloth
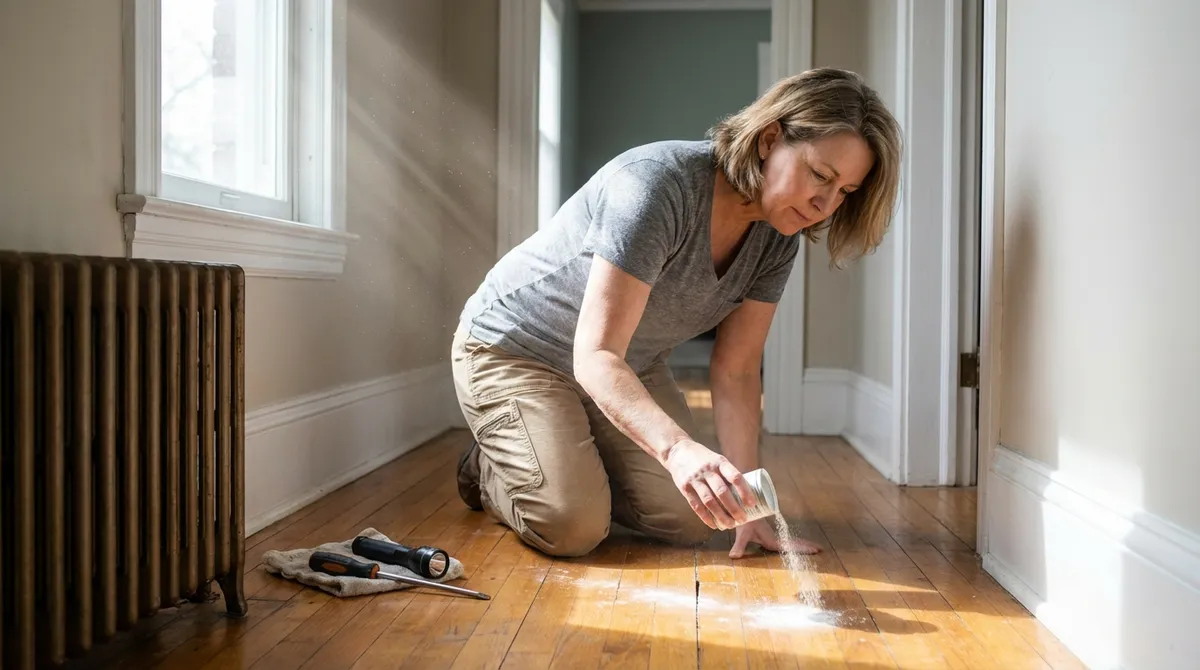
Method A: Lubricate minor friction squeaks
- Target narrow gaps.
If the squeak seems to come from boards rubbing against each other (not from subfloor), sprinkle a small amount of powdered graphite or talc into the gap.
- Work it in.
Place a cloth over the area and walk on it or gently tap with a rubber mallet to help the powder work between boards.
- Wipe excess.
Clean the surface so there’s no visible residue. This won’t fix structural movement but can quiet light board-on-board squeaks.
Method B: Add hidden screws and fill
- Drill pilot holes.
Once you’ve found the joist location, drill a very small pilot hole (at a slight angle if possible) through the hardwood or laminate into the subfloor and joist.
- Drive a trim-head or flooring screw.
Use the smallest head screw you can that still gives solid holding power. Sink it just slightly below the surface—do not crack the board.
- Test the area.
Walk over the repaired spot. If the squeak improves, you can add one or two more screws along the same joist.
- Fill and blend.
Use a color-matched wood filler or wax stick to fill the screw hole. Wipe away excess and, if needed, touch up with a stain marker to better match the surrounding floor.
Important:
- Never screw directly through a snap-together floating laminate floor and into the subfloor—this can prevent it from expanding/contracting and cause bigger issues. For floating floors, focus on fixing subfloor issues from below or at the edges.
Conclusion
You don’t have to live with squeaky floors—or pay for a full flooring replacement—to enjoy a quieter home. By understanding why floors squeak, carefully locating the problem spots, and choosing the right fix for your type of flooring and access, you can:
- Stabilize loose subfloors from below with shims and screws
- Quiet carpeted areas using hidden fastener kits
- Tame hardwood and laminate squeaks with targeted, low-visibility repairs
Most of these fixes require basic tools, a bit of patience, and careful testing as you go. Start with the least invasive method, retest often, and only move to more visible or involved repairs if you need them. With a methodical approach, your floors can go from noisy to nearly silent—without tearing your house apart.
Sources
- [U.S. Department of Housing and Urban Development – Residential Rehabilitation Guide](https://www.huduser.gov/portal/publications/rehab.html) – General guidance on common residential construction and repair issues
- [The Spruce – How to Fix Squeaky Floors](https://www.thespruce.com/fix-squeaky-floors-1821510) – Practical DIY methods for repairing squeaky floors from above and below
- [Family Handyman – Stop Floor Squeaks](https://www.familyhandyman.com/project/how-to-stop-floor-squeaks/) – Step-by-step techniques and illustrations for floor squeak repairs
- [This Old House – Fixing Squeaky Floors](https://www.thisoldhouse.com/flooring/21017737/how-to-fix-squeaky-floors) – Expert advice and product suggestions for different flooring types
Key Takeaway
The most important thing to remember from this article is that following these steps can lead to great results.


