A loud, weak bathroom fan is more than just annoying—it can leave moisture trapped in your home, feeding mold, peeling paint, and foggy mirrors that never clear. The good news: you can often fix a noisy, underperforming fan in a single afternoon with basic tools. This guide walks you through a practical, step‑by‑step process to clean, quiet, and upgrade your existing fan so it actually does its job.
Whether you’re a first‑time DIYer or a seasoned weekend fixer, these steps will help you squeeze more life and performance out of the fan you already have—without jumping straight to a full replacement.
Step 1: Diagnose Why Your Fan Is So Loud (Before You Grab Tools)
Before you start pulling things apart, take a few minutes to figure out what’s actually wrong. Different problems have different fixes.
Turn the fan on and listen closely:
- Rattling or vibrating: Often caused by a loose cover (grille), loose housing, or a fan wheel hitting something.
- Grinding or squealing: Usually a motor or bearing issue—often a sign the motor is worn or dirty.
- Humming but not spinning: The motor is getting power but the fan wheel is stuck or the motor is failing.
- Weak airflow with a normal sound: Could be a clogged duct, dirty fan blades, or a blocked vent outside.
Also, check these basics:
- Hold a square of toilet paper up to the grille. If it barely clings or drops, your fan isn’t moving much air.
- Look for condensation on mirrors and walls 10–15 minutes after a hot shower. If it lingers, ventilation is poor.
- Find the fan’s label (inside the housing or in the attic) to see its CFM rating and age. Very old or undersized fans might not be worth extensive repair.
If the fan is nearly silent and doing nothing, or is more than 20 years old and badly corroded, you may be better off replacing the unit entirely. Otherwise, continue—most noisy or weak fans can be revived with cleaning and tightening.
Step 2: Safely Remove the Cover and Expose the Fan Assembly
Any work on a fan starts with power and access. Take safety seriously—this is simple, but it does involve wiring nearby.
- Turn the power off at the breaker. Don’t just flip the wall switch. At your electrical panel, find the breaker labeled for the bathroom and switch it off. If labels are missing, switch off the main for complete safety while you work.
- Test that power is off. Turn the fan switch on and off. The fan should not run. If you have a non‑contact voltage tester, use it near the fan wires (if visible) to confirm no power.
- Remove the grille (cover). Most bathroom fan covers are held in place by spring clips:
- Gently pull the cover straight down a couple of inches.
- Pinch each metal spring leg together and unhook them from the housing slots.
- Set the cover aside—this alone is usually filthy and will need cleaning.
- Take a photo of the inside. Use your phone to snap a picture of the fan assembly, screws, and any wiring you can see. This makes reassembly much easier later.
- Identify the fan components. In most standard ceiling fans you’ll see:
- A round or squirrel‑cage fan wheel (also called a blower wheel).
- A small motor attached to a mounting plate or bracket.
- The metal or plastic housing mounted to framing above.
- Check for obvious issues. Look for:
- Fan blades rubbing against the housing.
- Wads of dust, lint, or insulation.
- Loose mounting screws or bent parts.
If anything looks dangerously damaged (melted wires, scorched plastic), stop and plan for a full replacement or call a licensed electrician.
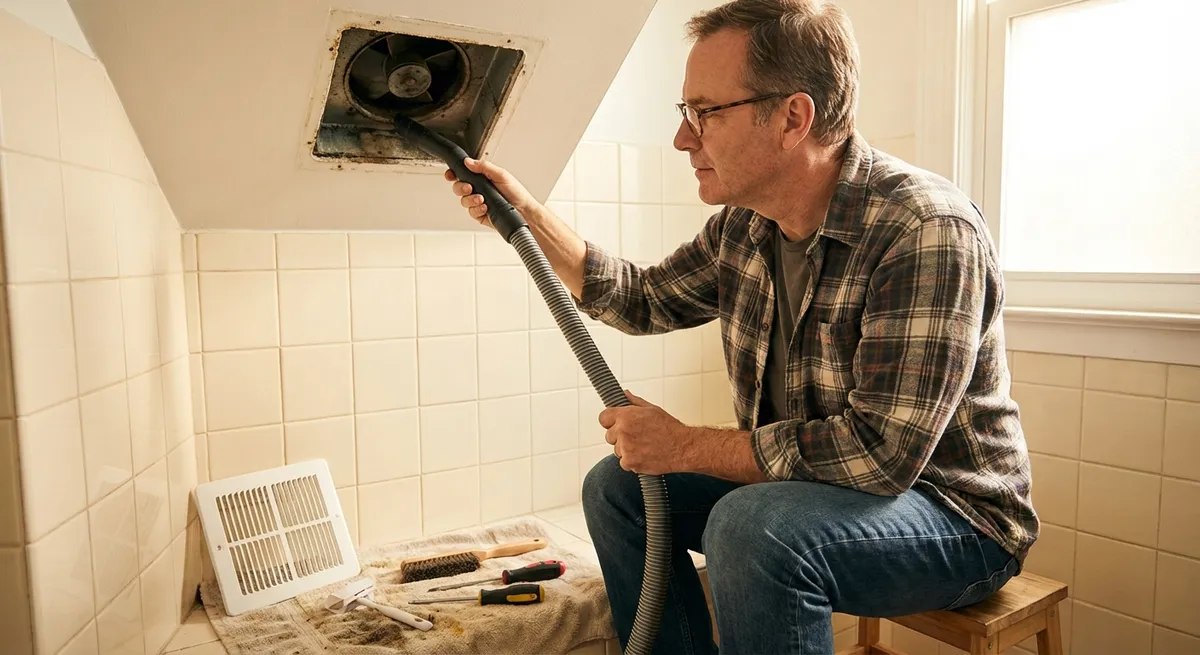
Step 3: Deep Clean the Fan Housing, Blades, and Duct Path
Dirt is the most common reason bathroom fans get louder and weaker over time. A thorough cleaning often makes them sound and perform like new.
You’ll need: a vacuum with brush attachment, old toothbrush or small nylon brush, mild cleaner, microfiber cloths, and optionally a can of compressed air.
- Remove the fan assembly if possible. On many models, the motor and fan wheel sit on a removable plate:
- Unscrew the 1–3 visible screws holding the plate.
- Carefully pull the assembly down. You may see a wiring plug; unplug it. If it’s hard‑wired, gently lower it while supported.
- Clean the fan wheel/blades.
- Use a dry brush to loosen dust and lint from between fins or on blades.
- Vacuum thoroughly with a brush attachment.
- Wipe with a slightly damp cloth if buildup is greasy (common in bathrooms near hair products).
- Avoid soaking the motor—keep liquids away from electrical parts.
- Clean the motor exterior and vents.
- Use a dry brush and vacuum to remove dust from motor vents and surfaces.
- Short bursts of compressed air can blow dust out, but hold the fan wheel still so it doesn’t spin freely at high speed.
- Clean the housing in the ceiling.
- Vacuum out the inside of the metal/plastic box.
- Pay attention to the outlet where the duct connects—the more open this is, the better the airflow.
- Inspect the duct connection.
- From inside the housing, look where the duct attaches. Make sure it’s not crushed or blocked.
- If you can reach the duct, gently feel for kinks or severe bends.
- Wash the grille (cover).
- Soak the cover in warm, soapy water; gently scrub with a soft brush.
- Rinse and let it fully dry before reinstalling.
- Check the exterior vent (if accessible).
- If the vent is low enough, go outside and inspect the flap or hood.
- Clear cobwebs, leaves, and lint. Make sure the flap can open and close freely.
Once the fan, housing, and vent path are clean, you’ve eliminated the most common causes of noise and poor performance. The next step is tightening and tuning.
Step 4: Tighten, Align, and Quiet the Fan for Better Performance
Now that everything is clean, you can fix the mechanical issues that cause vibration, rattling, and unnecessary noise.
- Tighten all mounting screws.
- Check the screws holding the motor plate to the housing.
- Check any screws attaching the housing to ceiling framing (from inside if visible).
- Snug them up, but don’t overtighten and strip them.
- Check fan wheel alignment.
- With the assembly out, gently spin the fan wheel by hand.
- It should spin freely without wobbling or rubbing.
- If it scrapes the housing when reinstalled:
- Loosen the motor mounting screws slightly.
- Shift the motor/plate until the wheel is centered, then retighten.
- Add anti‑vibration padding if needed.
- If the housing slightly vibrates against drywall, you can add thin foam weatherstripping between the housing lip and ceiling (only where safe and not blocking airflow).
- You can also use small rubber washers on mounting screws if the fan transmits vibration to framing.
- Inspect the motor condition.
- Mild humming is normal on older fans; loud grinding is not.
- If the motor shaft is loose or you see heavy rust, it’s near the end of its life. Consider planning a replacement fan even if you get a short‑term improvement.
- Many modern bathroom fan motors are permanently lubricated—don’t add oil unless the manufacturer specifies. Adding random lubricants can attract more dust or damage the motor.
- Reassemble the fan.
- Plug the motor assembly back into its receptacle or reconnect the wiring exactly as it was (this is where your earlier photo helps).
- Reinstall the plate with its screws, ensuring it’s seated level and tight.
- Test the fan before replacing the cover.
- Turn the breaker back on.
- Flip the fan switch and listen while looking up into the housing:
- The fan should start smoothly and run without wobble or scraping.
- Vibration should be minimal.
- Turn the breaker off again before attaching the cover for safety during the next step.
This tune‑up often drops the sound level noticeably. If your fan is still excessively loud after cleaning and tightening, it might simply be an old, low‑efficiency model designed before quiet standards improved. In that case, consider the next step as a bridge toward eventual replacement.
Step 5: Improve Real‑World Performance and Keep It Working Longer
A quieter fan isn’t useful if it still doesn’t clear steam. Now that it’s running smoothly, use these practical checks and habits to keep it effective.
- Verify airflow with simple tests.
- Repeat the toilet paper test at the grille. It should hold firmly when the fan is on.
- After a hot shower, run the fan and time how long it takes for the mirror to clear. Ideally, you should see a big improvement after 10–15 minutes.
- Make sure you’re running the fan long enough.
- Building and health authorities often recommend running a bathroom fan for at least 15–20 minutes after a shower to remove moisture.
- A simple mechanical timer switch or humidity‑sensing switch can automate this and improve indoor air quality.
- Check if your fan is undersized.
- Bathrooms generally need about 1 CFM (cubic foot per minute) per square foot of floor area, with a minimum of 50 CFM for most residential bathrooms.
- If your bathroom is large or has a jetted tub, you may need a stronger fan to truly control moisture.
- Set a simple maintenance schedule.
- Every 6 months: remove the cover, vacuum dust, and wipe blades and grille.
- Once a year: check screws, listen for new noises, and inspect the outdoor vent.
- Mark these on your calendar or set a recurring reminder on your phone.
- Know when it’s time to replace.
- Persistent loud grinding, burning smells, or visible damage are all signs the fan has reached the end of its life.
- Modern ENERGY STAR–rated bathroom fans are dramatically quieter and more efficient than older models and often worth the upgrade.
- If you plan to replace the fan, use your experience from these steps to choose a model that’s both quiet (rated in sones) and properly sized for your bathroom.
By combining cleaning, tightening, and better usage habits, you’ll get a bathroom fan that’s not only quieter but actually works—reducing moisture damage, mold risk, and that constant background roar you’ve gotten used to ignoring.
Conclusion
A noisy, weak bathroom fan doesn’t automatically mean you need a brand‑new unit. In many cases, a careful DIY session—shutting off power, removing the cover, deep cleaning, tightening components, and checking airflow—can transform an irritating fixture into something that quietly does its job in the background.
If, after these steps, your fan is still loud, weak, or clearly worn out, you’re in a much better position to upgrade confidently. You’ll know what’s inside the housing, what “normal” looks and sounds like, and how to maintain your next fan so it stays quiet and effective for years.
Sources
- [U.S. Environmental Protection Agency – Ventilation and Air Quality in Homes](https://www.epa.gov/indoor-air-quality-iaq/ventilation-and-indoor-air-quality) - Explains why proper bathroom ventilation matters for moisture and air quality
- [U.S. Department of Energy – Bathroom Ventilation Fans](https://www.energy.gov/energysaver/bathroom-ventilation-fans) - Covers fan sizing, efficiency, and usage recommendations
- [Broan-NuTone Bathroom Fan Maintenance Guide](https://www.broan-nutone.com/en-us/blog/bath-fans/bath-fan-cleaning-101) - Manufacturer instructions and tips for cleaning and maintaining common bathroom fans
- [Energy Star – Ventilation Fans Key Product Criteria](https://www.energystar.gov/products/ventilating_fans/key_product_criteria) - Details on efficiency and sound ratings (sones) for modern quiet fans
- [Washington State Department of Health – Mold Prevention and Control](https://doh.wa.gov/community-and-environment/air-quality/indoor-air/mold) - Explains the connection between moisture, ventilation, and mold growth in homes
Key Takeaway
The most important thing to remember from this article is that this information can change how you think about Home Repair.


