Squeaky floors are annoying, but they’re also one of the most fixable home problems—often without opening walls or ripping up flooring. Whether your floors are hardwood, carpeted, or somewhere in between, you can usually quiet those creaks with some targeted, low-cost repairs. This guide walks you through why floors squeak and how to fix them with five practical step-by-step methods any careful DIYer can handle.
Understand What’s Making Your Floor Squeak
Before grabbing tools, it helps to know what you’re trying to fix. Most squeaks come from two surfaces rubbing together as you walk: wood against wood, wood against a nail, or a loose subfloor flexing against joists.
In typical wood-frame homes, your finished flooring (hardwood, laminate, or subfloor under carpet) sits on a wood subfloor, which sits on joists. Over time, wood dries, shrinks, or warps. Nails can loosen. Gaps appear. When you step in the right spot, something moves and rubs, and you hear a squeak.
Your job is to:
- Find the exact squeak point.
- Stop the movement by tightening, supporting, or lubricating the contact surfaces.
- Do it in a way that doesn’t damage or visibly alter your finished floor.
Once you understand that squeaks come from movement, every fix in this guide will make more sense and be easier to adapt to your specific situation.
Step 1: Track Down the Exact Squeak Location
Before you can fix a squeak, you need to know precisely where it is. A vague “somewhere in the hallway” isn’t enough—you want to narrow it down to an area about the size of your hand or smaller.
How to locate the squeak from above:
- Walk slowly and deliberately. Wear soft-soled shoes or socks and walk back and forth over the problem area. Take small steps so you can feel when the squeak starts and stops.
- Mark the area. When you hear the squeak, stop and shift your weight slightly side to side and front to back. Use painter’s tape or a sticky note to mark the spot that reliably squeaks.
- Check the surrounding boards. Move your foot to adjacent boards in all directions. Mark any additional spots that squeak; sometimes an entire seam between boards is loose.
- Note the floor type. Confirm whether you’re on hardwood, laminate, engineered wood, or carpet over a subfloor. This will help you choose the right repair in the next steps.
Bonus: Locate from below if possible
If you have access to a basement or crawl space under the squeaky area, you can usually pinpoint the problem more accurately:
- Have someone walk on the floor above while you stand underneath and listen.
- Look for movement at the subfloor where it meets the joists.
- Mark the underside of the noisy area with a pencil so you know where to work.
Finding the exact point takes a few minutes, but it’s critical. Randomly driving screws or adding supports without a target often doesn’t fix the squeak and can create new ones.
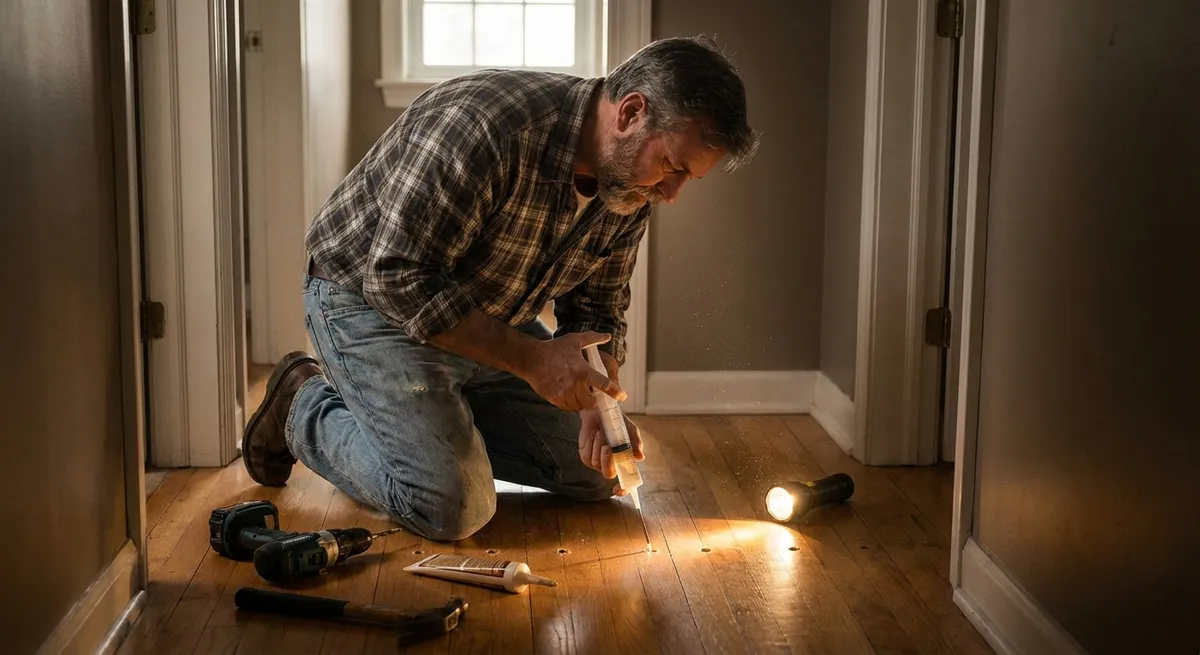
Step 2: Quiet Hardwood Floors with Targeted Fasteners
For exposed hardwood floors, the main goal is to stop movement without leaving visible damage. That usually means using slim, properly placed fasteners and hiding or blending any surface holes.
Tools and materials you’ll need:
- Drill with small drill bits
- Finish nails or trim-head wood screws (1 ½"–2", depending on floor thickness)
- Nail set (punch) and hammer (for nails)
- Wood filler or matching wood putty
- Painter’s tape (optional to protect finish)
Step-by-step method:
- Confirm what’s moving. Stand on your marked squeak spot and press with your foot. If one board flexes while the others stay firm, you likely have a loose board. If the whole area moves, the subfloor under multiple boards may be loose.
- Choose your fastener.
- Use finish nails if you’re comfortable patching tiny holes and want minimal visibility.
- Use trim-head screws if you need a stronger hold and don’t mind a slightly more visible repair.
- Pre-drill to avoid splits.
- Drill a small pilot hole at a slight angle through the noisy board and into the subfloor or joist below.
- Aim near a board edge but not so close that you risk splitting it (about ⅜"–½" from the seam is often safe).
- Drive the fastener.
- For nails: Gently tap them in until just above the surface, then use a nail set to sink them slightly below the finish.
- For screws: Stop when the head is just below the wood surface, but don’t overtighten; too much torque can split the board or strip the wood.
- Test the area. Step on the spot again. If the squeak is quieter but not gone, add another fastener 2–3 inches away and test again.
- Fill and blend. Use wood filler or matching putty to fill the small holes. Wipe away excess and let it dry. If you have matching stain, touch up as needed.
Practical tip: Start with fewer fasteners and add only as needed. Over-fastening can look messy and isn’t usually necessary when you’ve found the right trouble spot.
Step 3: Fix Squeaks Under Carpet with Hidden Screws
Carpet can hide a lot of sins—and also makes many repairs easier because you don’t have to worry about visible holes. You can usually stop a squeak by tying the subfloor more firmly to the joists below using screws.
Tools and materials you’ll need:
- Stud finder (optional but helpful)
- Drill/driver
- 2"–2 ½" wood screws (for standard ¾" subfloor over joists)
- Specialty squeak repair kit for carpet (optional, but very convenient)
Step-by-step method:
- Find the joist direction. Use a stud finder on the floor if you can, or tap lightly and listen for a more solid sound. Another way: look from below (in a basement) to see which way the joists run and how far apart they are (commonly 16" on center).
- Mark suspected joist lines.
- Once you find one screw-able spot that hits a joist (from below or by test-screwing), measure and mark along that line on the carpet with small bits of tape.
- You’ll be aiming to fasten through the subfloor into these joists.
- Drive a test screw.
- Choose one of your squeaky spots.
- Drive a screw straight down through the carpet, pad, and subfloor into the joist. The carpet fibers should spread around the screw and hide it; you don’t need to cut the carpet.
- Use a carpet squeak kit (optional).
- Kits often come with special breakaway screws and alignment tools that ensure the screw fastens securely and then snaps off just below the surface, leaving no protruding metal.
- Test the fix. Step on the squeaky area. If the sound is gone or noticeably reduced, repeat with 1–3 more screws along the problem area, spaced about 4–6 inches apart.
- Smooth the carpet. Brush the carpet fibers with your hand to help them bounce back over any subtle depressions.
If you feel the screw head through the carpet, it’s either too shallow or you’ve missed the joist and are stuck in the subfloor only. Remove it, adjust length or location, and try again.
Step 4: Add Support from Below Using Shims and Brackets
If you can access the underside of the floor (unfinished basement, crawl space, garage ceiling below living space), you can often fix squeaks without touching the finished floor at all. This is ideal when you don’t want to drill through hardwood or deal with carpet.
Tools and materials you’ll need:
- Wood shims (thin, tapered wedges)
- Construction adhesive (optional but helpful)
- Wood screws (1 ½"–3", depending on use)
- Small L-brackets or joist hangers (for more serious movement)
- Flashlight or work light
Step-by-step method:
- Identify loose spots under the subfloor. Have someone walk above while you watch from below. You’re looking for:
- A subfloor panel moving up and down on a joist.
- A visible gap between the subfloor and joist.
- Nails that move when someone steps above.
- Use shims to close small gaps.
- Gently tap a wood shim into the gap between the joist and subfloor until the movement stops. Don’t force it; you don’t want to lift the floor, just snug it.
- For a stronger fix, apply a bead of construction adhesive to the shim before tapping it in.
- Add screws through the subfloor into the joist.
- From below, drive wood screws up at an angle through the joist into the subfloor, near the squeaky area.
- Space screws every 4–8 inches along the noisy edge.
- Reinforce with brackets if needed.
- If a joist end is slightly sagging where it meets a beam or ledger, use L-brackets or appropriate joist hardware to tie it back into place.
- Re-test periodically. After each small adjustment, have your helper walk the floor above again. It’s usually best to make gradual changes instead of shoving in multiple shims at once.
Working from below is one of the most effective ways to fix squeaks because you stabilize the actual structure instead of just the surface. It’s especially useful for older homes where subfloor nails have loosened over time.
Step 5: Use Lubrication Techniques for Minor Creaks
Not every squeak needs screws or structural adjustments. Some minor creaks—especially between hardwood boards—are simply friction between two surfaces that are otherwise quite stable. In those cases, a dry lubricant can quiet the noise.
Tools and materials you’ll need:
- Powdered graphite, talcum powder, or powdered Teflon-based lubricant
- Soft brush or old toothbrush
- Vacuum with hose attachment
- Damp cloth
Step-by-step method:
- Clean the gaps.
- Vacuum between floorboards with a hose attachment to remove dust and grit.
- The cleaner the gaps, the better the lubricant can reach the rubbing surfaces.
- Apply a small amount of powder.
- Sprinkle a pinch of lubricant along the noisy seam between boards.
- Avoid getting large piles on the surface; you only need enough to work into the joint.
- Work it into the crack.
- Use a soft brush or your finger to gently push the powder down into the gap.
- Step lightly on the squeaky area a few times to help it settle into place.
- Clean the surface.
- Wipe away any excess powder with a slightly damp cloth to avoid a slippery surface or visible residue.
- Test and repeat if needed.
- Walk over the area again. If the squeak is improved but not gone, repeat once more.
- If there’s no improvement after two tries, the issue is likely movement, not just friction, and you’ll need to use fasteners or support (Steps 2–4).
Dry lubricants are a quick, low-risk option for small squeaks and creaks. They won’t fix structural problems, but they’re great for minor seasonal noises as wood expands and contracts.
Conclusion
Squeaky floors don’t mean your home is falling apart—they almost always mean something small is moving when it shouldn’t. By carefully locating the squeak, choosing the right approach for your floor type, and working methodically, you can usually silence the noise with simple tools and inexpensive materials.
Start with the least invasive fix (like lubrication or a single test screw), then move up to structural support from below if needed. Take your time, test after each change, and resist the urge to overdo it. A quieter, more solid-feeling floor is well within reach for most DIY homeowners, without tearing up your home or your budget.
Sources
- [U.S. Department of Housing and Urban Development – Residential Rehabilitation Inspection Guide (Floor Systems)](https://www.hud.gov/sites/documents/DOC_9143.PDF) – Technical guidance on common floor system issues and repair considerations
- [Family Handyman – How to Fix Squeaky Floors](https://www.familyhandyman.com/project/how-to-fix-squeaky-floors/) – Practical, step-by-step examples of repairing squeaks from above and below
- [This Old House – Fixing Squeaky Floors](https://www.thisoldhouse.com/flooring/21014963/fixing-squeaky-floors) – Detailed walkthroughs for hardwood and carpeted floor squeaks
- [University of Missouri Extension – Wood Shrinkage and Swelling](https://extension.missouri.edu/publications/g5550) – Background on how wood movement over time contributes to loose boards and squeaks
Key Takeaway
The most important thing to remember from this article is that this information can change how you think about Home Repair.


