Water is sneaky. A tiny drip under a sink or a slow stain on the ceiling can quietly turn into rotten wood, mold, and expensive repairs. The upside: you can prevent a lot of costly water damage with basic tools, a calm approach, and a little know‑how.
This guide walks you through five practical, step‑by‑step fixes for common small leaks. They’re designed for DIY homeowners who want to act fast, stay safe, and know when it’s time to call in a pro.
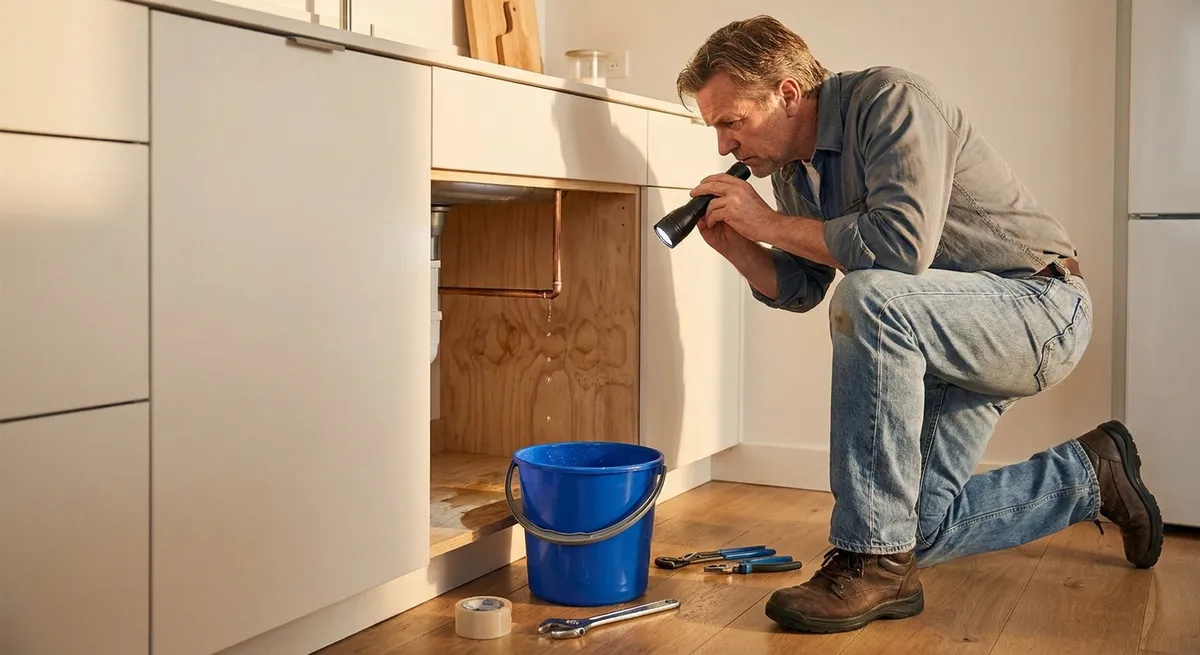
1. Track Down the Source of a Mystery Leak
Before you grab the wrench, you need to know exactly what’s leaking. A “water problem” might be plumbing, but it could also be condensation, roof seepage, or a bad appliance connection. Misdiagnose it, and you’ll waste time fixing the wrong thing.
Step‑by‑Step
- Shut off obvious water sources.
Turn off faucets, showers, washing machines, and dishwashers. Wait 10–15 minutes and see if the leak slows or stops. If it does, the issue is likely related to what you just shut off.
- Check nearby plumbing connections.
Use a flashlight to inspect under sinks, behind toilets, around the water heater, and behind/under appliances. Look for:
- Shiny wet spots
- Mineral buildup (white, green, or rust stains)
- Swollen or warped wood or drywall
- Use dry paper towels as “leak locators.”
Wipe all visible pipes, joints, and valves with a dry paper towel or cloth. Any wet streaks that show up will narrow down the source. Move from the highest visible point downward—water travels.
- Check for condensation vs. actual leaks.
If pipes are cold and sweating, your “leak” might just be condensation. Dry the pipe completely, then:
- Wrap it with a dry paper towel
- Wait a few minutes
If it gets damp evenly along the whole pipe, it’s likely condensation, not a pinhole leak.
- Shut off the main water if you can’t control the leak.
If water is actively running and you can’t stop it at a fixture, find your main shut‑off valve (often near the water meter, basement wall, or where the main line enters the home) and turn it clockwise. This buys you time to repair or call a plumber without more damage.
2. Fix a Leaky Sink P‑Trap Under the Vanity
The curved pipe under your sink (the P‑trap) is a common source of drips, especially after a clog or if it’s been bumped during storage. The repair is usually simple and doesn’t require special skills.
Step‑by‑Step
- Prepare the area.
- Clear everything out from under the sink.
- Place a small bucket or bowl under the P‑trap.
- Have some rags or paper towels ready.
- Identify the type of connections.
Most P‑traps use:
Note where each joint is and what’s leaking.
- Tighten the slip nuts gently.
Using your hand or adjustable pliers, snug each nut about a quarter‑turn at a time. Do not over‑tighten—plastic can crack and metal can strip threads. Run the faucet and check for drips. If tightening stops the leak, you’re done.
- Disassemble and inspect if it still leaks.
- Loosen the nuts and carefully remove the trap into your bucket.
- Check the washers for cracks, flattening, or brittleness.
- Clean out any sludge inside the trap and on the pipe ends. Build‑up can distort seals.
- Replace washers and reassemble.
- Take the old washers to a hardware store and match their size and type.
- Reinstall the trap, making sure washers are seated correctly and facing the right way (tapered side toward the joint).
- Hand‑tighten all nuts first, then give each a small extra turn with pliers.
- Run hot and cold water for 30–60 seconds while watching closely for any signs of moisture.
When to stop and call a pro:
If the metal pipe coming from the wall is corroded, soft, or flaking, tightening and new washers won’t solve the root problem. That usually means it’s time for a licensed plumber to replace that section of pipe.
3. Replace a Dripping Faucet Cartridge
A steady drip from a faucet wastes water and money. Most modern faucets use a cartridge or ceramic disk that can be replaced without changing the whole fixture.
Step‑by‑Step
- Shut off the water to the faucet.
Look for shut‑off valves under the sink (small oval or lever handles). Turn them clockwise. If there are no local shut‑offs, you may need to turn off the home’s main water valve temporarily.
- Plug the drain.
Use the sink stopper or a rag to block the drain. Tiny screws and parts love to disappear down open drains.
- Remove the handle.
- Look for a small decorative cap or plug on the handle; pry it off gently with a small screwdriver or knife.
- Unscrew the handle screw beneath and pull the handle straight up or off the side. If it’s stuck, gently wiggle—don’t force it.
- Take out the cartridge or stem.
- Remove any decorative trim or retaining nuts (note their order).
- Lift the cartridge straight out. Some need a gentle twist; some require a specific puller tool (often mentioned in the manufacturer’s instructions).
- Pay attention to how it’s oriented; a quick phone photo is helpful.
- Match and replace the part.
- Take the old cartridge to a hardware store or plumbing supply shop. Match brand, size, and shape as closely as possible.
- Install the new cartridge in the same orientation as the old one.
- Reinstall trim, retaining nuts, and handle in reverse order.
- Turn the water back on slowly and test hot and cold. Check for leaks around the base and handle.
Helpful tip:
If you don’t know your faucet brand, look under the spout, on the escutcheon (base plate), or underneath the sink for a logo or model number. That can save you an extra trip to the store.
4. Seal a Small Pipe Joint Leak with Thread Sealant
For minor seeping leaks at threaded pipe connections (like at a water heater, outdoor spigot, or some older plumbing), refreshing the thread seal can often fix the problem without replacing the entire pipe.
Step‑by‑Step
- Turn off water and relieve pressure.
- Close the nearest valve feeding that section of pipe (or shut off the main).
- Open a nearby faucet to relieve built‑up pressure and drain any standing water from the line.
- Mark the current orientation.
Use a marker or painter’s tape to mark how the joint and attached pipe are oriented. This helps you put everything back in the correct position when you reassemble.
- Disconnect the leaking joint.
- Use two wrenches: one to hold the fixed fitting, one to turn the threaded connection.
- Turn counterclockwise to loosen. Work slowly—old pipes can be fragile.
- Once free, inspect the threads on both pieces for cracks, flattening, or heavy corrosion.
- Clean and reseal the threads.
- Wipe the threads with a rag or small wire brush to remove old tape or compound.
- For metal pipe:
- Wrap PTFE (Teflon) tape clockwise around the male threads 3–4 times, starting one or two threads back from the pipe end so no tape dangles into the water stream.
- Optional but strong: apply a thin coat of pipe joint compound (pipe dope) over the tape.
- For plastic (PVC/CPVC) fittings, follow manufacturer guidance—often pipe dope only, or specific tapes rated for plastic, to avoid over‑tightening and cracking.
- Reconnect and test.
- Thread the joint back together by hand first to avoid cross‑threading.
- Use your wrenches to snug it up firmly, but don’t over‑torque; stop when it’s solid and lines up with your orientation mark.
- Turn the water back on slowly and watch the joint for several minutes. Use a dry paper towel to check for any weeping.
Warning:
If you see hairline cracks in the fitting, serious rust, or the joint feels “mushy” when you tighten it, sealant won’t fix it. Replace the damaged part or bring in a professional.
5. Stop a Running Toilet That Wastes Water
A toilet that cycles on and off or runs constantly is almost always losing water from the tank to the bowl or through the fill valve. These are usually fast, low‑cost fixes that save a lot on your water bill.
Step‑by‑Step
- Take off the tank lid and observe.
- Don’t flush yet—just watch.
- If water is going into the overflow tube (a vertical tube in the middle), the water level is too high or the fill valve is failing.
- If the tank slowly drains and refills, the flapper or its seal is likely the problem.
- Test the flapper for leaks.
- Push down gently on the flapper (the rubber piece at the bottom of the tank) and listen.
- If the running sound stops, the flapper is not sealing properly and needs adjustment or replacement.
- Replace the flapper if needed.
- Turn off the water at the valve behind the toilet and flush to empty most of the tank.
- Unhook the old flapper from the overflow tube and chain.
- Take it to the store to match size and style (universal flappers often work, but matching is safer).
- Install the new flapper and adjust the chain so there’s a little slack—too tight and it won’t seal; too loose and the handle won’t lift it fully.
- Adjust the water level.
- Turn the water back on and let the tank refill.
- Adjust the float:
- For a float arm: bend the metal arm slightly downward so the water stops about 1 inch below the top of the overflow tube.
- For a float‑cup style: use the adjustment screw or clip on the side of the fill valve to lower the water level.
- The tank should fill, then stop cleanly—no water should spill into the overflow tube.
- Replace the fill valve if it still misbehaves.
- Turn off the water and flush again to mostly empty the tank.
- Use a sponge or towel to remove remaining water.
- Disconnect the water supply line underneath the tank and remove the old fill valve (usually held by a large plastic nut).
- Install a new fill valve kit per its instructions, adjusting height to match your tank.
- Reconnect, turn water back on, and check for leaks around the base and supply line.
Quick check:
Drop a few drops of food coloring into the tank and wait 15–30 minutes without flushing. If colored water appears in the bowl, you still have a tank‑to‑bowl leak (typically the flapper or flush valve seat).
Conclusion
Small water leaks don’t stay small for long. The good news is that many of them are manageable with basic tools, a bit of patience, and a systematic approach:
- Find the actual source instead of guessing.
- Work safely by shutting off water and relieving pressure.
- Replace worn seals, cartridges, and valves before corrosion spreads.
If you see widespread corrosion, cracked fittings, or damage you’re not comfortable with, bring in a licensed plumber. But for many everyday leaks, these steps will let you act quickly, protect your home, and build real DIY confidence at the same time.
Sources
- [U.S. Environmental Protection Agency – Fix a Leak Week](https://www.epa.gov/watersense/fix-leak-week) - Overview of common household leaks, water waste statistics, and basic repair tips
- [International Association of Certified Home Inspectors – Plumbing Leaks](https://www.nachi.org/plumbing-leaks.htm) - Explains typical residential plumbing leak points and what inspectors look for
- [The Family Handyman – How to Fix Leaky Pipes](https://www.familyhandyman.com/project/how-to-fix-leaky-pipes/) - Practical DIY guidance with photos on repairing common residential pipe leaks
- [Lowe’s – How to Fix a Running Toilet](https://www.lowes.com/n/how-to/fix-a-running-toilet) - Step‑by‑step instructions and diagrams for diagnosing and repairing running toilets
- [Moen – How to Replace a Cartridge in Your Faucet](https://www.moen.com/customer-support/faq/faucet-cartridges) - Manufacturer’s guidance on faucet cartridge types and replacement procedures
Key Takeaway
The most important thing to remember from this article is that this information can change how you think about Home Repair.


