Water damage usually doesn’t start with a burst pipe—it starts with a tiny leak you almost ignore. Catching and fixing those small leaks early is one of the most valuable DIY skills you can have. It protects your home’s structure, your budget, and your sanity. This guide walks you through practical, step-by-step repairs you can handle yourself, plus how to spot trouble before it spreads.
Know Where Leaks Hide (and How to Spot Them Early)
Most leaks don’t show up as a dramatic drip from the ceiling. They show up as small clues you can learn to spot during a quick monthly check.
Walk through your home and look for:
- Stains, bubbling, or peeling paint on ceilings and walls, especially under bathrooms and near chimneys
- Soft or swollen areas around baseboards, door frames, and under windows
- Discolored or warped flooring near sinks, toilets, tubs, dishwashers, and refrigerators
- Musty smells in cabinets under sinks, around water heaters, or in closets on exterior walls
- Corrosion or white mineral deposits around pipe joints and shutoff valves
- Drips or rust trails under P-traps (the U-shaped pipes) and at hose connections
Outside, check:
- The ground around your foundation for soggy spots when it hasn’t rained
- Gutters for standing water, sagging sections, or joints that have separated
- Siding for warped boards, gaps around windows and doors, or cracked caulk
Make a simple habit: once a month, do a 5–10 minute “leak patrol.” A flashlight and a paper towel are all you need. If the paper towel comes back damp under a pipe or joint, you’ve found a leak worth fixing now, not later.
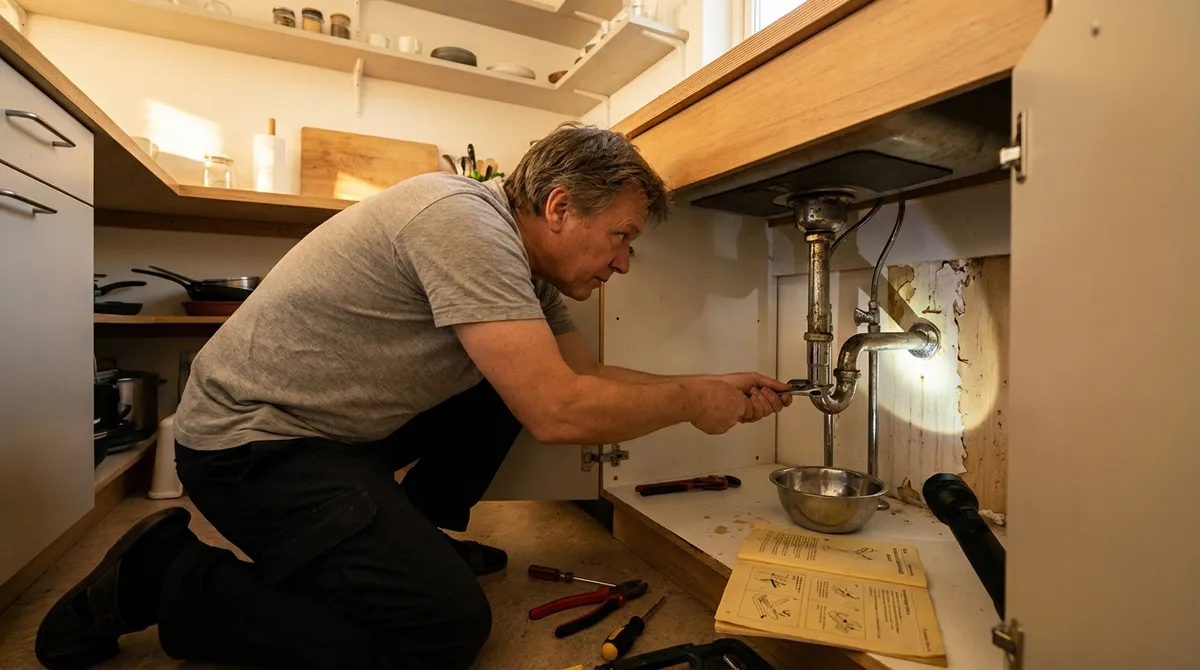
Step 1: Fix a Slow-Dripping Sink Drain (Without Calling a Plumber)
A slow drip under a sink is often from a loose or cracked P-trap or a worn-out washer. Left alone, it can warp cabinets and grow mold. This repair is usually simple and beginner-friendly.
What you’ll need:
Bucket, adjustable wrench or channel-lock pliers, old towel, replacement P-trap or washers (PVC or metal, matching your pipe type), plumber’s tape (Teflon), flashlight.
How to do it:
- Clear the space and confirm the leak.
Empty the cabinet. Lay down a towel and place a bucket under the P-trap (the U-shaped pipe). Run the faucet for 15–30 seconds and then shut it off. Watch where the water appears—at a joint, crack, or the bottom of the trap.
- Tighten the slip nuts first.
Most under-sink leaks are from loose slip nuts (the large plastic or metal nuts at each end of the P-trap). Hand-tighten them. Then, with pliers, turn them just another quarter turn. Don’t over-tighten, especially with plastic—too much force can crack the fittings.
- Remove and inspect the P-trap if tightening fails.
Turn off the faucet. Loosen the slip nuts and carefully remove the P-trap, dumping any water into your bucket. Check for:
- Cracks in the plastic or metal
- Deformed or missing washers/gaskets at each end
If it’s cracked or badly corroded, replace the entire P-trap assembly with a matching one from the hardware store.
- Reassemble with fresh washers and plumber’s tape.
If reusing parts, replace the cone-shaped washers (they’re cheap and often the root cause). Wrap plumber’s tape 2–3 turns around the threaded male ends of metal pipes (not usually needed for PVC slip joints). Reinstall the P-trap, orienting washers correctly (tapered side toward the joint), and tighten the nuts snugly.
- Test and watch for a few minutes.
Run the water for a minute and then stop. Dry all joints with a paper towel and then check again after 5 minutes. If it’s dry, you’re done. If it’s still dripping, note exactly where it’s wet—at the joint, from above, or from the sink drain body—so you can decide if the drain assembly itself needs attention next.
Step 2: Seal a Leaky Tub or Shower to Protect Walls and Floors
Water escaping around your tub or shower edges can sneak into walls and subfloors, causing rot and mold. Replacing old, cracked caulk is an easy way to stop those hidden leaks.
What you’ll need:
Utility knife or caulk removal tool, painter’s tape, rubbing alcohol or bathroom cleaner, rags or paper towels, 100% silicone or tub/shower caulk (mold-resistant), caulk gun (if using standard tubes), latex gloves.
How to do it:
- Remove all old caulk.
Use a caulk removal tool or a sharp utility knife to carefully cut along both edges of the old bead. Peel it away in strips. Don’t just go over old caulk—it won’t bond well and leaks can continue behind it. Scrape any residue until the surface is clean and smooth.
- Clean and dry the area thoroughly.
Wash the joint with a bathroom cleaner to remove soap scum and mold. Rinse, then wipe with rubbing alcohol to help the new caulk bond. Let it dry completely—ideally let it air-dry for at least an hour. Moisture trapped under new caulk can lead to mildew and poor adhesion.
- Tape for a clean, straight line.
Apply painter’s tape above and below the joint where you’ll caulk, leaving a gap for your caulk bead. This helps you get a neat, professional-looking line, especially if you’re new to caulking.
- Apply a steady bead of caulk.
Cut the caulk tube tip at a 45-degree angle, small enough to fit your gap. Run a continuous, steady bead along the joint without stopping every few inches. You want full, unbroken coverage—no gaps or thin spots.
- Smooth and remove tape before skinning.
With a gloved finger or a caulk tool, gently smooth the bead, pressing it into the joint. Immediately pull the painter’s tape up and away at a 45-degree angle before the caulk starts to skin over (within a few minutes). Follow the manufacturer’s cure time—often 24 hours—before using the tub or shower again.
Step 3: Stop a Running or Leaky Toilet Tank
Toilet leaks can waste hundreds of gallons of water a month and sometimes seep around the base, damaging floors. Many of these are simple fixes involving only a few parts inside the tank.
What you’ll need:
Adjustable wrench, sponge or small cup, towel, replacement flapper, fill valve (if needed), possibly a new tank-to-bowl gasket if you see tank leaks.
How to do it:
- Diagnose where the leak is happening.
- If the toilet runs intermittently, water may be leaking from the tank into the bowl (bad flapper or high water level).
- If you see water on the floor at the base, it could be a wax ring or condensation, not necessarily a tank leak.
- If water appears between tank and bowl, the tank bolts or gasket might be failing.
- Check and adjust the water level.
Remove the tank lid. The water line should be below the top of the overflow tube (usually marked). If it’s too high, adjust the float:
Flush and let the tank refill to confirm the new level.
- Replace a worn flapper.
Turn off the supply valve at the wall and flush to empty most of the tank. Use a sponge or cup to remove remaining water if needed. Disconnect the chain and unclip the old flapper from the overflow tube. Clip on the new flapper, reconnect the chain with a bit of slack (not tight, not drooping too much). Turn the water back on and test a few flushes. If water still trickles into the bowl, check that the flapper is sealing flat and the chain isn’t holding it up.
- Replace the fill valve if it won’t shut off.
If the toilet keeps running despite a correct water level and new flapper, the fill valve may be failing. Turn off water, flush and empty the tank. Disconnect the supply line under the tank, loosen the fill valve nut, and remove the old valve. Install the new one per instructions, making sure the height is correct relative to the overflow tube. Reconnect the supply, turn on water, and test operation.
- Check for external leaks and tighten carefully.
With the tank refilled, dry the outside with a towel. Wait a few minutes and look for new moisture at the tank bolts or supply connection. If damp, gently snug those nuts a bit at a time—alternating sides. Never over-tighten porcelain fittings; they can crack, and then you’re buying a new tank.
Step 4: Seal Window Leaks That Let Water (and Air) Sneak In
Leaky windows don’t just waste energy; they can also let water into the wall around the frame, leading to rot and mold you can’t see. You can address many of these leaks from the inside and outside with basic tools.
What you’ll need:
Utility knife, scraper, exterior-grade caulk (for outside), paintable interior caulk (for inside if desired), caulk gun, putty knife, rags, mild cleaner, ladder (for exterior access if needed), safety glasses.
How to do it:
- Find the actual leak path.
During a rain (or using a hose gently sprayed above the window), inspect:
- Inside: look for stains, peeling paint, or damp spots at the top corners, sides, or sill.
- Outside: check for gaps where siding meets window trim, cracked old caulk, and missing or damaged flashing or drip caps.
Focus first on obvious cracks and gaps at the exterior frame.
- Remove loose, cracked, or failed caulk.
Use your knife or scraper to cut and pull out old, brittle caulk along the window trim and siding. Clean out dirt and debris. The goal is a clean, solid surface so new caulk can bond well.
- Apply exterior caulk around frames and trim.
Use a high-quality exterior-grade caulk (silicone or polyurethane-based for durability). Run a continuous bead along gaps where the window frame meets the siding and trim, especially on the top and sides. Don’t caulk the bottom edge of the exterior trim if it has drainage gaps—those often let any trapped water escape.
- Seal interior gaps around the frame.
Inside, use paintable interior caulk to seal small gaps between the window casing and the wall. This helps with drafts and minor moisture pathways. Avoid sealing weep holes or any designed drainage points in the window assembly.
- Monitor after the next few storms.
After a few good rains, recheck the problem areas. If leaks persist above the window, the issue might be flashing higher up in the wall or roof. At that point, consulting a pro is wise—not because you failed, but because the repair might require opening the wall or properly installing new flashing.
Step 5: Repair a Minor Ceiling Stain After Fixing the Leak
Once you’ve stopped a leak, you’re often left with a stained ceiling. As long as the source of the water is fixed and the area is dry, you can repair and blend that stain so it doesn’t scream “problem” every time you look up.
What you’ll need:
Drop cloth, ladder, stain-blocking primer (oil-based or shellac-based works best on water stains), paintbrush or roller, matching ceiling paint, putty knife, joint compound (if the surface is damaged), fine sandpaper, safety glasses, dust mask.
How to do it:
- Confirm the leak is really fixed and the area is dry.
Wait at least a few days after fixing the leak. Use your hand to feel the ceiling—if it’s still soft or cool compared to surrounding areas, it may not be fully dry. Let it dry completely; painting a damp area traps moisture.
- Inspect for damage, not just discoloration.
Press gently around the stain with your hand or the back of your knuckles. If the drywall feels crumbly, spongy, or cracks easily, you may need to cut out and patch that section rather than just paint. For firm surfaces with only discoloration and perhaps slight bubbling, you can proceed.
- Scrape and smooth any loose material.
Use a putty knife to gently scrape off any flaking paint or loose texture. Lightly sand rough edges so the repair area transitions smoothly to the rest of the ceiling.
- Prime with a dedicated stain-blocking primer.
Regular paint often lets water stains bleed back through. Use a stain-blocking primer specifically meant for smoke or water damage. Apply it slightly beyond the stained area, feathering the edges. Let it dry fully according to the label. In stubborn cases, apply a second coat of primer.
- Repaint to blend the repair.
Once primed and dry, apply your ceiling paint. If you know the exact paint used originally, use that; if not, try a small test spot first. Sometimes repainting the entire ceiling or at least from one natural break (like a corner or beam) to another gives the best blend. For textured ceilings, you may need a texture spray or patch kit before painting so the repair doesn’t stand out under certain lighting.
Conclusion
Water has a way of finding every weakness in a home—but so do careful homeowners. By learning how to spot early signs of leaks and tackle simple fixes like under-sink drips, shower caulk failures, running toilets, leaky windows, and stained ceilings, you protect your home’s structure and your budget.
You don’t need advanced tools or pro-level skills to make a real difference. You just need a routine for checking problem areas, the willingness to open a cabinet or climb a ladder for a closer look, and the patience to follow each repair step carefully. Start with one small leak. Once you see how manageable it is, you’ll be ready for the next one long before it becomes a big, expensive problem.
Sources
- [U.S. Environmental Protection Agency – Fix a Leak Week](https://www.epa.gov/watersense/fix-leak-week) - Overview of common household leaks, how to find them, and why early repair matters
- [University of Florida IFAS Extension – Finding and Fixing Leaks](https://edis.ifas.ufl.edu/publication/HS994) - Educational guide on locating and addressing water leaks in and around the home
- [The Family Handyman – How to Fix a Leaky Sink Trap](https://www.familyhandyman.com/project/how-to-fix-a-leaky-sink-trap/) - Step-by-step visuals and tips for repairing or replacing P-traps under sinks
- [This Old House – How to Caulk a Tub or Shower](https://www.thisoldhouse.com/plumbing/21015171/how-to-caulk-a-bathtub) - Detailed walkthrough of removing old caulk and applying new waterproof caulk
- [Energy.gov – Air Sealing Your Home](https://www.energy.gov/energysaver/air-sealing-your-home) - Guidance on sealing window and door leaks to improve comfort and prevent moisture issues
Key Takeaway
The most important thing to remember from this article is that this information can change how you think about Home Repair.


