Water damage is one of the most expensive home repairs—especially when the leak is hidden inside walls, under floors, or behind cabinets. The good news: you can often track down the source and stop minor leaks yourself before they turn into a soaked ceiling, mold problem, or structural issue.
This guide walks you through a practical, DIY-friendly process to find and fix small plumbing leaks, from the first suspicious drip to the final dry-out. No advanced tools, no guesswork—just clear steps you can actually follow.
Step 1: Spot the Early Warning Signs
Most leaks start quietly. Your job is to notice the small clues before they become big problems.
Look and listen for:
- Ceiling or wall stains – Yellowish or brown rings, especially under bathrooms or near plumbing runs.
- Peeling paint or bubbling drywall – Moisture behind the surface causes paint to lose adhesion.
- Soft or spongy floors – Particularly near toilets, tubs, dishwashers, and under sinks.
- Musty or earthy odors – Often a sign of hidden dampness or early mold growth.
- Dripping or hissing sounds – In quiet moments, listen near walls that carry plumbing.
- Unexplained high water bill – A sudden jump in usage can signal a hidden leak.
Walk through your home slowly. Check:
- Under all sinks and vanities
- Around toilets and the base of tubs/showers
- Behind/around dishwashers and washing machines
- Basements, crawl spaces, and below any stained ceilings
Document what you find with your phone—photos and notes help you track whether a spot is getting worse over a few days.
Step 2: Confirm It’s a Plumbing Leak (Not Condensation or Roof Issues)
Before you start cutting into walls, make sure your problem is truly a plumbing leak, not a roof leak, window leak, or simple condensation.
Use this process of elimination:
Check the water meter for continuous flow
- Turn off all faucets and water-using appliances (dishwasher, washing machine, sprinklers). - Note the reading on your water meter. - Wait 30 minutes without using any water. - If the meter reading changes, you likely have a plumbing leak somewhere in the system.
Rule out roof leaks
- Stains that worsen after rain but don’t change when you use indoor plumbing often point to roof or exterior issues. - If the issue is directly under the roof with no plumbing nearby, suspect roofing rather than pipes.
Check for condensation
- In humid areas (like basements), cold pipes can sweat. - Wrap a dry paper towel around a suspect cold pipe and wait a few minutes. If it gets damp evenly, it’s probably condensation, not a leak. - Condensation can be managed with insulation around cold pipes and better ventilation.
- Identify hot vs. cold water problems
- If the leak gets worse when you run hot water (showers, washing machine on hot), the issue might be on the hot water line.
- Knowing which side is affected helps you narrow down the source later.
Once you’re confident you’re dealing with a plumbing leak (not roof or condensation), move on to narrowing down its location.
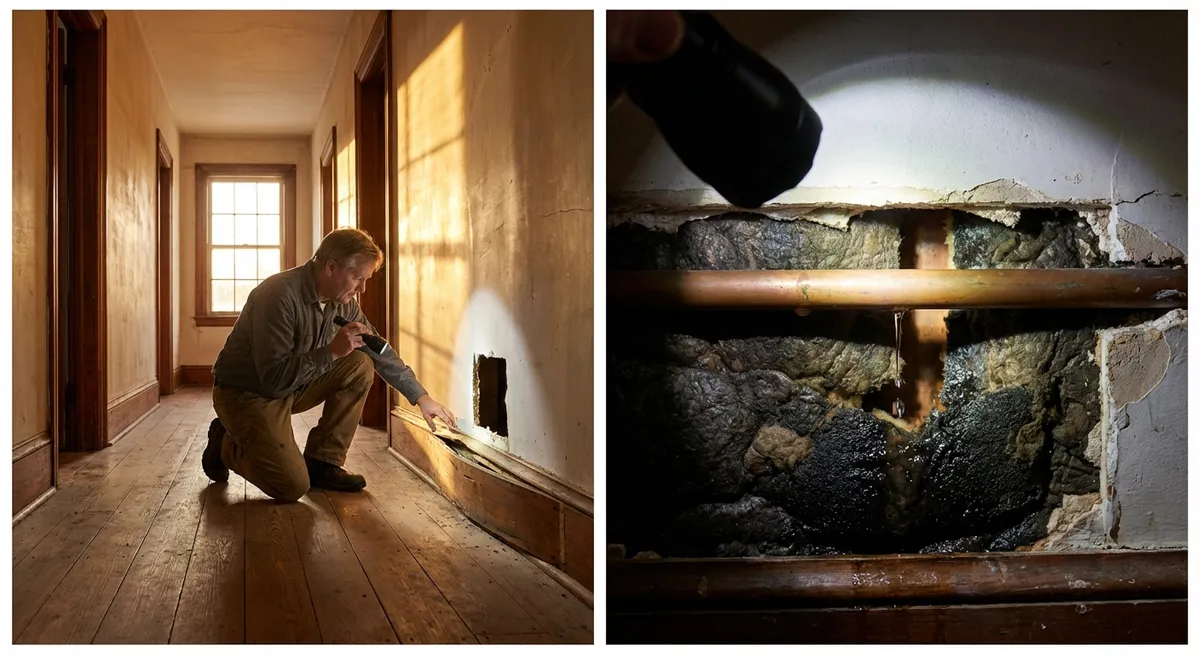
Step 3: Isolate the Leak Area Without Tearing Open Walls
Your goal in this step is to get close to the leak’s position using simple checks and small access points, not major demolition.
Here’s a systematic way to narrow it down:
Start at the most likely sources
- Toilets - Under-sink supply lines and traps - Tub/shower valves and shower arm penetrations - Washing machine hoses - Dishwasher connections
Perform “dry tests” on fixtures
- Toilets: - Listen around the base and tank; look for pooling at the floor. - Put a few drops of food coloring in the tank; if it shows in the bowl without flushing, your flapper or valve is leaking (wasted water, not usually wall damage, but still a leak). - Sinks: - Run water and feel each joint on the drain and supply lines with a dry tissue—this shows even tiny drips. - Showers/Tubs: - Run the shower while checking the ceiling below. - Plug the tub and fill it a few inches. After 15–20 minutes, check the ceiling or room below. If water appears now, the drain or overflow gasket may be leaking.
Use small inspection holes strategically
If you have a stained ceiling or wall and suspect a pipe behind it: - Turn off power to any nearby electrical circuits at the breaker. - Use a utility knife or small drywall saw to cut a 2" x 2" inspection hole near the center of the stain. - Shine a flashlight inside and use a mirror or phone camera to look around. - If you see wet insulation or dripping, expand the opening only as needed to expose the problem pipe.
Trace pipe runs logically
- Pipes generally run vertically from fixtures above and horizontally between studs or joists. - If you find a wet spot, look upstream toward the most likely fixture; water often travels along framing before dripping out.
Work methodically. The goal here is to locate the specific section or joint that’s leaking, not just the general area of damage.
Step 4: Make a Safe, Temporary Repair to Stop Active Leaks
Once you’ve found the leak, your priority is to stop water flow and prevent further damage. Permanent pipe replacement or re-routing can come later if necessary.
Shut off the water
- For fixture-specific leaks (like under a sink), turn off the angle stop valves feeding that fixture. - For in-wall or unknown source leaks, shut off the main water supply to the house. - Open a faucet at the lowest level in the home to relieve pressure and drain remaining water.
Dry the area around the leak
- Use towels to soak up standing water. - If possible, use a fan to circulate air and start drying nearby materials.
Apply an appropriate temporary fix
Your approach depends on the type of pipe and the kind of leak:
- Pinholes in copper pipes:
- Use a pipe repair clamp or rubber patch + hose clamp combo.
- Clean the pipe surface, wrap the leak with a piece of rubber (from an old hose or bike tube), then secure tightly with a hose clamp on each side of the hole.
- Loose threaded joints on metal or plastic pipes:
- Turn off water, remove the joint, clean threads, and reassemble with thread seal tape (PTFE) or joint compound.
- If you can’t disassemble, use a pipe repair clamp over the joint as a temporary measure.
- Cracked PVC drain pipes:
- For very small cracks, epoxy putty rated for plumbing can be pressed over the crack as a stopgap.
- For larger breaks, you may need to cut out the damaged section and use a slip coupling or new fittings—this is closer to a permanent fix and still DIY-friendly if the access is decent.
- Leaking flexible supply lines (to faucets, toilets):
- Don’t bother patching—replace the whole flexible line. They’re inexpensive and a common failure point.
Turn water back on slowly and test
- Restore water to the affected section. - Watch the repair for several minutes and re-check after an hour. - Place a dry paper towel or cardboard under the repair; any new drips will show clearly.
Temporary fixes buy you time, but don’t ignore them. Schedule a proper repair or replacement soon, especially if the pipe is corroded or in poor condition.
Step 5: Dry Out, Repair Surfaces, and Prevent Mold
Stopping the leak is half the job. You also need to dry the area thoroughly and repair damaged materials to avoid long-term issues like mold and structural rot.
Remove wet materials that won’t dry well
- Cut out soggy drywall at least 6–12 inches beyond visibly damaged areas. - Pull out wet insulation behind it; fiberglass can hold moisture and slow drying. - Remove soaked carpet padding; carpet alone may be salvageable if dried quickly, but padding usually isn’t.
Dry the area aggressively
- Use box fans or a small blower to move air across the damp area. - If humidity is high, run a dehumidifier in the room. - Keep interior doors open to improve air circulation. - Aim for at least 24–48 hours of continuous drying for minor leaks, longer if materials were heavily saturated.
Check for early mold growth
- Look for white, green, or black fuzzy spots on drywall, wood, or insulation. - A persistent musty smell can also indicate mold. - Small areas (under ~10 sq ft) can often be handled by homeowners with proper protection (gloves, N95 or better respirator, goggles) and careful cleanup. - Larger or hidden mold problems generally warrant a professional assessment.
Treat and seal stained areas
- Once fully dry, seal stained or previously wet surfaces with a stain-blocking primer before repainting. - For wood that got damp but is structurally sound, you can lightly sand and seal it if needed.
Patch drywall and restore finishes
- Cut damaged drywall to clean, straight lines, ideally to the center of studs. - Install new drywall pieces, screw them into studs, then tape and mud the seams. - Sand smooth once dry, prime, and paint. - If you cut an access panel for inspection, consider installing a removable access door instead of permanently sealing it—this makes any future inspection easier.
Fix the cause, not just the damage
- If the pipe was corroded, consider replacing more than just the leaking section. - If a fixture connection was stressed (for example, from movement), add bracing or support so it doesn’t flex. - For recurring leaks in the same area, it may be time for a plumber to inspect the broader system.
Conclusion
Hidden water leaks don’t have to be a nightmare repair. By learning to recognize the early warning signs, isolating the problem area, applying a safe temporary fix, and thoroughly drying and restoring affected surfaces, you can prevent major damage and expensive professional remediation.
If at any point you’re dealing with large volumes of water, extensive mold, or pressurized lines you’re not comfortable working on, bring in a licensed plumber or water damage specialist. But for small, contained leaks, these five steps give DIY enthusiasts a clear, practical roadmap to protect their home before a drip turns into a disaster.
Sources
- [U.S. Environmental Protection Agency – WaterSense: Fix a Leak](https://www.epa.gov/watersense/fix-leak-week) - Overview of common household leaks, how to spot them, and why early repair matters
- [U.S. Geological Survey – How Much Water Do Leaky Faucets and Toilets Waste?](https://www.usgs.gov/special-topics/water-science-school/science/drip-calculator-leaky-faucets-and-toilets) - Data and calculator on water loss from small leaks
- [CDC – Mold After a Disaster](https://www.cdc.gov/disasters/mold/index.html) - Health guidance and basic cleanup considerations related to moisture and mold
- [Federal Emergency Management Agency (FEMA) – Repairing Your Flooded Home](https://www.fema.gov/sites/default/files/2020-07/fema_p-234_repairing-your-flooded-home.pdf) - Detailed information on drying, cleaning, and repairing wet building materials
- [Harvard University – Mold and Moisture](https://www.ehs.harvard.edu/programs/mold-and-moisture) - Educational resource on moisture control and mold prevention in buildings
Key Takeaway
The most important thing to remember from this article is that this information can change how you think about Home Repair.


